25
4. FPV (First Person View)
3. Camera
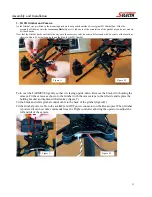
Fit the AV-out cable to the camera if not already to the USB socket on the camera.
Make sure the cable is not entangled so that it does not limit the cameras’ movement.
This will allow a video signal to reach the 5.8Ghz Video transmitter.
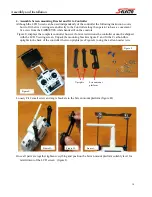
If you plan to record video through the camera ensure that a micro SD card is fitted.
Recommended card would be a Class 10 type with a capacity equal or larger than 4GB.
If you use a card with a speed less than Class 10 you may experience problems with
High definition video not properly recording to memory.
Power On the Camera by holding the
O
(operate) button until the LCD screen activates.
The Camera is supplied with its own manual which covers in detail how to adjust the
set up.
M O
For the purposes of this instruction the camera will only be used in mode
V1
which captures high definition 1080p Video at
30 frames per second.
As the camera is mounted upside down press and hold the
O
button for 3 seconds to flip the camera ensuring video on the
LCD screen and recorded videos can be viewed normally (the
V1
mode on the LCD screen will flip orientation
accordingly.
Pressing the
M
(mode button) will cycle through the different modes to V1.
This camera is charged through the USB socket and will need to have been charged for use.
Press and hold the
M
button for 10 Seconds to enable disable recording of date stamp on video
To set date stamp use the instruction supplied with the camera.
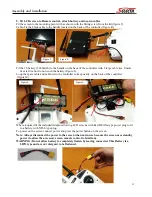
Connect the 2S battery to power both the gimbal
and the video transmitter.
The 2S batter has a Red JST type power connector
that needs to be connected to the corresponding red
JST connector.
When connected the live image from the camera
should appear live on the 7” LCD screen and after
a few seconds delay the gimbal will activate and
auto level the camera.
Note
: The Gimbal and Video transmitter are both connected to a Y splitter power cable which allows the single 2S battery to
power them together at the same time. If by chance any other JST plugs have been disconnected, review to ensure still correctly
cabled or you may find the battery to be powering just one device.
If desired start the camera recording by pressing the
O
button on the camera, which is also reflected on the viewing screen that
begins a counting timer indicating the video length that can also be used to measure the time flying. The battery indicator on the
7’ LCD screen reflects the power on the camera and not the Hexacopter.
Note:
If the gimbal is shaking or not stabilizing or image does not appear on the 7” LCD check the trouble shooting
information.
Start up and Flying: Full Start procedure


