


BREEZAIR EXQ/EZQ/EXS EVAPORATIVE COOLERS INSTALLATION MANUAL
|
7
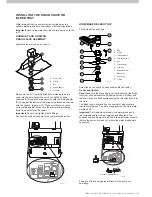
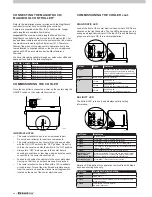
For EXQ/EXS model, fix the cooler to the dropper with 8
self-tapping screws provided (2 screws per side). There are
ten screw locations identified by “V” notches. If access to the
“high roof side” is limited, use 3 screws on each side and 2 on
the front. In exposed or high wind areas, seek advice from a
structural engineer.
Important!
Screw length must be less than 40mm (1.5’’) to
avoid interfering with the weatherseal.
ILL1420-B
ILL159-F
MOUNTING THE COOLER
Before mounting the cooler on the dropper, release the mains
power cable from the hook under cooler. Feed the cable down
into the dropper.
Locate the cooler on the dropper with the tank sump on the low
(gutter) side of the installation.
EXTRA NOTES FOR EZQ MODEL ONLY
ILL1292-B
Important!
Ensure the four tab screws (which are removed
to separate the transition from the cooler) are re-fitted
behind the tabs, after the cooler has been fitted into position.
Carefully lift the cooler onto the transition piece and lower
downwards ensuring all nine clips have engaged.
ILL1649-A
ILL1650-A
ILL525-D
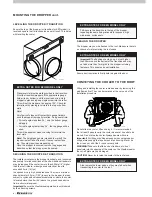
Check the Weatherseal moves freely and without obstruction by
lifting the latch and rotating counterweighted arm.
In the operating position it acts as a restrainer, preventing gusts
of wind from opening the Weatherseal. Once the cooler is
installed on the roof, squeeze the latch and rotate it clockwise to
its operating position.
The Weatherseal latch performs two functions. In the locked
position it acts as a latch, preventing movement during
transport.
WEATHERSEAL AND LATCH
LOCKED POSITION
OPERATING POSITION


