


12 Rev. 1.2 13/01/2021
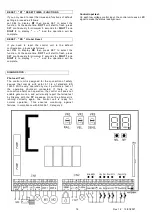
CONFIGURATIONS MENU “A”
The control unit is supplied by the manufacturer with the
possibility of selecting a number of important functions.
-----------------
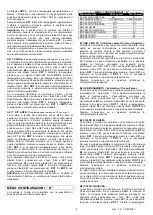
CONFIGURATIONS MENU “ A “ --------------
Digit Reference DOT 2 Off DOT 2 On
A1) NUMBER OF MOTORS M1 + M2 M1
A2) TYPE OF MOTOR Linear Variable
A3) AUTOMATIC PGM NO YES
A4) TX CODE NO YES
A5) PEDESTRIAN TX CODE NO YES
A6) MOTOR T. 30 sec. PGM User sec.
A7) PEDESTRIAN MOTOR T. 10 sec. PGM User sec.
A8) PAUSE T. 30 sec. PGM User sec.
A9) DOOR DELAY T. NO PGM User sec.
A1 ) NUMBER OF MOTORS :
The default settings of the control unit have an operation
logic for connection of 2 Motors ( M1 + M2
DOT 2
Led off
). If operation logic is required for connection of one Motor
( M1 ) only by doubling the power available per motor (
DOT 2
on ), proceed as follows: set SEL and SET to
display
A1
then press SET to select the function. At the
same time,
DOT 1
will start to flash, press SET to change
the function,
DOT 2
will remain permanently lit and the
operation will be complete. Repeat the procedure to
restore the previous configuration.
A2 ) TYPE OF MOTOR :
The default settings of the control unit have an opera tion
logic for connection of Linear Actuators (
DOT 2
off). If
operation logic is required for connection of gear motor
connection with variable absorption
(
DOT 2
on), proceed as follows: set SEL and SET to
display
A2
then press SET to select the function. At the
same time
DOT 1
will start to flash, press SET to change
the function,
DOT 2
will remain permanently lit and the
operation will be complete. Repeat the procedure to
restore the previous configuration.
A3) AUTOMATIC PGM:
W ith this control unit it is possible to carry out Automatic
Programming ( SIMPLIFIED). First place the automation
doors in an intermediate position and set SEL and SET to
display
A3
, then press SET to select the function. At the
same time,
DOT 1
will start to flash, press SET, Motor 2
will close until reaching the limit switch or stop, followed
by the manoeuvre of Motor 1 repeated.
Should the motors move in a manner contrary to that
described, release the SET button, disconnect the power
supply to the control unit and connect the motor wires
correctly.
If the motor sequence is correct, the control unit
completes the Auto programming phase by executing a
complete opening and closing phase (hold the SET key
down until Auto Programming is finished).
At the same time, the Deceleration cycle is automatically
configured at 15% of the complete cycle.
During automatic programming, the Display scans the
operation seconds elapsed for each phase and Motor.
During programming the radio control key of the contr ol
unit can be used instead of the SET key, if stored
previously.
A4 ) TX CODE :
(Radio control code)
The control unit allows up to 150 radio-controls to be
memorised with different types of fixed, rolling codes or
Plus.
Programming.
Programming the transmission code is carried out as
follows: place the SEL and SET buttons to
A4
display,
then press SET to select the function. At the same time,
DOT 1
and
DOT 2
will start to flash. At this point, send the
selected code with the desired radio control. W hen
DOT 1
and
DOT 2
stop flashing, the
DOT 2
LED will remain on
and programming will be complete.
If all 150 available codes have been memorised, by
repeating the programming operation, the Display will
view
AF
, indicating that it is not possible to memorise any
more codes.
A5 ) PED TX CODE:
(Pedestrian radio control code)
The programming procedure is the same as the one
illustrated above except that it refers to the Pedestrian
Radio Control Code, function
A5
.
A6 ) MOT T. and DECELERATION:
(Programming a motor
operation time of max 4 minutes)
The control unit is supplied by the manufacturer with a
default motor operation time of 30 seconds, without
deceleration.
To modify the operation time of Motors 1 and 2, proceed
as follows when the gate is closed: set SEL and SET on
display
A6
, then press SET to select the function. At the
same time,
DOT 1
will start to flash, press SET and
DOT 2
will also start to flash, Motor 1 will start the Opening cyc le,
(at the same time, the Display will scan the operating
seconds elapsed for every phase and motor). Press the
SET key again and the
DOT 2
Display will start flashing
more slowly and Motor 1 will decelerate; when the desired
position is reached, press the SET key to complete the
Opening cycle.
Then
DOT 2
will start flashing normally again and Motor 2
will begin its opening cycle: repeat the operations to
program the work time for Motor 2.
After programming the opening times for the motors,
Motor 2 will start its closing cycle: repeat the same
instructions as above for programming the closing cycle of
Motor 2 and then for the closing cycle of Motor 1.
Important:
If you do not want the control unit to
decelerate, press the SET key twice instead of once
during programming and on completion of the opening
and closing cycle, or previously disable deceleration (see
function
C7
), so that when programming motor time, the
deceleration phase will be automatically excluded.
During programming the radio control key of the control
unit can be used instead of the SET key, if stored
previously.
A7 ) PED MOT. T.:
(Programming a pedestrian operating time
of 4 minutes max.)
The control unit is factory supplied with a predefined
(Pedestrian) Motor 1 operating time of 10 sec. without
deceleration.
To modify the operation time of Pedestrian Motor 1,
proceed as follows when the gate is closed: set SEL and
SET on display
A7
, then press SET to select the function.
At the same time,
DOT 1
will start to flash, press SET and
DOT 2
will also start to flash, Motor 1 will start the
Opening cycle, (at the same time, the Display will scan
the operating seconds elapsed for every phase and
motor). Press the SET key again and the
DOT 2
Display
will start flashing more slowly and Motor 1 will decelerate;
when the desired position is reached, press the SET key
to complete the Opening cycle.
Then
DOT 2
will start flashing again at its standard pace
again and Motor 1 will begin the Closing phase; repeat the
above operations for the Closing phase.
Important:
If you do not want the control unit to
decelerate, press the SET key twice instead of once
during programming and on completion of the opening


