


r3bEL mini User Manual
43
5.
Click the Get Position custom button to obtain the actual physical position of (0, 0, 0)
relative to the previous incorrect position of (0,0,0). For example:
>>>M114
SENDING:M114
X:1.1 Y:0.7 Z:-0.9
………………
Record the results below:
X
Y
Z
6.
Turn off the bioprinter and unplug the microUSB cable. Remove the microSD card from
the controller board and using the provided microSD card adapter, plug it into your
computer.
7.
In the microSD card’s sys folder, open the config file (sys > config.g) in a text
editor
program.
8.
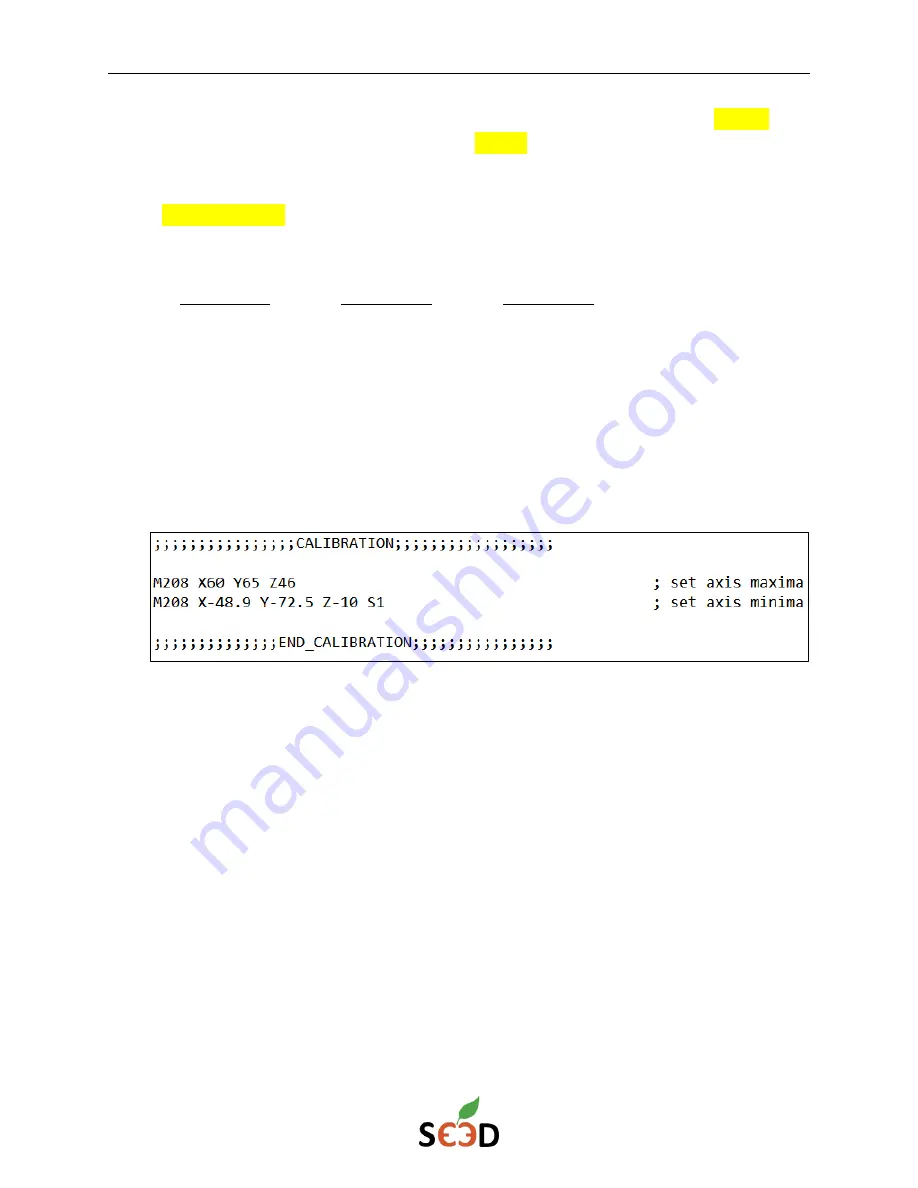
Navigate to the M208 commands, which should be clearly labeled in the CALIBRATION
section of the file:
a.
There will be two M208 lines:
i.
The top line is used to adjust the Z height
ii.
The bottom line is used to adjust the X and Y coordinates
b.
For the Z height, subtract the value you recorded in step 5 from 0 and add it to
the existing value. For example, if you have “
-
0.9” listed above and the value in
the file is “Z
46
”, you will
subtract -
0.9 from 0 which is 0.9 and add it to “Z46” and
the new
value is “Z46.9”.
c.
For the X and Y positions, subtract the value you recorded in step 5 from 0 and
add it to the existing value like you did for the Z axis. For example, if you have
“1.1” listed above and the value in the file is “X
-48.9
”, you will
subtract 1.1 from
0, which is -
1.1 and add it to “X
-
48.9” and the new value is “X
-
50”.
9.
Save the file and place the microSD card back in the controller board.
10.
Restart the bioprinter and reconnect in Pronterface. Click the Home All button. Verify that
the bioprinter has homed correctly. If it is still not at the correct position, repeat steps 2-9.