Page 56
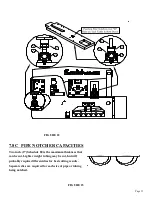
The 2-1/2 and 3 inch (63 and 76mm) die inserts are designed to fit in the standard die holder in place of
the 2 inch (51mm) insert. They are used in oversize punching applications. for applications,
REFER TO THE PUNCH AND DIE SECTION OF THE TOOLING PARTS MANUAL.
7.11 OPTIONAL PUNCH AND DIE HOLDERS
7.11A 2-1/2" AND 3" DIE INSERTS
The offset die holder is used for punching holes in the flange of structural shapes such as channel, Ibeam
and H-beam. The offset die holder is installed in place of the standard die holder. The offset
die holder requires four bolts to anchor it to the bolster. Use the two bolts provided with the die holder.
Use the same method of installing and aligning punches and dies as outlined in SECTION 6.1, with a few
exceptions. The die holder must be removed to install a new punch and die. The down stroke of the
machine must be set. Use the instruction sheet that came with the die holder.
7.11B OFFSET DIE HOLDER FOR FLANGE PUNCHING
The offset die holder is designed to be used in conjunction with an offset stripper.
The standard stripper will not work with the offset die holder.
Always follow the preferred method of aligning punches and dies. SEE SECTION 6.1. The 6 x 6 die
holder is installed in place of the standard die holder. The 6 x 6 die holder requires four mounting bolts
that are shipped with the tool. Capacities for oversize punching with this tool go up to 4 inch (102mm)
diameter rounds. For sizes and applications, REFER TO THE PUNCH AND DIE SECTION OF THE
TOOLING PARTS MANUAL.
7.11C 6 X 6 DIE HOLDER
The #45 punch retaining nut is of the same design as the #40 and is used in oversize punching applications.
For applications, refer to the PUNCH AND DIE SECTION OF THE TOOLING PARTS MANUAL.
7.11D # 45 PUNCH RETAINING NUT
CAUTION: FAILURE TO SET THE STROKE WILL ALLOW THE PUNCH RETAINING NUT
TO STRIKE THE DIE HOLDER, CAUSING DAMAGE TO THE MACHINE AND
POSSIBLE INJURY TO THE OPERATOR. BECAUSE OF ITS DESIGN, THE
OFFSET DIE HOLDER HAS A MAXIMUM CAPACITY OF 40 TONS.
EXCEEDING 40 TONS WILL DAMAGE THE TOOL AND MAY CAUSE INJURY
TO THE OPERATOR. FOR PUNCH TONNAGE REQUIREMENTS,
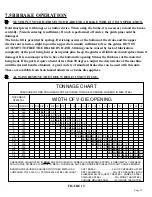
REFER TO FIGURE 9 ON PAGE 27.
Summary of Contents for 9012-24M
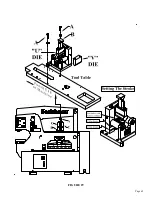
Page 10: ...Page 9 FIGURE 1 ...
Page 12: ...Page 11 FIGURE 2 ...
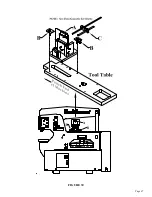
Page 16: ...Page 15 FIGURE 4A ...
Page 17: ...Page 16 FIGURE 4B ...
Page 18: ...Page 17 FIGURE 4C ...
Page 22: ...Page 21 FIGURE 6 ...
Page 24: ...Page 23 FIGURE 7 ...
Page 35: ...Page 34 THIS PAGE LEFT BLANK INTENTIONALLY ...
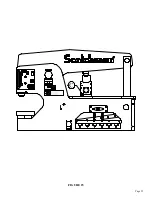
Page 40: ...Page 39 FIGURE 15 ...
Page 42: ...Page 41 FIGURE 16 ...
Page 48: ...Page 47 FIGURE 20 ...
Page 54: ...Page 53 FIGURE 24 ...
Page 56: ...Page 55 FIGURE 25 ...
Page 62: ...Page 61 FIGURE 27 ...
Page 66: ...Page 65 FIGURE 29 ...
Page 68: ...Page 67 FIGURE 30 ...
Page 74: ...Page 73 FIGURE 32 ...
Page 78: ...Page 77 FIGURE 34 ...
Page 80: ...Page 79 FIGURE 35 ...
Page 82: ...Page 81 FIGURE 36 ...
Page 84: ...Page 83 FIGURE 37 ...
Page 86: ...Page 85 FIGURE 38 ...
Page 90: ...Page 89 FIGURE 41 ...
Page 92: ...Page 91 FIGURE 42 ...
Page 93: ...Page 92 FIGURE 43 ...
Page 96: ...Page 95 THIS PAGE LEFT BLANK INTENTIONALLY ...
Page 98: ...Page 97 FIGURE 46 ...
Page 100: ...Page 99 FIGURE 47 ...

