


B.17
Date Code 20080213
Instruction Manual
SEL-351A Relay
Firmware Upgrade Instructions
Relay Firmware Upgrade Instructions
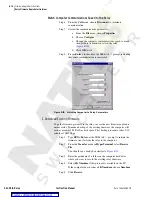
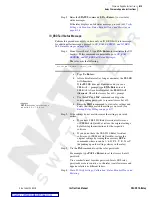
Step 2. Use the
SHO
command
to view the relay settings and verify
that these match the settings you saved earlier (see
).
If the settings do not match, reenter the settings you saved
earlier (see
Fail Status Messages on page B.16
Step 3. Type
SHO C <Enter>
to verify the relay calibration settings.
If the settings do not match the settings contained in the text file
you recorded in
C. Save Settings and Other Data on page B.7
,
contact your customer service representative or the factory for
assistance.
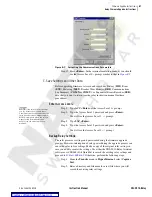
Step 4. Use the firmware identification string (FID) to verify download
of the correct firmware:
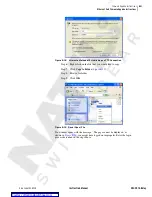
a. From the
File
menu, choose
Properties
.
b. Select the
Settings
tab in the
Firmware Upgrade
Properties
dialog box (
).
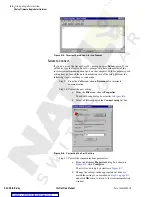
c. Click
ASCII Setup
.
You should see a dialog box similar to
.
d. Under
ASCII Receiving
, select the check box to
Append line feeds to incoming line ends
.
Figure B.16
Preparing HyperTerminal for ID Command Display
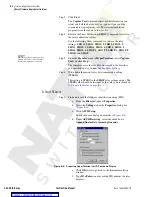
e. Click
OK
twice to return to the terminal emulation
window.
f.
Type
ID <Enter>
and compare the number the relay
displays against the number from the firmware
envelope label.
g. If the label FID and part number match the relay
display, proceed to
h. For a mismatch between a displayed FID or part
number, and the firmware envelope label, reattempt the
upgrade or contact the factory for assistance.
Step 5. Type
STA <Enter>
and verify that all relay self-test parameters
are within tolerance.
Summary of Contents for SEL-351A
Page 10: ...This page intentionally left blank Courtesy of NationalSwitchgear com ...
Page 16: ...This page intentionally left blank Courtesy of NationalSwitchgear com ...
Page 34: ...This page intentionally left blank Courtesy of NationalSwitchgear com ...
Page 126: ...This page intentionally left blank Courtesy of NationalSwitchgear com ...
Page 184: ...This page intentionally left blank Courtesy of NationalSwitchgear com ...
Page 198: ...This page intentionally left blank Courtesy of NationalSwitchgear com ...
Page 228: ...This page intentionally left blank Courtesy of NationalSwitchgear com ...
Page 278: ...This page intentionally left blank Courtesy of NationalSwitchgear com ...
Page 384: ...This page intentionally left blank Courtesy of NationalSwitchgear com ...
Page 410: ...This page intentionally left blank Courtesy of NationalSwitchgear com ...
Page 450: ...This page intentionally left blank Courtesy of NationalSwitchgear com ...
Page 454: ...This page intentionally left blank Courtesy of NationalSwitchgear com ...
Page 472: ...This page intentionally left blank Courtesy of NationalSwitchgear com ...
Page 504: ...This page intentionally left blank Courtesy of NationalSwitchgear com ...
Page 558: ...This page intentionally left blank Courtesy of NationalSwitchgear com ...
Page 562: ...This page intentionally left blank Courtesy of NationalSwitchgear com ...
Page 586: ...This page intentionally left blank Courtesy of NationalSwitchgear com ...
Page 608: ...This page intentionally left blank Courtesy of NationalSwitchgear com ...
Page 666: ...This page intentionally left blank Courtesy of NationalSwitchgear com ...


