


2.10
SEL-351A Relay
Instruction Manual
Date Code 20080213
Installation
Making Rear-Panel Connections
Making Rear-Panel Connections
–
for wiring examples of typical applications.
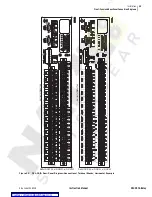
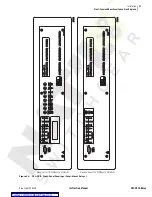
. Notice the two
types of rear-panel hardware connections. Reference is made to the model
numbers in discussing rear-panel connection differences in the following text.
Required Equipment
and General
Connection
Information
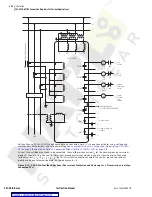
Models 0351A0W (Plug-In Connectors)
Wiring Harness
The SEL-WA03510W Wiring Harness includes all connectors necessary for
relay installation. All connectors requiring special termination come prewired
from the factory. Refer to the SEL-WA03510W Model Option Tables, which
are available from the factory.
The SEL-WA03510W Wiring Harness includes the following connectors (not
prewired):
➤
(2) 8-position female plug-in connectors for output contacts
OUT101
–
ALARM
.
➤
(2) 6-position female plug-in connectors for optoisolated inputs
IN101
–
IN106
.
➤
(1) 8-position female plug-in connectors for EIA-485/IRIG-B
Serial
PORT 1
.
These connectors accept wire size AWG 24 to 12. Strip the wires 0.31 inches
(8 mm) and install with a small slotted-tip screwdriver. Secure each 8 position
connector to the relay chassis with the screws located on either end of the
connector. The 8-position connectors are coded at the factory to prevent
swapping connectors during installation. Refer to
for the standard
input/output connector coding.
The wiring harness includes the following prewired connectors:
➤
(1) CT shorting connector for current inputs
IA
,
IB
,
IC
, and
IN
.
➤
(1) connector for voltage inputs
VA
,
VB
,
VC
, and
VS
.
➤
(1) connector for
POWER
inputs (
+
and
–
).
➤
(1) spade connector for ground (
GND
) connection (chassis
ground).
These prewired connectors (and the serial port connector) are unique and may
only be installed in one orientation.
Tools: Small slotted-tip screwdriver, wire strippers
Parts: SEL-WA03510W Wiring Harness
Summary of Contents for SEL-351A
Page 10: ...This page intentionally left blank Courtesy of NationalSwitchgear com ...
Page 16: ...This page intentionally left blank Courtesy of NationalSwitchgear com ...
Page 34: ...This page intentionally left blank Courtesy of NationalSwitchgear com ...
Page 126: ...This page intentionally left blank Courtesy of NationalSwitchgear com ...
Page 184: ...This page intentionally left blank Courtesy of NationalSwitchgear com ...
Page 198: ...This page intentionally left blank Courtesy of NationalSwitchgear com ...
Page 228: ...This page intentionally left blank Courtesy of NationalSwitchgear com ...
Page 278: ...This page intentionally left blank Courtesy of NationalSwitchgear com ...
Page 384: ...This page intentionally left blank Courtesy of NationalSwitchgear com ...
Page 410: ...This page intentionally left blank Courtesy of NationalSwitchgear com ...
Page 450: ...This page intentionally left blank Courtesy of NationalSwitchgear com ...
Page 454: ...This page intentionally left blank Courtesy of NationalSwitchgear com ...
Page 472: ...This page intentionally left blank Courtesy of NationalSwitchgear com ...
Page 504: ...This page intentionally left blank Courtesy of NationalSwitchgear com ...
Page 558: ...This page intentionally left blank Courtesy of NationalSwitchgear com ...
Page 562: ...This page intentionally left blank Courtesy of NationalSwitchgear com ...
Page 586: ...This page intentionally left blank Courtesy of NationalSwitchgear com ...
Page 608: ...This page intentionally left blank Courtesy of NationalSwitchgear com ...
Page 666: ...This page intentionally left blank Courtesy of NationalSwitchgear com ...