background image

X3  Operating Manual 

SMA Protocol 

Sartorius 

121 

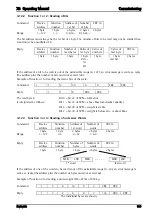
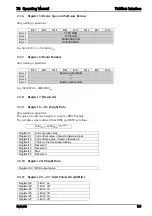
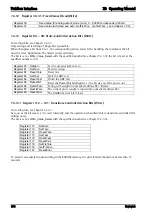
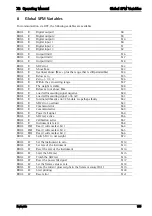
5.4.5  Reply with ‘A’ and ‘B’ Command 


Reply format with ‘A' and 'B' commands (variable length): 

<LF><xxx>:<yyyyyy><CR> 

The reply format and meaning are:  


<LF> 

Start of reply from 'A'/'B' command 

<xxx> 

The field name is three characters long, left-adjusted and filled up with spaces on the 

right, if necessary. 


The following fields are sent: 

 “SMA” 

level/revision 


(reply from ‘A’ command) 


“MFG” manufacturer marking 


(reply from the 1st ‘B’ command) 


“MOD” product / model identification 


(reply from the 2nd ‘B’ command) 


“REV” software version 


(reply from the 3rd ‘B’ command) 


“SN_“ serial number 


(reply from the 4th ‘B’ command) 


“END”: This is always the last inscription field 


(reply from the last ‘B’ command) 


‘:’ 

Separator between field name and field content. 


<yyyyyy> 

The data field contains up to 25 character. 


The SMA field contains <level/revision> 


with the following meaning: level = (1, 2, etc.); revision = (1.0; 1.1; etc.) 


<CR> 

End of reply from 'A'/'B' command 


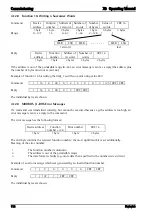
Example: 

Command Reply 

<LF> A <CR> 

<LF>SMA:1/1.0 <CR> 

<LF> B <CR> 

<LF>MFG:Sartorius <CR> 

<LF> B <CR> 

<LF>MOD:PR5410 <CR> 

<LF> B <CR> 

<LF>REV:01.01.9 <CR> 

<LF> B <CR> 

<LF>SN_:148388723 <CR> 

<LF> B <CR> 

<LF>END: <CR> 


Note: If the controlling computer sends another 'B' command: 

<LF> B <CR>  <LF> ? <CR> 


Summary of Contents for X3 PR 5410

Page 1: ...nics T H GmbH Meiendorfer Str 205 22145 Hamburg Germany Tel 49 40 67960 303 Fax 49 40 67960 383 Operating Manual X3 Process Indicator PR 5410 Operating Manual 9499 050 54102 Edition 2 01 02 2008 for PR 5410 Release 1 30 ...

Page 2: ... and all license numbers in all correspondence concerning this product Bitte beachten Alle Angaben in diesem Dokument sind soweit nicht gesetzlich vorgegeben unverbindlich für SARTORIUS und stehen unter Änderungsvorbehalt Die Bedienung des Produktes darf nur von geschultem fach und sachkundigem Personal durchgeführt werden Bei Schriftwechsel über dieses Produkt bitte Typ Bezeichnung und Versionsnu...

Page 3: ...9 3 3 4 Optocoupler Outputs 20 3 4 Accessories 21 3 4 1 Installing Plug in Cards 21 3 4 2 Cable Connection in the D Sub Connector Mating Plug 22 3 4 3 PR 5510 02 Serial I O 23 3 4 4 PR 5510 04 Serial I O 24 3 4 5 PR 5510 07 Analog Input Output Card 28 3 4 6 PR 5510 08 BCD Output Open Emitter 30 3 4 7 PR 5510 09 BCD Output Open Collector 33 3 4 8 PR 5510 12 6 Optocoupler Inputs 12 Optocoupler Outpu...

Page 4: ...5 2 Selecting the Calibration Mode 69 4 5 3 Determining the Maximum Capacity Max 70 4 5 4 Determining the Scale Interval 71 4 5 5 Determining the Dead Load 72 4 5 6 Calibration with Weight by Load 73 4 5 7 Calibration with mV V Value 74 4 5 8 Calibration with Load Cell Data Smart Calibration 75 4 5 9 Subsequent Dead Load Correction 76 4 5 10 Linearization 76 4 5 11 Test Value Determination Display...

Page 5: ...f Used Symbols 114 5 3 SMA Command Set 115 5 3 1 Requesting a Weight 115 5 3 2 Controlling the Scale 116 5 3 3 Scale Diagnosis 117 5 3 4 Scale Data 118 5 3 5 Scale Information 118 5 3 6 Escape Command 118 5 4 SMA Reply Messages 118 5 4 1 Standard Reply 119 5 4 2 Reply with Unknown Command 120 5 4 3 Reply in Case of Communication Error 120 5 4 4 Reply with Diagnosis Command 120 5 4 5 Reply with A a...

Page 6: ...ement 138 10 2 Solder Work 139 10 3 Cleaning 139 11 Disposal 139 12 Specifications 140 12 1 Instructions for Use of Free Software 140 12 2 General Data 140 12 2 1 Backup Battery for Time Date 140 12 2 2 Power Supply PR 5410 00 140 12 2 3 Power Supply PR 5410 01 140 12 3 Effect of Ambient Conditions 141 12 3 1 Environmental Conditions 141 12 3 2 Electromagnetic Compatibility EMC 141 12 3 3 RF Inter...

Page 7: ...e that may have occurred during transport If there are grounds for rejection of the goods a claim must be filed with the carrier immediately and the Sartorius sales or service organization must be notified 1 3 Before Commissioning Visual inspection Before commissioning and after and storage or transport inspect the instrument visually for signs of mechanical damage 1 3 1 Installation The front pan...

Page 8: ...d against short circuits and overload and switches off automatically in the event of failure When the electronic protection is triggered Disconnect the unit from all voltage sources and wait at least one minute Determine and eliminate the source of error Re connect the unit to the supply voltage 1 3 4 1 Power Connection 24 VDC PR5410 01 The version PR5410 01 is designed for 24 V direct current The...

Page 9: ...ts Galvanically isolated interfaces except RS 232 analog input and BCD output Wide range power supply for 100 to 240 V AC protection class I protective earth Version PR 5410 01 for 24 VDC direct current Plug in connections on the back panel for load cells inputs outputs LAN adaptor Suitable for mounting in a panel cut out or a control cabinet Calibration using front keys or PC tool Browser VNC Cal...

Page 10: ... are on the back panel of the housing A 6 pin plug in terminal block is provided for connection of the load cells The built in serial interface has a 9 contact D Sub female connector Network connection is possible via the built in RJ 45 LAN socket 3 optocoupler inputs and 3 optocoupler outputs can be connected using plug in terminals The cut outs for up to 2 plug in cards are covered by dummy plat...

Page 11: ...play Stability of the weight value Tare weight or fixtare display Range indication 2 3 2 Front Panel Keys Indicator keys Instrument settings set up Start printing Taring the current gross weight is stored in the tare memory provided that weight value is stable indicator not in error status function dependent on configuration Set gross weight to zero provided that weight value is stable weight with...

Page 12: ... Show version Press the key to select an item Show status If the list of menu items is long a vertical bar graph on the left black and gray shows which part of the list is displayed WP A Calibration Measuretime 320 ms Digital filter off Test mode absolute W M none Standstill time 0 50 s Standstill range 1 00 d Availability of settings options selectable with or is indicated by preceding double arr...

Page 13: ...nnot be executed e g if saving is not possible because the CAL switch is closed Read the description and press OK to continue Processing is in progress If an action takes a long time e g Max for setting the full scale deflection a clock symbol is shown Warning A warning is marked by three exclamation points Informational text An informational text is marked by one exclamation point Execution messa...

Page 14: ...Process Indicator X3 Operating Manual 14 Sartorius 2 3 6 Overview of Accessories ...

Page 15: ...alog output 4 analog inputs 16 bit analog output 0 4 20 mA Input 4 channels with common ground 3000 d resolution max 1 card Slot 1 or 2 PR 5510 08 BCD output Output 5 decades plus or minus sign or 3 bytes binary open emitter 1 input Slot 1 or 2 PR 5510 09 BCD output Output 5 decades plus or minus sign or 3 bytes binary open collector 1 input Slot 1 or 2 PR 5510 12 6 optocoupler inputs and 12 optoc...

Page 16: ...data cables power cable etc Connect the instrument power cable Check the installation 3 1 Mechanical Preparation For cabinet or panel mounting a corresponding cut out for the housing must be provided see Chapter 2 2 Have all required parts technical documents and tools at hand for mounting Secure the cable at the place of installation e g using cable ties Remove the insulation from the cable ends ...

Page 17: ...PC is possible install version 3 3 7 VNC program on the PC For setting the network address see Chapter 4 2 4 3 3 2 Standard RS 232 Interface The instrument is provided with a built in RS 232 interface that is accessible on the back panel of the housing This interface is configurable and can be used for example for data transmission to a remote display or a printer Number of channels 1 Type RS 232 ...

Page 18: ...232 RS 485 converter selection for display on PR 1628 is possible using addresses For this purpose select multiple transmitters as Mode in all instruments enter the instrument address under Device Id and the address of the subsequent instrument under Next Device Id 3 3 2 2 Connecting a YDP12IS or YDP04IS Ticket Printer The ticket printer YDP12IS OCEUV or YDP04IS OCEUV can be connected via Builtin ...

Page 19: ...ial free Number of inputs 3 CH1 CH2 CH3 Input signal Logic 0 0 to 5 VDC or open Logic 1 10 to 31 VDC Passive external supply required Input current 7 mA 24 V 3 mA 12 V Protected against incorrect polarity Electrical isolation Yes via optocoupler Connection Plug in 7 pin screw terminal block cable shield connected to housing terminal 14 max 1 5 mm cable Cable Shielded max 50 m Example connection of...

Page 20: ...5 mA Voltage drop 25 mA 3 V Passive external supply required Electrical isolation Yes via optocouplers Connection Plug in 7 pin terminal block cable shield connected to housing terminal 7 max 1 5 mm cable Cable Shielded max 50 m Example connection of relay control The relay switches when the output is active true For protection of the output circuit relays with free wheel diode must be provided Ex...

Page 21: ...ots 1 2 4 The flat cables plug into connectors Slots 1 2 4 on the main board The cables are polarized i e incorrect polarity is precluded A description and examples of the various cards and connections are given in Chapter 3 3 3 Remove the dummies from the back panel 2 screws M3 and replace them with the retainer plates for the plug in cards The flat cable connectors must be inserted into the corr...

Page 22: ...le Open the connector housing catches Release and open the cable clamp Remove approx 50 60 mm of the cable insulation Shorten the shield to 5 mm and bend it over the cable sheath Remove 3mm wire insulation and connect it by soldering Insert the pin unit Put the cable under the cable clamp The grounding tongue presses on the shield bent backwards the clamp presses on the cable sheath Close and tigh...

Page 23: ... RX CTS Input signal level logic 1 high 3 15 V logic 0 low 3 15 V Output signal level logic 1 high 5 15 V logic 0 low 5 15 V Potential isolation No Cable length max 15m Cable type twisted pairs screened e g LifYCY 3x2x0 20 1 conductor pair for GND External connection 2x D Sub 9 pole socket female Accessories delivered with the unit 2x connector counterpart D Sub 9 pin male incl screening hoods Dim...

Page 24: ...XD CTS DCD RI RS 422 485 signals TxA RxA TxB RxB Electrical isolation RS 232 no RS 422 485 yes Cable length Max 15m with RS 232 Max 1000 m with RS 422 485 Cable type Shielded twisted pair e g LifYCY 3x2x0 20 1 conductor pair for GND External connection 2 D Sub 9 contact female connectors Accessories delivered with the unit 2 D Sub 9 pin mating plugs male incl shielded housing Dimensions LxWxH 86 x...

Page 25: ...uires corresponding driver programming see relevant instrument manual Factory setting Switch S101 Settings for RS 422 485 1 Tristate enable OFF RS 422 ON RS 485 2 Rx enable OFF 4 wire ON 2 wire 3 Rx pull up resistor OFF not connected ON RxB 1k54 V 4 Rx bus termination OFF not connected ON RxA 205E RxB 5 Rx pull down resistor OFF not connected ON RxA 1k54 V Overview of which switches must be closed...

Page 26: ...lex simultaneous sending and receiving possible with PR 1627 00 remote display Configuration Serial ports parameter Remote display Slot1 2 RS 485 3 4 4 4 RS 422 Point to Point Connection Four Wire Four wire transmission full duplex simultaneous sending and receiving possible RS 422 can be used only for point to point connection Configuration Serial ports parameter Slot1 2 RS 485 ...

Page 27: ...the Instrument and Plug in Cards Sartorius 27 3 4 4 5 Connecting Several PR 1627 Remote Displays over RS 485 Connection of several PR 1627 remote displays over RS 485 four wire full duplex simultaneous sending and receiving possible ...

Page 28: ...put range 0 4 20mA configurable Output resolution 16 bits binary 20 000 internal counts 20 mA Output linearity error 0 20mA 0 04 4 20 mA 0 02 Output temperature effect 100 ppm K Output zero error 0 05 Max output error 0 1 Load Max 0 500 ohms External connection 15 contact D Sub female connector Accessories 15 pin D Sub male connector Dimensions LxWxH 86x53x16mm Weight 40g Inputs 4 channels current...

Page 29: ... S201 CH1 CH2 CH3 CH4 ON ON ON ON OFF OFF OFF OFF OFF OFF OFF OFF S202 CH1 CH2 CH3 CH4 OFF OFF OFF OFF ON ON ON ON OFF OFF OFF OFF Input resistance 250 ohms 100 kohms 10 Mohms Pin allocation of rear socket for installation see Chapter 3 4 1 D Sub 15 Input PIN 2 9 3 10 4 11 5 12 4 channels CH1 GND CH2 GND CH3 GND CH4 GND Output PIN 13 14 1 channel 0 4 20 mA Sig GND ...

Page 30: ...t cable for Slot 1 2 Number of outputs 5 digits BCD plus or minus sign Number of inputs Input 1 bit DATA IN Output stage Common collector at Uext open emitter External supply 5 V 24 VDC Voltage drop Approx 1 7 V Output current Max 50 mA Enable input 5 V 24 V adjustable via S101 5 V high 3 1 V low 1 5 V 24 V high 16 V low 10V protected against incorrect polarity Cable Shielded max 50 m Electrical i...

Page 31: ...X3 Operating Manual Installing the Instrument and Plug in Cards Sartorius 31 External supply voltage required pin 1 Uext reference potential pin 26 GND ...

Page 32: ...en the output pins 2 24 25 and GND pin 26 Input When using as DATA_IN the input pin 25 can control the 23 outputs As an output data is continuous hold tristate and its signal can be configured TTL 24V active high low It is applied to pin 25 DATA_IN of the 26 pin connector and is effective only with DIL switch S101 1 OFF and S101 2 ON The meaning of switches is given in the table in Chapter 3 4 7 1...

Page 33: ...on flat cable for Slot 1 2 Number of outputs 5 digits BCD plus or minus sign Number of inputs Input 1 bit DATA IN Output stage Common emitter at GND open collector External supply 5 V 24 VDC Voltage drop Approx 0 9 V Output current Max 50 mA Enable input 5 V 24 V adjustable via S101 5 V high 3 1 V low 1 5 V 24 V high 16 V low 10V protected against incorrect polarity Cable Shielded max 50 m Electri...

Page 34: ...Installing the Instrument and Plug in Cards X3 Operating Manual 34 Sartorius External supply voltage is required pin 1 Uext reference potential pin 26 GND ...

Page 35: ...connector and is effective only with DIL switch S101 1 OFF and S101 2 ON 3 4 7 1 Meaning of Switches S101 and S102 Fact sett S101 1 2 3 4 5 for OU IN Level Level Diode As INPUT DATA_IN 5V Active HIGH Pin 25 OFF ON ON ON x As INPUT DATA_IN 5V Active LOW Pin 25 OFF ON ON OFF x As INPUT DATA_IN 24V Active HIGH Pin 25 OFF ON OFF ON x As INPUT DATA_IN 24V Active LOW Pin 25 OFF ON OFF OFF x Free wheel d...

Page 36: ...Installing the Instrument and Plug in Cards X3 Operating Manual 36 Sartorius PR 5510 09 connector pin allocation BCD output for weight value Output circuitry ...

Page 37: ...uest signal changes from Data hold to Data valid In this case the reading instrument must wait 100 µs until the data is considered valid Mode 3 Parallel bus system tristate external request DATA_IN hold Parallel connection of n PR 5510 09 cards controlled via the DATA_IN tristate hold input Output of the consistent data in held condition on request otherwise tristate high impedance As long as DATA...

Page 38: ...polarity Output Max switching voltage 32 VDC Max switching current 25 mA Voltage drop 25 mA 3 V Protected against wrong polarity Passive external supply required Electrical isolation Yes via optocoupler Cable Shielded max 50 m Accessories delivered with the unit 1 DB37 mating plug male incl shielded housing External connection 26 contact D Sub connector female Dimensions LxWxH 60 x 106 x 22 Weight...

Page 39: ...X3 Operating Manual Installing the Instrument and Plug in Cards Sartorius 39 Passive external supply voltage required I O channels potential free no common reference ...

Page 40: ...Installing the Instrument and Plug in Cards X3 Operating Manual 40 Sartorius Output circuitry Input circuitry ...

Page 41: ...X3 Operating Manual Installing the Instrument and Plug in Cards Sartorius 41 Circuit diagram PR 5510 12 PR 1623 10 PR 1623 20 ...

Page 42: ...Installing the Instrument and Plug in Cards X3 Operating Manual 42 Sartorius Circuit diagram PR 5510 12 PR 1623 10 PR 1623 30 ...

Page 43: ...o EN 50 170 DIN 19245 mono or multi master systems are supported Master and slave devices max 126 nodes possible Watchdog timer Transport EIA RS 485 Profibus DIN 19245 Part 1 Cable Special Profibus color violet Shielded twisted pair cable Cable impedance 150 ohms Bus termination Can be activated externally via DIL switch Certificates Profibus test center Comdec in Germany and PNO Profibus User Org...

Page 44: ...closed ring Protocol INTERBUS S master slave fixed telegram length deterministic cyclical process data transmission with max 10 words I O Transport EIA RS 422 cable bound Cable Interbus color green 3x2 twisted pairs common shield Cable impedance 150 ohms Lead termination Not required due to active ring topology Certificates From Interbus Club e V Compatibility with Interbus standard IEC 61158 Part...

Page 45: ...Polling method polled IO CRC error detection to IEC 62026 EN50325 Max 64 station nodes Max data width 512 bytes input output Transport EIA RS 485 Configuration EDS file PR 1721 34 specific MAC ID 1 62 Certificates conformity Compatible with DeviceNet specification Vol 1 2 0 vol 2 2 0 ODVA certificate in accordance with conformity test software version A 12 Suitable for industrial applications CE U...

Page 46: ...o 10286 Test Date 06 09 2005 Vendor ID 90 See also www odva org Tested according to CE UL cUL Potential isolation Yes Dimensions LxWxH 87 x 55 x 15mm Weight 125 g The EtherNet IP card is supported from PR 5410 Firmware Release 1 30 onwards The IP Address and the Subnet Mask are set at Fieldbus parameter FP 96 und 97 see chapter 4 7 7 and Fehler Verweisquelle konnte nicht gefunden werden Take care ...

Page 47: ... sec 10BaseT Ethernet and 100Mbits sec 100BaseTx Fast Ethernet Auto detection 10 100 HalfDX FullDX Connection mode Network Protocol ModBus TCP Transport TCP IP or UDP IP Certificates Compatible with ModBus TCP standard of ModBus organization suitable for industrial applications CE UL cUL Cable Twisted pairs screened e g patch cable CAT5 Autolink straight or crossover Cable impedance 150 Ohm Cable ...

Page 48: ...e reduced to below approx 4 VDC Terminal block Connection Description M meas signal LC output M meas signal LC output V supply supply excitation S sense sense S sense sense V supply supply excitation Housing GND shield ground 3 5 1 Connecting a Load Cell with 4 Wire Cable Provide links between supply and sense and between supply and sense directly at the terminal block The cable colors shown above...

Page 49: ...d for the PR 6135 connecting cable When using different load cells the cable colors may have different assignments For this reason consult the relevant manual or data sheet for the assignments of cable colors before connecting Recommendations Install cable in steel pipe connected to earth potential Min distance to high voltage cables 1m Load cell supply circuit Load resistance of load cell circuit...

Page 50: ...ced by a potential free external supply The neutral wire of the external supply voltage 0 ext supply must be connected to the instrument housing to ensure that the voltage is symmetrical to 0 The internal supply is not connected The cable colors indicated above are valid for connecting cable PR 6135 When using other load cells cables the assignment of colors may differ For this reason the relevant...

Page 51: ...6135 and PR 6136 connecting cables When using other load cells the assignments of cable colors may differ For this reason the relevant manual or data sheet should be consulted for assignments of cable colors before connecting When using the PR 1626 60 intrinsically safe load cell interface with 7 5 VDC MX 8 closed open the solder link on the main board of PR5410 to switch the sense voltage detecti...

Page 52: ...ith 4 wire connection Platforms with 4 wire connection require links between V and S and between V and S The cable colors shown above are valid for a CAPP4 500 x 400 and a CAPP1 320 x 420 as an example The assignments of cable colors are given in the platform operating manual The cable shields must be connected to the GND terminal of the instrument If the measuring lines M M are shielded individua...

Page 53: ...ailure 4 1 1 CAL Switch The CAL switch is located on the instrument back panel Generally we recommend setting the switch into the closed position after calibration to prevent accidental overwriting data loss The built in alibi memory is protected against erasure as long as the CAL switch is closed With legal for trade applications the CAL switch must be sealed in the closed position With operation...

Page 54: ...ll display items After approx 5 s the menu is closed automatically 4 2 2 Front Panel Key Test Press and hold then press as well x 0 0 0 0 0 0w One digit per key is displayed Each time a key is pressed the corresponding digit is incremented by 1 x 0 0 0 1 0 0w Display if is pressed once x 8023 w Display if several keys 2 and 3 are triggered simultaneously If no key is pressed for 5 s the test is fi...

Page 55: ... and confirm with DONEw Is displayed to indicate the execution ERR31w Error message if digit group for IP address mask is not within 0 255 For DHCP Assignment by server the address has to be set to 00 000 0w 00 000 0w 4 2 5 Viewing the Network Address via Front Panel Keys Press Setup at the instrument DS PTS Tw Press to reach the BIOS menu BIOS w Press BIO S w Is displayed followed by FLASH w Pres...

Page 56: ...strument indicates Waiting for address assignment by the server 17 202 4w The most significant part of the Ethernet address is displayed 02 108 1w Subsequently the least significant part of the Ethernet address is displayed FLASH w The instrument is waiting for the start of the FlashIt program Run FlashIt 32 Rel 02 60 02 Nov 21 2006 Select the network Enter the instrument IP address Select the mod...

Page 57: ...creased with decreased Inputs are completed by a menu is left with All parameters data are clearly characterized by a max 3 digit number additionally two letters are preceded for the parameter group for easy allocation If data have to be overwritten a safety prompt appears SAVE w if the data should not be saved then YES has the be changed with to no 4 3 2 Entering Date and Time 1 Press SEtuP is sh...

Page 58: ... 022 oVrLd Overload 023 MIn Min weight 024 MuLrnG Multi range mode 025 rAnG 1 Range 1 026 rAnG 2 Range 2 LI Limits 030 LIM 1on LIM 1oF Limit 1 On Limit 1 Off 031 LIM 2on LIM 2oF Limit 2 On Limit 2 Off 032 LIM 3on LIM 3oF Limit 3 On Limit 3 Off LA Limits action condition 033 LIM 1on Action Condition 034 LIM 1oF Action Condition 035 LIM 2on Action Condition 036 LIM 2oF Action Condition 037 LIM 3on A...

Page 59: ...e Time 086 YEAr YYYY dAtE MM DD tIME HH MM VS Program Version 087 FIrM Firmware Version 088 bIoS Bios Version 089 boArd Board number FP Fieldbus Parameter 090 Prot Protocol 091 PdPAdr PDP Address 092 dVnbdr Devicenet Baudrate 093 dVnAdr Devicenet Address 094 CCLbdr CC link Baudrate 095 CCLAdr CC link Address 096 ModbIP Modbus TCP EtherNet IP IP Address 097 ModbSu Modbus TCP EtherNet IP Subnet Mask...

Page 60: ...is flashing and if required change to t Lb or g with DEFINING SCALE INTERVAL Cd 002 12 Press Cd 002 13 Press StEP is shown 14 Press 1 is shown change with to 2 for 200 g scale interval SETTING DEADLOAD Cd 003 15 Press Cd 003 16 Press dEAdLo is shown 17 Press LoAd is shown Deadload with empty scale else with MUoLt for mV V input 18 Press unLoAd is shown unload scale 19 Press a weight value for dead...

Page 61: ...no further calibration data or parameters have to be entered close the CAL switch now see chapter 4 1 1 4 3 6 View Calibration Data START 1 Press SEtuP is shown 2 Press Cd 000 Cd is flashing 3 Press CALIb is shown with CAL switch closed CAL CLS is shown calibration is not possible but data can be shown continue with 6 4 Press nEW is shown with switch to VIEW 5 Press CAL oPn is shown for CAL switch...

Page 62: ...ess Cd 004 is shown 8 Press SPAn is shown 9 Press MVoLt is shown 10 Press the maximum load is shown in mV V 11 Note the value for maximum load in mV V 12 Leave Setup menu 4 3 8 PIN Code The Setup program can be protected against unauthorized access by a PIN code defined by the user ACTIVATING PIN 1 Press SEtuP is shown 2 Press Cd 000 Cd is flashing 3 Select oP with 6 x oP 060 is shown 4 With switc...

Page 63: ...d VNC client viewer The server program is part of the instrument software The client program viewer must be installed and executed on the PC to be used for operating the instrument For direct operation using the VNC program the IP address extended by 1 must be specified when you run the program e g 172 24 21 85 1 The address range of the controlling PC can be limited in the instrument see Chapter ...

Page 64: ...e Configuration VNC Pop up Window For instrument operation using the VNC program without additional installation of VNC see Chapter 4 4 1 Indicator Indicator Pop up Window The weight value is displayed with the unit and status symbols Configuration Printout Can be used for printing the configuration data as a text file see chapter 9 Logfiles Screenshot Device display for saving the display Show er...

Page 65: ...umber different from the device serial number When you select Show status instrument status information is displayed Info Status Free system RAM 5052 of 15196 kb Clock battery ok Low if voltage too low CAL Switch closed opened if CAL switch is open When you select Show HW slots the installed plug in cards are displayed Info HW Slots Builtin RS 232 Standard serial interface Slot 1 PR 5510 04 RS 485...

Page 66: ... RS 232 Param Assigned to Protocol Baud rate Bits Parity Stop bits Date Time Change date and time Operating parameter Address Address of the instrument PIN Access code for setup Use Alibimemory None Gross Net Tare combinations Sequencenumber Sequence number SetTareKey Tare reset tare tare tare again disabled SetZeroKey Only when not tared reset tare on zeroset disabled N B T Key enabled disabled P...

Page 67: ...ve W M none OIML NSC NTEP Standstill time 0 01 s 0 50 s 2 0 s range is dependent on response time Standstill range 0 00 d 1 00 d 10 00 d Tare timeout 0 1 s 2 5 s 25 s timeout due to instability Zeroset range 0 00 d 50 00 d 10000 00 d Zerotrack range 0 00 d 0 25 d 10000 00 d Zerotrack step 0 00 d 0 25 d 10 00 d Zerotrack time 0 0 s 25 s Overload 0 d 9 d 999999 d Min 0 d 50 d 999999 d minimum weight...

Page 68: ...ble with Param Cannot calibrate Scale is tared If the scale was tared the following message is displayed data display with View reset tare with Res tar return with Cancel With View the calibration data can be displayed but not changed WP A View Calibration Max 3000 d 3000 kg Number of scale intervals and max capacity Scale interval 3000 d 1 kg Scale interval Deadload at 0 00 kg 0 000000 Dead load ...

Page 69: ...itivity 833 33 4 000000 Test 4 5 2 2 Changing the Calibration Modify may be used only for minor changes e g changing the dead load adapting mV V values for dead load and or Max otherwise always use New Open the menu via Calibration Modify WP A Calibration Max 3000 d 3000 kg Scale interval 3000 d 1 kg Deadload at 1 07 kg 0 000358 Max at 3000 00 kg 1 000000 Calibrated at 3000 00 kg 1 000000 Sensitiv...

Page 70: ...r confirmation of the change is displayed with Setting Max Error messages The maximum capacity is too high the calculated input voltage for the specified maximum capacity exceeds 36 mV Set Max failed below calibration Subsequent changing of the maximum capacity is possible if you decrease the capacity a message is displayed if the new maximum capacity is lower than the test load Calibrated at Set ...

Page 71: ...an be set by pressing The weight unit is taken from Max and cannot be changed here The number of digits behind the decimal point must be determined already when entering Max as well Set Scale interval After or confirmation of the change is displayed with Set scale interval failed Max not multiple of scale interval The maximum capacity is not an integer multiple of the scale interval ...

Page 72: ...0 d 3000 kg Scale interval 3000 d 1 kg Deadload at 0 00 kg 0 000000 Max at 3000 00 kg 1 000000 Calibrated at 3000 00 kg 1 000000 Sensitivity 833 33 4 000000 by load by mV V Test Possible error messages Set deadload failed above physmax The dead load entered in mV V plus maximum capacity in mV V is higher than 3 mV V 36 mV Set deadload failed no standstill The scale is not stable Remedial action Ch...

Page 73: ... d 3000 kg Scale interval 3000 d 1 kg Deadload at 165 11 kg 0 057920 Max at 3000 00 kg 1 052369 Calibrated at 2000 kg 0 701579 Sensitivity 876 97 4 209600 by load by mV V by data Linear Test Set SPAN failed No stability The scale is not stable Remedial action Check the mechanical function of the scale adapt the filter setting reduce the resolution if necessary adapt the stability conditions Set SP...

Page 74: ...pacity cell load mV V C y sensitivit cell load capacity maximum mV V Span Avr Dead load Calculation of the equivalent input voltage in mV V The input voltage in mV V equivalent to the dead load can be calculated by using the dead load rather than the maximum capacity in the formula specified above Normally calculation of the dead load scale without load empty hopper is not necessary Subsequent dea...

Page 75: ...onfiguration LC resistance 600 000 Enter Calc Number of loadcells Number of load cells connected in parallel 1 2 4 9 10 Nominal load Nominal load Emax of a load cell not the overall nominal weight of the scale Gravity Acceleration of gravity at the place of installation default is the value for Hamburg Germany 9 81379 m s Hysteresis error When switching from Not specified to Specified values for C...

Page 76: ...etermine the dead load with Deadload at by load see Chapter 4 5 5 4 5 10 Linearization After selecting Calibration New Modify and after completing calibration select the linearization menu with softkey Linear by load by mV V by data Linear Test When you press Linear the menu shown below appears WP A Calibration Linearisation Max at 3000 00 kg 1 000000 Add by mV V by load To add a new linearization...

Page 77: ...nish the calibration with You are prompted to confirm whether calibration should be closed without determining the test value Calibration not complete Exit calibration If not all data was determined when calibrating with New e g dead load not set entered this message is shown Press Yes to confirm and then press again another prompt is displayed Exit calibration Press Save to save changes in calibr...

Page 78: ...ow pass filter 0 1 80 Hz the setting is dependent on the measurement time Test mode With Absolute the test value is determined when the test is called With Relative the deviation from the initially stored test value is displayed see Chapter 4 5 11 W M Setting for legal for trade mode select None OIML NTEP for USA or NSC for Australia see Chapter 4 5 13 1 Standstill time Parameters Standstill range...

Page 79: ... 00 d to 10000 00d In legal for trade mode a value 2 of Max must be entered Example 60 d for 3000e class III Zerotrack range Range within which automatic zero tracking compensates deviations 0 25 to 10000 00d In legal for trade mode a value of 0 25 d has to be entered Zerotrack step Step for automatic tracking 0 25 to 10d In legal for trade mode a value of 0 25 d has to be entered Zerotrack time E...

Page 80: ...oint from range 2 to 3 Multiple range scale With Range mode Multiple range the scale has up to 3 ranges with different resolutions The switch points Range limit 1 and Range limit 2 are the range limits As soon as the gross weight exceeds range 1 the next higher range with the next higher interval becomes valid 1 2 5 10 20 50 100 200 When reducing the weight the interval of the previous range is ke...

Page 81: ...ERROR7 Negative Input Input voltage is negative e g wrong polarity of load cell signal or supply voltage 4 6 1 1 Testing the Measuring Circuit A simple test with the load cells connected can be carried out with a multimeter not with external supply or intrinsically safe load cell interface 12 VDC 0 8 V symmetrical to housing GND 12 VDC 0 8 V symmetrical to housing GND 0 12 mVDC LC with 1 0 mV V 0 ...

Page 82: ...l ports parameter Setup Serial ports parameter Select Serial ports parameter with and Date Time Operating parameter Printing parameter Setup Serial ports Printer Standard RS232 Remote display Slot1 RS232 JBUS MOD Bus Slot2 RS485 SMA Param Printer Select the serial interface to which the printer is connected Select Param to define the transfer characteristics Setup Serial ports Builtin RS232 Assign...

Page 83: ...be set to single transmitter Foe a PR1577 remote display PR 1577 mode has to be set If more than 1 instrument are connected to 1 remote display Mode must be set to multiple transmitters At Device Id the own instrument address A B C has to be entered at Next Device Id the address of the subsequent instrument has to be entered JBUS MOD Bus Setup Serial ports Builtin RS232 Assigned to JBUS MOD Bus Pr...

Page 84: ...s 1 The SMA protocol is described in Chapter 4 8 4 7 4 EW Protocol At configuration of serial ports Serial ports parameter a serial port for Asycom has to be selected and the protocol and communication parameters have to be set Setup Serial ports Printer none Remote display Slot1 RS232 JBUS MOD Bus none SMA none Asycom Slot1 RS485 Param Setup Serial ports Slot1 RS485 Assigned to Asycom Protocol As...

Page 85: ...d tare reset tare the scale is tared if it was not tared previously otherwise tare is reset tare tare again when you press the Tare key the current value is stored in the tare memory and a net weight of 0 is displayed disabled The key has no function SetZeroKey only when not tared The function of the zero setting key on the keypad can be limited to gross mode reset tare on zeroset The zero setting...

Page 86: ...compose a printout of 6 positions from the following list Sequencenumber Current sequence number max 6 digits after 999999 the 000001 is following CR LF Formfeed Carriage return and line feed form feed Deviceaddress Address of the instrument A B Z none Nothing is printed The function can be used for printing less than 6 data items displayedweight Grossweight Netweight Tareweight The displayed gros...

Page 87: ...5510 14 Setup Fieldbus Fieldbus protocol Profibus DP Which additional parameters are required depends on the interface type Interbus S Setup Fieldbus Fieldbus protocol Interbus S Profibus DP Setup Fieldbusparameter Fieldbus protocol Profibus DP Profibus DP Address 1 Enter address DeviceNet Setup Fieldbus Fieldbus protocol DeviceNet DeviceNet baudrate 500k Press to select 500 250 or 125 k DeviceNet...

Page 88: ...tion of the instrument The Hostname is subject to the following restrictions Minimum number of characters 2 maximum number of characters 24 The first character must be a letter Spaces are not permitted 0 9 A Z upper and lower case letters are not distinguished are permitted or may be included but neither at the end nor in succession When setting IP address Subnet mask and Standardgateway please co...

Page 89: ...3 X18 0 1 Limit signal 3 ADC error X32 0 1 Error in load cell ADC area negative far outside scale above Max X33 0 1 Weight above Max overload X34 0 1 Weight above Max plus the range which is still permissible below zero X35 0 1 Weight below zero center zero X36 0 1 Within 1 4 d of zero inside ZSR X37 0 1 Within zero setting range standstill X38 0 1 Mechanical stability of the scale dimmed X39 0 1 ...

Page 90: ... action Input 3 on no action Input 3 off no action BCD out Gross 4 8 3 Configuring Outputs Configure the required function for Output 1 to Output 3 by selecting a signal from the list see Chapter 4 8 1 The output goes to the corresponding state Example Setup Digital I O parameter Output 1 below zero X35 1 Output 2 above Max X33 0 Output 3 center zero X36 1 Input 1 on no action Output 1 is true act...

Page 91: ...put signal changes from 0 to 1 a tare command is generated Accordingly an action for the falling edge can be determined Selection list for actions of the inputs Input 1 2 3 on off Function SPM bit no action No function set marker 1 X64 1 Set marker 1 set marker 2 X65 1 Set marker 2 set marker 3 X66 1 Set marker 3 select net X72 1 Select net set zero X112 1 Set zero set tare X113 1 Set tare reset t...

Page 92: ...irectly Example Taring via digital input only if the instrument is set to gross Setup Digital I O parameter Output 1 marker bit 1 X64 1 Output 2 marker bit 2 X65 1 Output 3 marker bit 3 X66 1 Input 1 on set tare X113 1 Condition tare active X58 0 Input 1 off no action Input 2 on no action Input 2 off no action Input 3 on no action Input 3 off no action BCD out Gross When input 1 changes from 0 to ...

Page 93: ...ration Limit parameter Press and Digital I O parameter to select Limit parameter Setup Limit parameter Determine the limit values Limit 1 on 890 kg Action no action Limit 1 off 900 kg Action no action Limit 2 on 300 kg Action no action Limit 2 off 290 kg Action no action Setup Digital I O parameter Assign the outputs Output 1 limit 1 out X16 1 Output 2 limit 2 out X17 1 Example The output signal L...

Page 94: ...SPM bit no action No function set marker 1 X64 1 Set marker 1 set marker 2 X65 1 Set marker 2 set marker 3 X66 1 Set marker 3 select net X72 1 Select net set zero X112 1 Set zero set tare X113 1 Set tare reset tare X114 1 Reset tare set test X115 1 Activate the analog test reset test X116 1 Finish the analog test reset PWF X117 1 Reset power fail set fixtare X118 1 Set fixtare use the value in add...

Page 95: ...ut 2 marker bit 2 X65 1 Output 3 marker bit 3 X66 1 Input 1 on no action Input 1 off no action Input 2 on no action Input 2 off no action Input 3 on no action Input 3 off no action BCD out Gross BCD out Output as BCD with max 5 decades with minus or plus sign and status Gross Gross weight Net if tared Net weight if tared else gross weight Selected Gross or Net depending on SPM Bit X72 Transparent ...

Page 96: ...s D08 Output of the gross weight Net if tared D09 Output of the net weight Select D11 Output Gross or Net depending on SPM Bit X72 Transparent D30 Output of the value in D30 Analog range 0 20 mA Output of 0 20 mA 4 20 mA Output of 4 20 mA Output on error 0 mA Set the output to 0 mA 4 mA Set the output to 4 mA 20 mA Set the output to 20 mA hold The last output value is held Output if 0 0 mA Set the...

Page 97: ...0 mA Select with Stop PLC Stop I O Adjust Reset Press Adjust Adapt analog output Safety prompt Reply Yes to start adapting Info HW Slots Adjust Analog Output Slot 1 Output 4 000 mA Measured 4 004 mA Enter e g the value for 4 mA measured by the connected PLC under Measured After pressing the 2nd value 20 mA is displayed Info HW Slots Adjust Analog Output Slot 1 Output 20 000 mA Measured 20 010 mA E...

Page 98: ...t and or Tare weight is filed see chapter 4 3 3 Display of the datasets using VNC see chapter 4 4 3 The alibi memory can be completely erased if the CAL switch is open using front keys AL 101 With the Browser the datasets can be exported as CSV file for later evaluation as EXCEL file The CSV file uses the comma as separator between the different elements of an item Consequently in the EXCEL progra...

Page 99: ...pying instrument configurations cloning Creating a document PDF XLS etc with the instrument configuration 4 11 1 Installation The installation is done from the CD ROM delivered with the instrument It is recommended to close further application programs running on the PC For installation approx 150 MByte is required on the harddisk For RAM 256 MByte is necessary with a 2GHz processor approx 5 minut...

Page 100: ...nd defined To create an icon on the PC desktop for easy starting of the program the box has to be activated Continue the installation with Install The progress of installation is displayed the installation may last some minutes depending on the performance of the PC If the start box is activated the ConfigureIt Professional is directly started if Finish is pressed ...

Page 101: ...usly see chapter 4 11 1 it can be started with the icon on the desktop 4 11 2 1Define a New Project Select File New ConfigureIt Projekt Enter the project name this is the name of the folder and press Next The device type X3 PR5410 has to be selected and a configuration name file has to be defined continue with Finish ...

Page 102: ... defined with File New Configuration Select the instrument Type X3 PR5410 and continue with Next Enter or select the folder where the configuration has to be placed and enter the name for the configuration Continue with Finish In the Navigator the new configuration Batch cfg is shown in the folder Mixhouse ...

Page 103: ...the interface to the instrument can be set With Search Device all instruments of the selected identical type can be found in the network If the address of the instrument is known it can be directly entered in IP Address The instruments of the selected type found in the network are shown the instrument to be configured can be selected continue with OK The IP Address of the selected instrument is ta...

Page 104: ...eters is transferred from the instrument to the PC 4 11 5 Store Current Dataset on PC With File Save as the complete dataset including the calibration data and parameters can be stored in a file The folder can be selected and a new name for the file can be given The file Charge old cfg is added at Mixhouse The configuration can be found on the PC with the Explorer in the following folder ...

Page 105: ...ations are started by selecting Edit parameter After selection of the port where the printer of the instrument is connected the transmission paramters can be altered Continue with OK The new parameters are shown With File Save As the modified dataset can be stored in a file The folder can be selected and a new name for the file can be given continue with OK ...

Page 106: ...ith the parameters to be transferred or with for all parameters The transfer is started with OK 4 11 7 Reset the Instrument to Factory Default With ConfigureIt Reset to default the default data data in the instrument when leaving the factory are taken For transfer to the instrument continue with chapter 4 11 6 4 11 8 Exporting a Dataset as Printable File With File Print the dataset can be sent to ...

Page 107: ...tivate Browser The program can be operated in the same manner as if it had been started directly see chapter 4 3 4 11 10 Closing the Program Befor closing the program it has to be ensured that The correct configuration has been stored in the instrument The configuration of the instrument has been stored as CFG file The configuration data has been filed as print out e g PDF or printed Closing the p...

Page 108: ...a from and to the SPM of PR 5410 are transmitted using this protocol Any data exchange includes two telegrams a command from the PC to PR 5410 and a reply from PR 5410 to the PC Command Command PC Reply Reply PR 5410 Each telegram consists of four blocks 1 Device address 2 Functional code 3 Data addresses and values 4 Control word CRC Note All 2 byte values 16 bit values word have the Motorola not...

Page 109: ...e status bits of the scale Command 1 1 2 32 0 8 CRC CRC Reply 1 1 1 X CRC CRC The read byte X Bit 0 bit 32 of SPM ADC error is interpreted as follows Bit 1 bit 33 of SPM above Max maximum capacity Bit 6 bit 38 of SPM weight is stable Bit 7 bit 39 of SPM weight is below zero or above Max 4 12 3 Function 3 or 4 Reading n Successive Words Command Device address Function number Address of 1st word Num...

Page 110: ... of the bit is out of the permissible range 0 127 an error message is sent as a reply Example of function 5 for setting bit 113 taring Command 1 5 0 113 255 0 CRC CRC Reply 1 5 0 113 255 0 CRC CRC The individual bytes are shown 4 12 5 Function 6 Writing a Word Command Device address Function number Word address Value of the word CRC 16 1 byte 1 byte 2 bytes 2 bytes 2 bytes Range 0 127 6 0 63 Reply...

Page 111: ... 2 bytes 2 bytes 4 12 7 Function 15 Writing n Successive Bits Command Device address Function number Address of the 1st bit Number of bits Number of bytes Value of bits CRC 16 1 byte 1 byte 2 bytes 2 bytes 1 byte n bytes 2 bytes Range 0 127 15 0 127 8 16 24 1 2 3 1st byte 2nd byte 3rd byte Last byte 8th 1st bit last bit The bit address must always be the 1st bit of a byte The number of bits to be ...

Page 112: ... 893 Command 1 16 0 48 0 2 4 0 0 3 125 CRC CRC Reply 1 16 0 48 0 2 CRC CRC The individual bytes are shown 4 12 9 MODBUS J BUS Error Messages If a command was transmitted correctly but cannot be executed because e g the address is too high an error message is sent as a reply to the command The error message has the following format Device address Function number 128 Error number CRC 16 1 byte 1 byt...

Page 113: ... 38 39 40 41 42 43 44 45 46 47 7 112 113 114 115 116 117 118 119 120 121 122 123 124 125 126 127 Address Meaning Read bits 32 ADC error 33 Above Max full scale deflection 34 Above Max n d 35 Below zero minus sign 36 Zero within d 37 Within zero setting range 38 The weight is stable 39 The weight is below zero or above Max Write bits 112 Set zero 1130 Set tare 114 Reset tare For further bits see Ch...

Page 114: ... character carriage return 0D hex _ space The underscore or space character is used to mark an ASCII space character 20 hex ESC The escape character 1B hex is used to cancel a command An ASCII exclamation mark 21 hex is used for communication errors An ASCII colon is used as a field delimiter ASCII minus sign 2D hex An ASCII question mark 3F hex is used for unknown or non supported commands c Comm...

Page 115: ...R After elapse of the waiting time without reaching stability the following reply is sent LF _ 1 n _ f ___ CR For details see Chapter 5 4 1 5 3 1 3 Requesting Weight Continuously This is a command which generates non requested replies because it does not function according to the strict pattern of command and reply After the command the scale repeats the reply continuously Command LF R CR Reply Th...

Page 116: ...ommand the scale repeats the reply continuously Command LF S CR Reply The scale repeats the high resolution weight and status information continuously until another command is received LF s r n m f xxxxxx xxx uuu CR For details see Chapter 5 4 1 Dependent on the used baud rate the repetition rate of reply telegrams is roughly as follows 19200 bd Ö 100ms 9600 bd Ö 110ms 4800 bd Ö 170ms 5 3 1 7 Requ...

Page 117: ...ter For this function the stability condition must be met The maximum waiting time for stability is set under Tare timeout see Chapter 4 5 13 LF Z r n m f xxxxxx xxx uuu CR For details see Chapter 5 4 1 Unless the scale is in the zero setting range an error reply is generated 5 3 2 4 Request for Tare Resetting Command LF C CR Reply The scale deletes the tare weight and signals the tare reset statu...

Page 118: ...ils see Chapter 5 4 1 5 3 5 2 Scale Information Other Lines Command LF N CR Reply The scale sends further lines of its scale information LF TYP yyyyyy CR For details see Chapter 5 4 1 5 3 6 Escape Command Command ESC Reply This is the only command which does not work according to the protocol principle It does not have a reply The ESC character is detected at any time and cancels any current comma...

Page 119: ... range scales n Gross net Status G Gross weight T Tare weight as reply from M command N Net weight g High resolution gross weight n High resolution net weight m Stability status M The scale is not stable space The stability of scale condition is met f Reserved for future extensions xxxxxx xxx Weight value the field has always 10 characters uuu Unit of the weight value CR End of the reply message E...

Page 120: ...known to the scale due to a communication error is replied with an ASCII This includes parity error or frame error if any 5 4 4 Reply with Diagnosis Command When a diagnosis command is given the scale makes a test and gives a status reply LF r e c m CR Reply format and meaning LF Start of diagnosis reply r R RAM or ROM error _ OK e E EEPROM error _ OK c C calibration error _ OK m Always _ OK CR En...

Page 121: ...ation reply from the 2nd B command REV software version reply from the 3rd B command SN_ serial number reply from the 4th B command END This is always the last inscription field reply from the last B command Separator between field name and field content yyyyyy The data field contains up to 25 character The SMA field contains level revision with the following meaning level 1 2 etc revision 1 0 1 1...

Page 122: ...nd Separator between field name and field content yyyyyy The data field contains up to 25 characters The SMA field contains level revision Meaning level 1 2 etc revision 1 0 1 1 etc CR End of reply from I N command Example 6000kg x 1kg platform scale Command Reply LF I CR LF SMA 2 1 0 CR LF N CR LF TYP S CR LF N CR LF CAP kg_ 6000 1 0 CR LF N CR LF CMD HPTMCR CR LF N CR LF END CR Example 5000g x 1...

Page 123: ...on Description I QIaaaaaa ddssnnnnn LV QLVxxxx xx x xxaaaaaa ddssnnnnnttttt xxxx xx x xx instrument version aaaaaa Max in 5 digits with dec point dd Unit ss Scale interval nnnnn Span in mV V ttttt deadload in mV V Befehl Antwort Beschreibung WSAwwwwwwe Q Set fixtare ZS1Awwwwwwewwwwwwe QZS1A Set Limit 1 ZS2Awwwwwwewwwwwwe QZS2A Set Limit 2 ZS3Awwwwwwewwwwwwe QZS3A Set Limit 3 ZSDDDMMYYYYhhmm QZSD S...

Page 124: ...ritten and 8 bytes are read also if the data content is unchanged The fieldbus protocol ensures the data transport between the fieldbus master and the 2 x 8 byte data windows The interface protocol runs under the fieldbus and manages the access to a multitude of different data Fieldbus Interface Data and Functions with PR 5410 Weight data Weight status Limit values Digital inputs Digital outputs A...

Page 125: ...w by far For this reason data is addressed with Write_Value_Select and Read_Value_Select To do this the first six bytes of the write window and the first five bytes of the read window are required These can be used by the master to write data in PR 5410 e g a limit value is set to 100kg The master can also read out weight values or other data from the PR 5410 For this purpose the write and the rea...

Page 126: ...it 4 Bit 3 Bit 3 Bit 1 Bit 0 The control byte activates the corresponding action in the instrument with a set bit After execution of the operation the bit should be reset Variable Function Write_Value The weight value is transmitted as a binary 32 bit value with plus or minus sign Data type DINT Read_Value_Select For selecting the value sent by the instrument Write_Value_Select For selecting the f...

Page 127: ...set by ResPower with transition from 0Æ1 Cmd_Busy The instrument is busy executing a command e g the instrument has received a taring command and waits for stability Cmd_Error The instrument has interrupted the execution of a command e g StandStill could not be reached within the defined standstill time The error number can be read at Lasterror It is set only if an action is executed Tare_Active T...

Page 128: ...ct together with the data Execution is indicated by bit Write_Active in the output area Action of the master Response of PR 5410 Writing value in Write_Value Writing the register number in Write_Value_Select Writing Write_Value in the selected register Setting bit Write_Active Waiting until Write_Active was set Writing 0 in Write_Value_Select Resetting bit Write_Active 7 2 3 3 Setting Bit Action_S...

Page 129: ...ger time was started the end of execution can be waited for after starting see Chapter 7 2 3 3 and Chapter 7 2 3 5 Action of the master Response of PR 5410 Setting bits as in Chapters 7 2 3 3 or 7 2 3 5 Acknowledging the set bit as in Chapter 7 2 3 3 Setting the CmdBusy bit The operation is handled In the event of an error Setting the CmdError bit and the LastError byte Resetting the CmdBusy bit W...

Page 130: ...e 4 of the output area Output area Byte Value Description 0 00 Gross value 1 00 2 4 3 D2 4 8 Gross weight request was detected 5 Status 6 Test active Command status 7 Stand still Inside ZSR Center zero Below zero Over load Above Max ADC error Device status Bit 7 Bit 6 Bit 5 Bit 4 Bit 3 Bit 3 Bit 1 Bit 0 The gross value hex 000004D2 1234 can be read from bytes 0 3 When the Overload Test Active or A...

Page 131: ... deflection was exceeded OVL Scale overload Gross Max overload Error 2 BELOW0 Gross weight is negative 0 1 4 d CZERO Center of zero weight within 0 1 4 d INZSR The gross weight is within the zero setting range STND The scale is stable DIM The gross weight has exceeded the full scale deflection 0 1 4 d weight value Max overload OR function of bits BELOW0 OVL E7 The input signal is negative inverse ...

Page 132: ...2 Bit 1 Bit 0 Byte 0 EXPO Byte 1 UNIT Byte 2 STEP Byte 3 LASTERROR EXPO One byte for the position of the decimal point content in decimal form 0 255 0 000000 1 00000 0 2 0000 00 3 000 000 4 00 0000 5 0 00000 UNIT One byte for the weight unit content in decimal form 0 255 2 g grams 3 kg kilograms 4 t tons 5 lb pound STEP One byte for scale interval content in decimal form 0 255 1 scale interval 1 2...

Page 133: ...Register 8 15 Weight Data Only reading is permitted The gross net and tare weight are stored as DINT fixpoint The real data value is derived from DINT and EXPO as follows ValueReal readingDINT 10 EXPO Register 8 Current gross value Register 9 Current net value if tared otherwise gross Register10 Current tare value if tared otherwise 0 Register11 Value on the front panel display Register12 Reserved...

Page 134: ... Register 83 SetTest Start the ADC test Register 84 ResetTest Finish the ADC test Register 85 ResetPwf Reset the PowerFail bit Register 1 the bit was set after power on Register 86 SetFixTare Taring with weight in numerical address D31 Fixtare Register 87 GetFixTare The current gross weight is copied into numerical address D31 Register 89 ResetError The CmdError error bit is reset 7 3 13 1 Registe...

Page 135: ...uring signal negative X40 BOOL R Load cell measuring signal 36 mV X41 BOOL R Internal arithmetic error CAL data are perhaps faulty X42 BOOL R ADC error overload X43 BOOL R Command error X48 BOOL R Command active X49 BOOL R Power fail signal X50 BOOL R ADC test active X56 BOOL R Calibration active X57 BOOL R Instrument is tared X58 BOOL R W Read write marker bit 1 X64 BOOL R W Read write marker bit...

Page 136: ...rrent gross weight D8 DINT R Current net weight D9 DINT R Current tare weight D10 DINT R Current gross net weight selecteDwith X72 D11 DINT R Max weight full scale deflection D14 DINT W Weight limit 1 on D24 DINT W Weight limit 1 off D25 DINT W Weight limit 2 on D26 DINT W Weight limit 2 off D27 DINT W Weight limit 3 on D28 DINT W Weight limit 3 off D29 UDINT W Analog output for transparent mode D...

Page 137: ... kg Action no action Limit 3 off 0 kg Action no action Digital I O Output 1 limit 1 out X16 Output 2 limit 2 out X17 Output 3 limit 3 out X18 Input 1 on set zero X112 1 Condition no condition Input 1 off no action Input 2 on set tare X113 1 Condition no condition Input 2 off no action Input 3 on reset tare X114 1 Condition no condition Input 3 off no action Serial assignment Printer none Remote di...

Page 138: ...ns 10 1 Battery for Date Time The lithium battery for back up of the calendar time chip is located below the cover for the power supply on the main board The battery is activated before the instrument leaves the factory After initial start up the clock must be set date and time 10 1 1 Battery Replacement The instrument is equipped with a lithium battery for back up of the time calendar chip If the...

Page 139: ...sed air this is not permitted 11 Disposal If you no longer need the packaging after successful installation of the equipment you should discard it by the local facilities for waste disposal The packaging is made of environmentally friendly materials and is a valuable source of secondary raw material Place discharged batteries in local collection boxes not in the household waste In Germany correspo...

Page 140: ... conditions is contained on the CD ROM delivered with the instrument 12 2 General Data The following characteristics are valid after a warm up time of at least 60 minutes reference temperature 23 C 12 2 1 Backup Battery for Time Date The lithium battery for back up of the time calendar chip is activated before the instrument leaves the factory Battery lifetime Instrument connected continuously to ...

Page 141: ... EN 61326 Housing Radio frequency electromagnetic fields 80 1000 MHz EN 61000 4 3 10 V m Electrostatic discharge ESD EN 61000 4 2 6 8 kV Signal and control lines Fast transients burst EN 61000 4 4 1 kV Peak voltages surge 1 2 50 µs EN 61000 4 5 1 2 kV Conducted disturbances by radio frequency 0 15 80 MHz EN 61000 4 6 10 V Mains inputs Fast transients burst EN 61000 4 4 2 kV Peak voltages surge 1 2...

Page 142: ... 10 20 40 80 160 320 640 960 1200 1600 ms Digital filter Selectable 4th order low pass Characteristic Bessel aperiodic Butterworth Tschebyscheff Configurable cut off frequency 12 4 3 Accuracy and Stability Accuracy class 10000 e Cl III acc to OIML R76 EN 45501 Min measuring signal OIML 0 42mV V 5mV corr to 0 5µV e for 10000 e Min measuring signal OIML 0 25mV V 3mV corr to 0 5µV e for 6000 e Linear...

Page 143: ... the following PDF documents in preparation EC Declaration of Conformity to Council Directive 90 384 EEC Plates and markings sealing and labels Test certificate for the instrument EC type approval 12 6 2 Additional Instructions Information on the meaning of the CAL switch to be sealed can be found in Chapter 4 1 1 Make sure when configuring the instrument see Chapter 4 5 13 that the settings are i...

Page 144: ......

Page 145: ...es calibration 70 71 72 Ethernet 15 EtherNet IP 87 Execution message 13 External supply 50 F Fieldbus protocol 87 Free Software 140 Fuse 140 H Housing 10 I I O slots 21 IEC 1010 7 Increased resolution 68 Info key 65 Informational text 13 Input Area 126 Interbus S 15 87 Intrinsically safe load cell interface 51 IO status bits for reading 131 J J BUS 108 K Kit for panel mounting 10 L LAN adaptor 17 ...

Page 146: ...8 RS 232 17 23 24 25 RS 422 24 25 RS 485 24 25 S Safety information 7 Scale interval 71 Scale status 131 Sense voltage 81 Sequence number 85 Serial interface 15 Serial ports 82 Setup menu 66 SIL chip 16 Slot 1 2 15 Slot 4 15 SMA protocol 114 Smart calibration 75 Standard 17 Stop message 13 Subsequent dead load correction 76 System messages 13 T Tare key 85 Test certificate 143 Ticket printer 18 To...

Page 147: ......

Page 148: ...tronics T H GmbH Meiendorfer Straße 205 22145 Hamburg Germany Tel 49 40 67960 303 Fax 49 40 67960 383 www sartorius mechatronics com Sartorius Mechatronics T H GmbH All rights are strictly reserved Printed in Germany ...

Reviews: