-8-
●
Cleaning with air spray
1. Remove the cabinet top following to “Mechanical
Disassemblies”.
2. Clean up the LCD panel and polarizing plate by
using the air spray from the cabinet top opening.
Caution:
Use a commercial (inert gas) air spray designed for
cleaning camera and computer equipment. Use a
resin-based nozzle only. Be vary careful not to damage
optical parts with the nozzle tip. Never use any kind of
cleanser on the unit. Also, never use abrasive materials
on the unit as this may cause irreparable damage.
After long periods of use, dust and other particles will accumulate on the LCD panel, prism, mirror, polarized
glass, lens, etc., causing the picture to darken or color to blur. If this occurs, clean the inside of optical unit.
Remove dust and other particles using air spray. If dirt cannot be removed by air spray, disassemble and clean
the optical unit.
●
Disassembly Cleaning
Disassembly cleaning method should only be per-
formed when the unit is considerable dirty and cannot
be sufficiently cleaned by air spraying alone.
Be sure to readjust the optical system after per-
forming disassembly cleaning.
1. Remove the cabinet top and main units following to
“Mechanical Disassemblies”.
2. Remove the optical base top following to “Optical
Unit Disassemblies”. If the LCD panel needs clean-
ing, remove the LCD panel unit following to “LCD
panel/Prism ass'y replacement”.
3. Clean the optical parts with a soft cloth. Clean
extremely dirty areas using a cloth moistened with
alcohol.
Caution:
The surface of the optical components consists of mul-
tiple dielectric layers with varying degrees of refraction.
Never use organic solvents (thinner, etc.) or any kind of
cleanser on these components.
Since the LCD panel is equipped with an electronic cir-
cuit, never use any liquids (water, etc.) to clean the
unit. Use of liquid may cause the unit to malfunction.
●
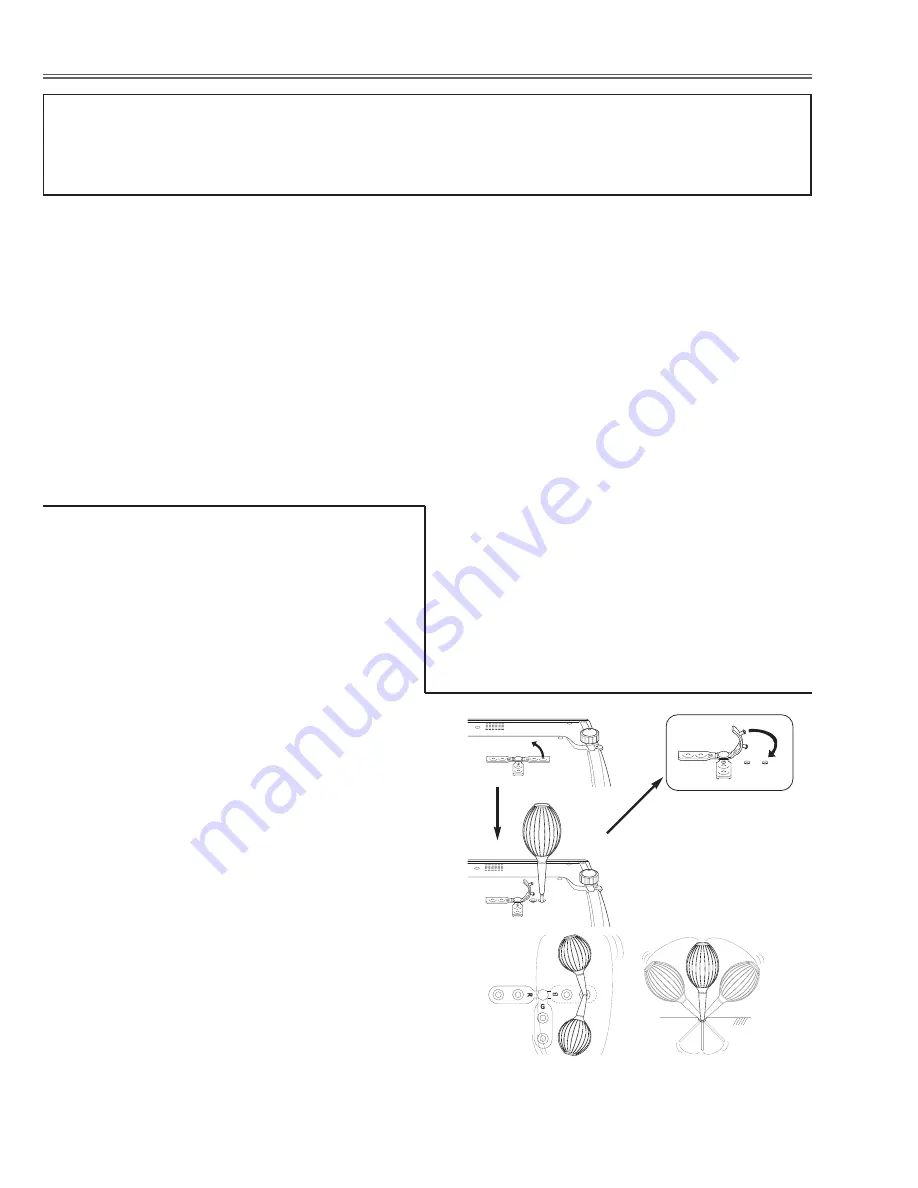
Cleaning with the cleaning function
1. Press MENU button to display the On-Screen Menu
and select the Setting menu by pressing the Point
Up/Down button. Then press Point Right button to
enter the sub-menu.
2. Press Point Up/Down button to select the Cleaning
function then press SELECT button to select the
item, and then the image is blacked out temporary.
3. Turn over the projector then pull one of the hole cov-
ers upward gently, and put the blower nozzle in the
hole.
Note:
When you look at the screen
- When red spots (dust) are the most remarkable, put
the nozzle in the R panel cleaning holes.
- When Green spots (dust) are the most remarkable,
put the nozzle in the G panel cleaning holes.
- When Blue spots (dust) are the most remarkable,
put the nozzle in the B panel cleaning holes.
4. While watching the position of the dust on the
screen, blow air into the projector by the blower.
5.
When finishing, pull the blower out and put the hole
cover back tightly.
Note:
When putting back the hole cover, starts from the
outside hole to make the operation easier and prevent
the hole cover from damaging.
6. Turn over the projector again, then press any button
on the top control or on the remote control to cancel
the Cleaning function.
The nozzle will be stopped
by the stoppers when
being put in the hole. Do
not try to force the nozzle
into further. The nozzle
could be break and fall into
inside of the projector.
When cleaning, wave the nozzle inside of the projector
back and forth. (Do not try to force the nozzle to bend.)
Caution:
Use only supplied blower nd nozzle.
■
Cleaning


