background image


A4b Automatic Dispenser                                                       

  V1.0                                                                                           

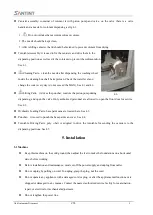
5.1.3 


Do not operate the machine in case the machine shell is removed. 


Take out tool box; check the items inside according to the packing list. Preserve        the tool box for 

next use.     


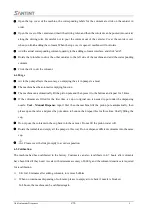
Find the two side door keys and open the door lock. Press the button to pop out the handle. Rotate 

the handle to open the side door. See 5.1.1.     


Use spanner 19 to remove the four bolts connecting the machine and the tray. Lift the machine to the 

required site and level it.   


Open the right/left side door and top door, remove the two fixing seats of the turntable. See 5.1.2.     


Connect the machine with power supply.     


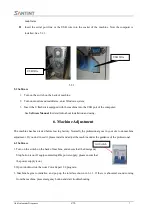
Insert the nine-pin serial port line or the USB wire into the corresponding socket which is under the 

change-over switch and fix it well. See 5.1.3.     

The machine is installed now.   


5.2 Computer 


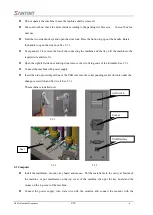
Install the mainframe, monitor, key board and mouse

Put the mainframe in the cavity at bottom of 

the  machine,  or  put  mainframe  on  the  top  cover  of  the  machine,  then  put  the  key  board  and  the 

mouse on the top cover of the machine.   


Connect  the  power  supply  wire,  data  wire  with  the  monitor,  and  connect  the  monitor  with  the 

5.1.2 

Seat 

5.1.1 

USB Interface 

色浆桶部件


Socket 

Air Switch 

Summary of Contents for A4B Series

Page 1: ...A4b Automatic Dispenser User Manual ISO 9001 2008 Certified...

Page 2: ...ne 10 6 3 Add Colorants 10 6 4 Purge 11 6 5 Calibration 11 7 Operation 12 7 1 Load Base Paint Can 12 7 2 Change Water for Cleaning Box 13 8 Maintenance 14 8 1 Daily Maintenance 14 8 2 Periodical Maint...

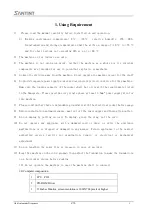
Page 3: ...meplate Please provide every single phase at least 1 5mm power supply wire for this machine 7 Please confirm that there is dependable ground wire with the electrical socket before usage 8 Before insta...

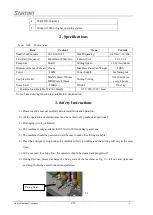
Page 4: ...epth 1335 900 1000 mm Notes Timed stirring function is available for customization 3 Safety Instructions 1 Please read this manual carefully before installation and operation 2 All the operation and m...

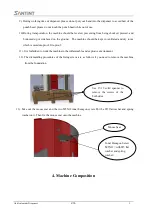
Page 5: ...lated and dry room which is moisture proof fire proof 11 It is forbidden to work the machine in the inflammable and explosive environment 12 The dismantling procedures of the fixing screws are as foll...

Page 6: ...A4b Automatic Dispenser V1 0 4 4 4 4 2 4 1 Canisters Cleaning Parts Turntable Lifting Parts 4 3 Base Paint Can Tray 4 5 Punch Assembly Turntable Drive Assembly...

Page 7: ...n pump during dispensing and open the valve Only authorized personnel are allowed to open the front door for service See 4 2 Hydraulic Loading Parts base paint cans are located here See 4 3 Puncher it...

Page 8: ...e right left side door and top door remove the two fixing seats of the turntable See 5 1 2 Connect the machine with power supply Insert the nine pin serial port line or the USB wire into the correspon...

Page 9: ...as been tested before leaving factory Normally the professional goes to your site to do machine adjustment If you don t need it please install and adjust the machine under the guidance of the professi...

Page 10: ...6 3 Add Colorants Before colorant is added into canister it must be fully mixed by stirring ruler Mixer is not recommended for mixing since too many bubbles will be produced and it will affect the acc...

Page 11: ...nd then press it to the bottom and repeat for 3 times If the colorants are filled for the first time a cup or original can is needed to put under the dispensing nozzle Tool Manual Dispense input 30ml...

Page 12: ...lifting switches after locating the base paint can properly When the lifting switch is pressed upwardly the tray would be lifted When the lifting switch is pressed downwardly the tray would be lowere...

Page 13: ...Box Lift lock handle to loose cleaning box Hold the box handle take it out Clean box and add water Water level should be lower than wheel axis Put the cleaning box back Make sure it is in bottom posit...

Page 14: ...accuracy Notice moving parts may cause injury Clean the nozzle if the colorant is not dispensed out in straight line If the machine hasn t been used for more than 3 days every colorant needs to be di...

Page 15: ...he colorants inside the canister 3 Change Inner Canister Loose the fixing screws of the fixing plate Remove the fixing plate Loose the fixing screws on the cylinder rack and the turntable Hold the rac...

Page 16: ...A4b Automatic Dispenser V1 0 14 10 Circuit Board...

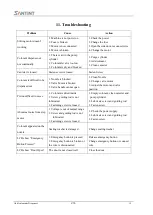
Page 17: ...1 Clean Nozzle 2 Change valve motor 3 Adjust the motor and valve position Piston difficult to move 1 Colorant is dried inside 2 Screw guiding rod is not lubricated 3 Fastening screw is loosed 1 Empty...

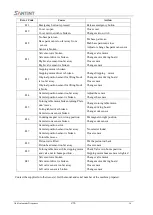
Page 18: ...Canister position sensor is broken Adjust the sensor Change the sensor E35 Turning table motor broken turning Plate don t move Turing table driver broken Canister code sensor broken Change turning tab...

Page 19: ...V1 0 1 ZHENGZHOU SANHUA TECHNOLOGY INDUSTRY CO LTD ADD Feilong Road Xingyang City Henan 450121 P R China TEL 86 371 67857168 After Service 86 371 67857219 FAX 86 371 67857166 WEB http www santint com...

Reviews: