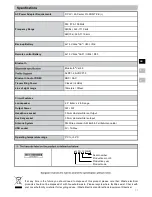
Sangean RCR-30 Operating	 Instruction Download Page 6

05

GB

F

E

3. 

 Press and hold the Info / Menu button until you hear a 

beep (then release the button) to enter the menu setting.

4. 

 Rotate the Tuning control knob until the FM AUTO / 

MONO setting shows on the display. If the setting is 

Auto press the Tuning control button and rotate the 

Tuning control knob to switch to Mono mode to reduce 

the hiss. Press and release the Tuning control button to 

confirm the setting.

5. 

 To return to Auto (Stereo) mode, press and hold the 

Info / Menu button to enter the menu setting. Rotate the 

Tuning control knob until the "FM MONO" shows on the 

display. Press and release the Tuning control button and 

rotate the Tuning control knob to select AUTO. Press and 

release the Tuning control button to confirm the setting.

Presetting stations in AM / FM mode

There are 5 preset stations each for AM and FM radio. 

They are used in the same way for each frequency band. 

(Please note that 9 memory presets for each band can be 

accessed via remote control.)

1. 

 Press the Standby (main power) button to switch on 

your radio.

2. 

 Press the Source button to select the desired frequency 

band. Tune to the required radio station as previously 

described.

3. 

 Press and hold the required Preset button until the 

display shows “P4” for example after the frequency. 

The station will be stored using the preset number . 

Repeat this procedure for the remaining presets as you 

wish.

4. 

 Preset stations which have already been stored may 

be overwritten by following the above procedure if 

required. 

Recalling a preset in AM / FM mode

1. 

 Press the Standby (main power) button to switch on 

your radio.

2. 

 Select the required frequency band by pressing the 

Source button.

3. 

 Momentarily press the required Preset button to have 

your radio tune to one of the stations stored in the 

preset memory.

The display will show “EMPTY” if no station has been 

stored to that preset.


NOTE

Listening to nature or soothing sounds

There are 27 different sounds for the Sound mode. (For 

the Sound select button 1 / 2 / 4 / 5, each button has 

5 different sounds. The  Sound select button 3 has 7 

different sounds.)

1. 

 With your radio switched on, press the Source button 

to select the Sound mode.

2. 

 Press the Sound select button1-5 repeatedly to select 

different sounds.

When the radio is in the standby mode, pressing the 

Sound select button1-5 will turn on the radio and switch 

to the corresponding sound.


NOTE

Sound select 

button1-5

Nature or soothing sounds

 - 1

RAIN DROPS

 - 2

STREAM

 - 3

OCEAN WAVES

 - 4

WATER FLOW

 - 5

WHALES

 - 1

FROGS

 - 2

CICADAS

 - 3

WIND

 - 4

BIRDS

 - 5

BIRDS 2

 - 1

WATER DROPS

 - 2

BUBBLES

 - 3

FIRE CRACKLING

 - 4

TRAIN

 - 5

WHITE NOISE

 - 6

WHITE NOISE 2

 - 7

FAN

 - 1

SOOTHING SOUNDS

 - 2

LULLABY

 - 3

PIANO MUSIC

 - 4

TWINKLE TWINKLE LITTLE STAR

 - 5

PIANO MUSIC 2

 - 1

SOOTHING SOUNDS 1

 - 2

SOOTHING SOUNDS 2

Summary of Contents for RCR-30

Page 1: ......

Page 2: ...01...

Page 3: ...thority to operate the equipment RF exposure statements IMPORTANT NOTE To comply with the FCC RF exposure compliance requirements the antenna s used for this transmitter must be installed to provide a...

Page 4: ...se of the controls throughout this instruction manual show the buttons on the radio The buttons on the remote control can be used if you prefer NOTE The operations described below for the radio are th...

Page 5: ...station name 5 When the end of the frequency band is reached your radio will recommence tuning from the opposite end of the frequency band 6 Use the Volume control to adjust the sound level as desired...

Page 6: ...station will be stored using the preset number Repeat this procedure for the remaining presets as you wish 4 Preset stations which have already been stored may be overwritten by following the above pr...

Page 7: ...ooth audio streaming or even temporarily disconnect from your device Such behavior is a function of the connected device and does not indicate a fault with your RCR 30 NOTE Playing audio files in Blue...

Page 8: ...e Tuning control button to enter the date format setting 3 Rotate the Tuning control knob to select the required date format Press and release the Tuning control button to confirm your choice of date...

Page 9: ...owered with the AC adaptor If not i e your radio is disconnected from an AC adaptor but inserted with back up batteries buzzer alarm with no Humane Waking System will be activated instead NOTE 7 To vi...

Page 10: ...utton to mute the sound output 2 Press the Mute button again or one of the Volume buttons to un mute the sound output Auxiliary input socket A 3 5mm stereo Auxiliary Input socket is provided on the re...

Page 11: ...to the AM FM band NOTE The charger may not supply power to some USB devices When not using or after charging remove the USB cable Do not connect power source to USB port Otherwise there is a risk of...

Page 12: ...DC 9V 2A Center Pin POSITIVE Frequency Range FM 87 5 108 MHz AM 9k 522 1710 kHz AM 10k 520 1710 kHz Back up Battery 2x1 5V Size AA UM 3 R6 Remote control Battery 2x1 5V Size AAA UM 4 R03 Bluetooth Blu...

Page 13: ...sable de la conformit peut annuler le droit de l utilisateur d utiliser cet quipement D clarations sur l exposition RF REMARQUE IMPORTANTE Pour assurer la conformit avec les exigences de conformit aux...

Page 14: ...ton Mono St r o n Bouton de couplage Bluetooth o Bouton de l Alarme 2 p Bouton de s lection Bouton de Lecture Pause q Bouton de recherche vers les fr quences sup rieures piste suivante bouton avance r...

Page 15: ...ez la molette de r glage Tuning dans le sens anti horaire et puis appuyez sur le bouton de r glage Tuning Votre radio cherchera dans le sens inverse et s arr tera automatiquement quand elle trouvera u...

Page 16: ...ndby alimentation principale pour allumer votre radio 2 Appuyez sur le bouton Source pour s lectionner la bande de fr quence souhait e Syntoniser la station de radio requise comme d crite pr c demment...

Page 17: ...tomatiquement si l appareil source est ramen dans la port e Soyez conscient que pendant la p riode de d connexion aucun autre appareil Bluetooth ne peut se coupler ou se connecter avec votre radio 3 S...

Page 18: ...n de se lier avec la radio Une fois coupl un appareil Connecting RCR 30 connextion au RCR 30 ou un message similaire s affichera sur votre appareil compatible NFC 3 Utilisez les contr les sur votre p...

Page 19: ...4 Lorsque l action est termin e l ic ne RDS s affiche sur l cran LCD indiquant que l heure de la radio est l heure de l horloge RDS L heure de l horloge de la radio sera valable pendant 2 jours chaque...

Page 20: ...ce que SNOOZE X apparaisse l cran Appuyez et rel chez le bouton de r glage Tuning pour la saisie du param tre Tournez le bouton de r glage Tuning pour ajuster le temps de silence de 5 10 15 et 20 min...

Page 21: ...rleur interne Veuillez noter que la sensibilit des couteurs casque peut varier consid rablement Nous vous recommandons donc de r gler le volume sur un niveau bas avant de connecter un casque des coute...

Page 22: ...pas de clou de fil etc dans le port d alimentation USB Autrement cela peut causer un court circuit et causer de la fum e et un incendie Ne connectez pas cette fente USB avec le port USB de votre PC ca...

Page 23: ...fr quences FM 87 5 108 MHz AM 9k 522 1710 kHz AM 10k 520 1710 kHz Batterie de secours 2x1 5 V type AA UM 3 R6 Batterie de la t l commande 2x1 5V type AAA UM 4 R03 Bluetooth Bluetooth Version 5 0 A2DP...

Page 24: ...o aprobados expresamente por la parte responsable de su cumplimiento podr an anular la autoridad del usuario para usar el equipo Declaraci n de exposici n a radio frecuencia RF NOTA IMPORTANTE Para cu...

Page 25: ...r hacia arriba s Bot n de informaci n t Bot n de subir bajar volumen u Bot n de fuente En aras de la claridad la instrucciones de uso de los conntroles de este manual de instrucciones muestran los bot...

Page 26: ...a se mostrar la frecuencia de la se al encontrada Si la se al es lo suficientemente fuerte y tiene informaci n RDS la radio mostrar el nombre de la emisora 5 Cuando se alcanza el final de la banda de...

Page 27: ...anda de frecuencia deseada Sintonice la emisora que quiera como se describi anteriormente 3 Mantenga presionado el bot n de presinton a deseado hasta que en pantalla por ejemplo se muestre P4 tras la...

Page 28: ...ve a estar dentro del alcance de detecci n Tenga en cuenta que durante el periodo de desconexi n ning n otro dispositivo Bluetooth podr emparejarse o enlazarse con su radio 3 Si RCR 30 aparece en su l...

Page 29: ...tivos NFC le pedir n permiso para vincularse con la radio Una vez vinculado con el dispositivo en su dispositivo NFC se mostrar Conectando RCR 30 o un mensaje similar 3 Use los controles en su disposi...

Page 30: ...om ticamente seg n los datos RDS recibidos 4 Cuando se haya completado la acci n el icono de RDS aparecer en la pantalla LCD indicando que la hora de la radio es hora RDS La hora del reloj de la radio...

Page 31: ...celar la posposici n mientras la alarma est suspendida presione y suelte el bot n de modo espera alimentaci n principal Apagado autom tico La radio puede configurarse para que se apague autom ticament...

Page 32: ...a de audici n Para prevenir posibles da os auditivos no escuche a vol menes altos durante periodosprolongados de tiemp IMPORTANTE Versi n del software ajustes de los intervalos sintonizaci n ajustes d...

Page 33: ...cte esta toma USB al puerto USB de su PC ya que es muy posible que de hacerlo estropeara su unidad No use la toma USB en condiciones de lluvia o mojadas para evitar que el agua o la humedad penetren e...

Page 34: ...in central positivo Rango de frecuencia FM 87 5 108 MHz AM 9k 522 1710 kHz AM 10k 520 1710 kHz Bater a de respaldo 2x1 5 V de tama o AA UM 3 R6 Bater a del mando a distancia 2x1 5 V de tama o AAA UM 4...

Reviews: