background image


preference. 

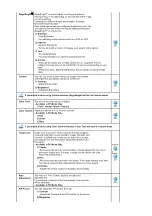
1) Bass


: Emphasize low frequency audio. 

2) Treble 

: Emphasize high frequency audio.

3) Balance 

: Allows you to adjust the sound balance between the left and right 
speakers.


Auto 
Volume

Reduces the differences in volume level among 
broadcasters. 

• On /Off 


Dolby 
Virtual

Dolby Virtual Sound On/Off (Dolby Virtual simulates the effect 
of the Dolby Surround sound system, recreating the movie-
theatre or concert-hall- quality sound.)  

• On /Off 


BBE

BBE

 (Barcus-Berry Electronics) recreates the natural sound 

and improves sound clarity through boosting high and low 
range frequencies.  
As a result, high sounds are clearer, brilliant and finely 
detailed while low sounds are tight, well-defined and 
harmonically rich.  

• On /Off 


BBE and Dolby Virtual cannot be functioned at the same time.

Select 
Sound

You can select either Main or Sub when PIP is On. 

• Main / Sub 


Available : PIP ON


FM Radio

Press the button on the front or the "FM RADIO" button on 
the remote control to select the "FM RADIO" feature.  

• Auto Store


You can scan the frequency ranges available on your 
FM Radio in your area and store all the channels found 
automatically. 

• Manual Store


You can scan the frequency ranges available on your 
FM Radio in your area and store all the channels found 
manually.  
  

- Channel

 : Chooses the Radio channel through the 

adjustment of up/down under the current frequency. 
  

- Search

 : The tuner scans the frequency range until 

the first channel or the channel that you selected is 
received. 
  

- Store

 : Restores the number user inputs. 

• Add / Delete


Adds or deletes channels from the memory. 
 

If you select FM Radio, picture will turn black 
while FM Radio is functioning in TV, EXT, 
AV, S-Video, Component modes except PC, 
DVI modes. 

Available : FM Radio ON


Auto Store 


Manual Store 


Add / Delete


Channel 

Summary of Contents for SyncMaster 730MP

Page 1: ...Install Drivers Install Programs...

Page 2: ...erstand at all times Do not disassemble Disconnect the plug from the outlet Do not touch Grounding to prevent an electric shock Power When not used for extended period of time set your computer to DPM...

Page 3: ...n them which could cause damage z This may cause an electric shock or fire Do not connect too many extension cords or plugs to an outlet z This may cause fire Installation Put your monitor in a locati...

Page 4: ...ong the outdoor antenna cable and entering the house be sure the outdoor portion of the cable hangs down below the point of entry z If rainwater enters the product it may cause an electric shock or fi...

Page 5: ...ot operate normally in particular if there are any unusual sounds or smells coming from it unplug it immediately and contact an authorized dealer or service z This may cause an electric shock or fire...

Page 6: ...the monitor z This may cause an explosion or fire Never insert anything metallic into the monitor openings z This may cause an electric shock fire or injury Do not insert metal objects such as utensil...

Page 7: ...efore moving the monitor z Failure to disconnect a cable may damage it and lead to fire or an electric shock When you remove batteries from the remote be careful that they are not swallowed by childre...

Page 8: ...contact a service center...

Page 9: ...y items are missing contact your dealer Contact a local dealer to buy optional items Unpacking Option A Monitor Option B Monitor WISELINK Manual Quick Setup Guide Warranty Card Not available in all lo...

Page 10: ...rol Batteries AAA X 2 Connecter Option B WISELINK Front 1 MENU 2 CH 3 VOL 4 ENTER FM RADIO 5 SOURCE D Sub Cable Power Cord Radio Antenna Audio Cable Cable Option B D Sub Cable Power Cord Radio Antenna...

Page 11: ...monitor OFF when it is not needed or when leaving it unattended for long periods 2 CH 3 VOL 4 ENTER FM RADIO 5 SOURCE 6 PIP 7 Power button 8 Power indicator 9 Remote Control Sensor 1 MENU Use this bu...

Page 12: ...put 4 EXT RGB connection terminal EXT RGB connection terminal Rear The configuration at the back of the monitor may vary from product to product 1 Power Connection Terminal This product may be used wi...

Page 13: ...5 MUTE 6 TTX MIX 7 MENU 8 ENTER 9 FM RADIO 10 CH P 11 SOURCE 12 INFO 13 EXIT 14 Up Down Left Right Buttons 15 AUTO 16 P MODE M B MagicBright 5 EXT RGB connection terminal EXT RGB connection terminal...

Page 14: ...er left corner of the screen 13 EXIT Exits from the menu screen 14 Up Down Left Right Buttons Moves from one menu item to another horizontally vertically or adjusts selected menu values 15 AUTO Adjust...

Page 15: ...onitor at the time 12 INFO Current picture information displays on the upper left corner of the screen 13 EXIT Exits from the menu screen 14 Up Down Left Right Buttons Moves from one menu item to anot...

Page 16: ...ng if you connect simultaneously both the D sub and DVI cables to one computer Connecting the monitor 1 Connecting to a Computer 1 Connect the power cord for your monitor to the power port on the back...

Page 17: ...input devices like DVDs VCRs or Camcorders You may enjoy AV signals as long as the monitor is turned on to see if the monitor status is set to analogue Press Source button to have the monitor double...

Page 18: ...or a CATV cable without installing any separate TV reception hardware or software on your computer 1 Input devices such as DVDs VCRs or Camcorders are connected to the Video or S Video terminal of th...

Page 19: ...between the component PR PB Y jacks on the Monitor and the PR PB Y jacks on the DVD DTV set top box 1 Connect the CATV or antenna coaxial cable to the Antenna terminal on the rear of the monitor You n...

Page 20: ...grees 2 Attaching a base This monitor accepts a 75 mm x 75 mm VESA compliant mounting interface pad 3 Select Component using the SOURCE button on the monitor s front 4 Connecting Headphone You may con...

Page 21: ...ve 2 Click Windows ME Driver 3 Choose your monitor model in the model list then click the OK button A Monitor B Mounting interface pad 1 Turn off your monitor and unplug its power cord 2 Lay the LCD m...

Page 22: ...system The certified driver will be posted on Samsung Monitor homepage http www samsung monitor com 4 Click the Install button in the Warning window 5 Monitor driver installation is completed Windows...

Page 23: ...nd select Driver tab 5 Click Update Driver and select Install from a list or then click Next button Windows XP Windows 2000 Windows Me Windows NT Linux When prompted by the operating system for the mo...

Page 24: ...tor homepage http www samsung monitor com 9 Click the Close button then click OK button continually 6 Select Don t search I will then click Next and then click Have disk 7 Click the Browse button then...

Page 25: ...11 Continue choosing Close button and OK button until you close the Display Properties dialogue box 10 Monitor driver installation is completed Microsoft Windows 2000 Operating System When you can see...

Page 26: ...then press the Enter key If the drive where the CD is inserted is not D enter the applicable drive Microsoft Windows NT Operating System 1 Click Start Settings Control Panel and then double click Dis...

Page 27: ...click Add Delete a program Select Natural Color from the list and then click the Add Delete button How to delete the Natural Color software program Select Setting Control Panel on the Start menu and...

Page 28: ...en of your choice PC DVI HDCP supported TV Ext EXT RGB is mainly used in Europe AV S Video Component PIP When external A V devices such as VCRs or DVDs are connected to the monitor PIP allows you to w...

Page 29: ...osition of the PIP window 5 Transparency High Medium Low Opaque Adjust the Transparency of PIP windows 1 PIP 2 Source 3 Size 4 Position 5 Transparency Edit Name Name the input device connected to the...

Page 30: ...tom mode Color Tone The tone of the color can be changed Available in PC Mode Only Cool Normal Warm Custom Color Control Adjust the individual R G B color controls Available in PC Mode Only 1 Red 2 Gr...

Page 31: ...ivate either Dynamic Standard Movie or Custom You can select Custom which automatically recalls your personalized picture settings Dynamic Standard Movie Custom Custom You can use the on screen menus...

Page 32: ...wing experience On Off Sound Available Mode PC DVI TV AV S Video Component OSD Description Play Mode The Monitor has a built in high fidelity stereo amplifier 1 Standard Choose Standard for the standa...

Page 33: ...elect Sound You can select either Main or Sub when PIP is On Main Sub Available PIP ON FM Radio Press the button on the front or the FM RADIO button on the remote control to select the FM RADIO featur...

Page 34: ...am may miss a few channels due to weak signals and the channels may not be added to the channel memory Add Delete Adds or deletes channels from the memory Fine Tune Due to weak signals or an incorrect...

Page 35: ...Note The language chosen affects only the language of the OSD It has no effect on any software running on the computer Sleep Timer Use to set the Monitor to be turned off automatically the set in cert...

Page 36: ...out it to select or cancel MagicChannel is impossible If you don t remember your pin number turn the power off and press MUTE 8 2 4 press each key within 2 seconds interval and then turn on the power...

Page 37: ...e different slot configurations for Compact Flash Type I and II This product supports CF Type I z How to Insert a Memory Card Gently push the memory card into the slot If the card is not inserted comp...

Page 38: ...may not play depending on the data transfer rate z Data Transfer Rate Files from 8 Kbps through 320 Kbps will run No limit to file sizes Movie Files are classified into Motion JPEG Compatibility Phot...

Page 39: ...ble at the computer source z Connect the upstream USB port to an appropriate USB port on your computer z Connect USB peripherals to the downstream USB ports on the WISELINK When you do writing reading...

Page 40: ...de 2 z While making a selection information about the selected file is displayed on the right side of the screen z When no card is inserted Please Insert Card will be displayed z When a new card is in...

Page 41: ...n saver will become active after a set period of time 1 Press the buttons to move to the desired file and select it Press the ENTER button and a full page image will be displayed 4 Press the INFO butt...

Page 42: ...l become active after a set period of time if the music is stopped 1 Press the or button to move to a desired file and it will automatically play 4 Press the INFO button to move to the WISELINK setup...

Page 43: ...ired file and it will automatically play 4 Press the INFO button to move to the WISELINK setup 2 The active page is displayed Change the pages by pressing or button 5 The title total playback time cre...

Page 44: ...e page is displayed Change the pages by pressing or button 5 The information for the current file is displayed 3 Press the EXIT button to ruturn to the previous menu 6 The selected memory card type is...

Page 45: ...e Show will not run z During the Music Slide Show only the ENTER EXIT INFO and SOURCE buttons are available Photo Slide Speed You can set the Time per Picture when the slide show starts z Fast Picture...

Page 46: ...prolog the life of the Screen z Off Stops the screen saver z 5min The screen saver automatically turns on if no button is pressed within five minutes z 10min The screen saver automatically turns on i...

Page 47: ...e type and capacity of the card Wait for a few seconds The screen will return to the initial card selection screen z Ejecting the card during playback may cause an error Press the SOURCE button on the...

Page 48: ...so that the computer recognizes the driver Note that it will not recognize WISELINK The file names are distorted z WISELINK only supports file names in English It does not support file names in other...

Page 49: ...ormal working condition though it does not sense any video signal While in the Self Test mode the LED power indicator remains green and the figure moves around on the screen Failure of any of the boxe...

Page 50: ...r deformation of the screen surface z The user will be required to pay costs and related expenses for repair of damages caused by him her Sometimes the screen turns black without the Not Supported Mod...

Page 51: ...sage z Check the maximum resolution and the frequency of the video adapter z Compare these values with the data in the Preset Timing Modes Chart 2 Maintaining the Flat Panel Display Screen Clean with...

Page 52: ...teries have been exhausted Refer to the Connecting the Monitor Check Signal Cable message z Ensure that the signal cable is firmly connected to the PC or video sources Refer to the Connecting the Moni...

Page 53: ...ntrol Problems related to the remote control and their solutions are listed Problems Items to check The remote control buttons do not respond z Check the battery polarities z Check if the batteries ha...

Page 54: ...m resolution SXGA 1280 x 1024 75Hz Input Signal Terminated RGB Analog DVI Compliant Digital RGB Composite H V Sync 0 7Vp p Positive at 75 ohms Separate H V sync TTL level positive or negative TV Video...

Page 55: ...thout uneasiness z For example the number of TFT LCD sub pixels that is contained in this product are 3 932 160 Note Design and specifications are subject to change without prior notice PowerSaver Thi...

Page 56: ...480 37 500 75 000 31 500 VESA 640 x 480 37 861 72 809 31 500 VESA 640 x 480 43 269 85 008 36 000 VESA 800 x 600 35 156 56 250 36 000 VESA 800 x 600 37 879 60 317 40 000 VESA 800 x 600 48 077 72 188 50...

Page 57: ...banon Egypt Russia Hungary Bulgaria Poland France Horizontal Frequency The time to scan one line connecting the right edge to the left edge of the screen horizontally is called Horizontal Cycle and th...

Page 58: ...omer Care 7037 Financial Drive Mississauga Ontario L5N 6R3 1 800 SAMSUNG 1 800 726 7864 http www samsung ca CHILE SONDA S A Teatinos 550 Santiago Centro Santiago Chile Fono 56 2 5605000 Fax 56 2 56053...

Page 59: ...ustrial Vallejo Gustavo A Madero C P 07700 Mexico D F Mexico TEL 52 55 5747 5100 Fax 52 55 47 52 02 RFC SEM950215S98 http www samsung com mx IMPORTADO POR SAMSUNG ELECTRONICS MEXICO S A DE C V Saturno...

Page 60: ...00 118001 Tel 46 8 590 966 00 Fax 46 8 590 966 50 http www samsung se THAILAND HAI SAMSUNG SERVICE CENTER MPA COMPLEX BUILDING 1st 2nd Floor 175 SOI SUEKSA VIDHAYA SATHON SOI 12 SILOM ROAD SILOM BANGR...

Page 61: ...mber of the Horizontal Cycle is called Horizontal Frequency Unit kHz Interlace and Non Interlace Methods Showing the horizontal lines of the screen from the top to the bottom in order is called the No...

Page 62: ...evices as VCRs camcorders and DVD players separate from a TV broadcast For Better Display 1 Adjust computer resolution and screen injection rate refresh rate on computer as described below to enjoy th...

Page 63: ...use of this material Samsung is the registered trademark of Samsung Electronics Co Ltd Microsoft Windows and Windows NT are registered trademarks of Microsoft Corporation VESA DPMS and DDC are registe...

Page 64: ...dealer or an experienced radio TV technician for help User Information Changes or modifications not expressly approved by the party responsible for compliance could void the user s authority to opera...

Page 65: ...lly adapted electronic products Why do we have environmentally labelled monitors In many countries environmental labelling has become an established method for encouraging the adaptation of goods and...

Page 66: ...On the page this folder you will find a brief summary of the environmental requirements met by this product The complere environmental criteria document may be ordered from TCO Development Unit S 114...

Page 67: ...as computers and other electronics equipment are concerned is that environmentally harmful substances are used both in the products and during their manufacture Since it is not so far possible to sat...

Page 68: ...ntain any mercury It also demands that mercury is not present in any of the electrical or electronics components associated with the labelled unit There is however one exception Mercury is for the tim...

Page 69: ...s for the residents in the following countries please contact the company corresponding to your region of residence For those who reside in other countries please contact a nearest local Samsung deale...

Page 70: ...er or field service technician for help Video In RS 232 Video Out Accessories equipment connected to the analog and digital interfaces must be certified to the respective IEC standards i e IEC 950 for...

Page 71: ...ttern z Use a Screen saver if possible z Set the Monitor to power off with the PC Display Properties Power Scheme Turn the power off for 4 hours after 24 hours in use Turn the power off for 2 hours af...

Page 72: ...tterns When the LCD panel is operated for a long time with a fixed pattern over 12 hours there may be slight difference in voltage between electrodes that work the liquid crystal LC in a pixel The vol...

Reviews: