background image

English


_67

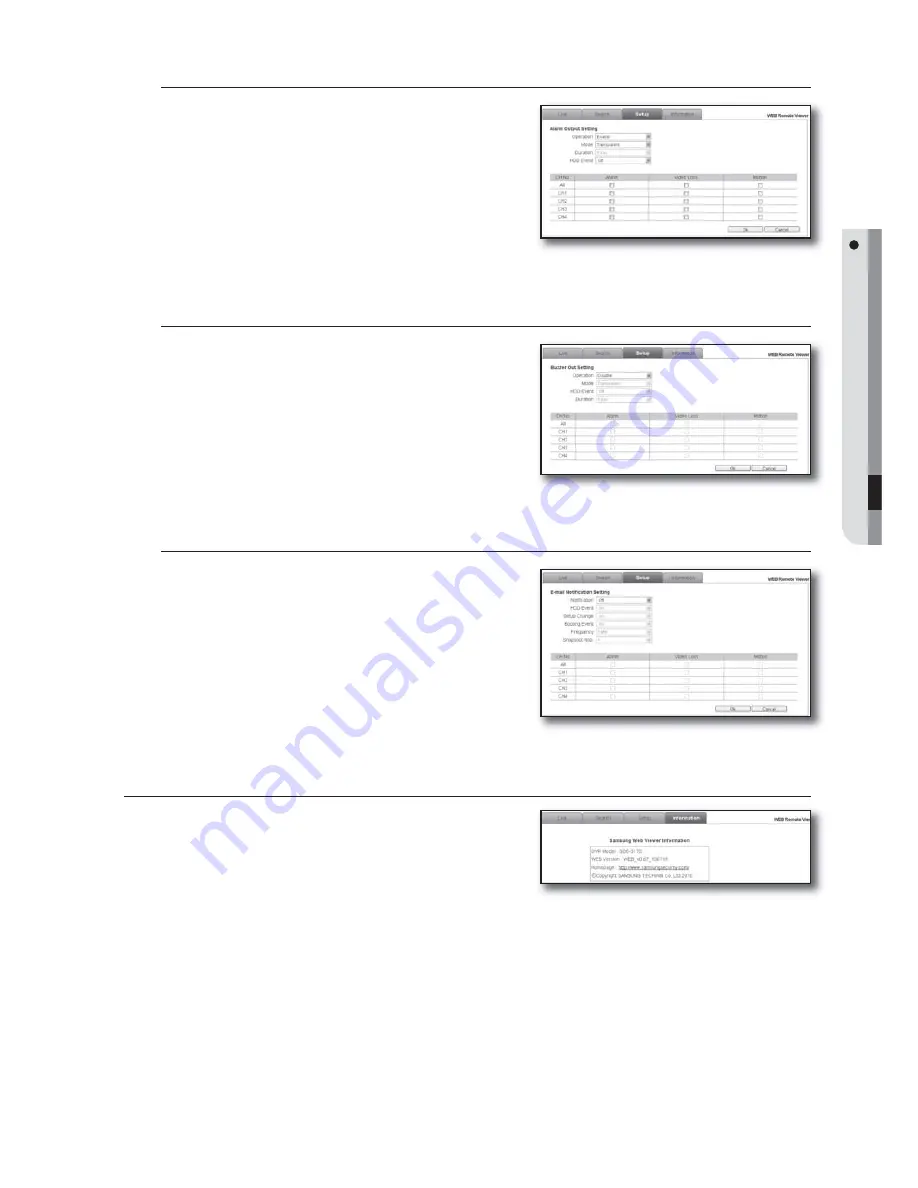
Alarm output setting

From the left menu tree, select <

Sensor

>.

Click <

Alarm Output

>.

Make your changes as necessary in details.

For more information, refer to “

ALARM OUTPUT

”. (Page 42)

Click <

Ok

>.

Your changes will be saved.

Buzzer out setting

From the left menu tree, select <

Sensor

>.

Click <

Buzzer Out

>.

Make your changes as necessary in details.

For more information, refer to “

BUZZER OUT

”. (Page 42)

Click <

Ok

>.

Your changes will be saved.

E-mail notification setting

From the left menu tree, select <

Sensor

>.

Click <

E-mail Notification

>.

Make your changes as necessary in details.

For more information, refer to “

E-MAIL NOTIFICATION

”. 

(Page 43)

Click <

Ok

>.

Your changes will be saved.

INFORMATION

Click the <

Information

> tab to display the DVR model name and 

the version of the Web Viewer.

1.

2.

3.

4.

1.

2.

3.

4.

1.

2.

3.

4.

WEB VIEWER

Summary of Contents for SRD-450

Page 1: ...4 CHANNEL DVR User Manual SRD 450 ...

Page 2: ...arch buttons on the front panel or a combination of them to perform freeze fast playback backward playback as well as monitoring an event of detection such as time motion and alarm It provides various recording modes including continuous motion and alarm recordings Supports DDNS use dynamic IP as like static IP USB Back Up Separate resolution settings for each channel Separate motion area settings...

Page 3: ...he third prong are provided for your safety if the provided plug does not fit into your outlet consult an electrician for replacement of the obsolete outlet Protect the power cord from being walked on or pinched particularly at plugs convenience receptacles and the point where they exit from the apparatus Only use attachments accessories specified by the manufacturer Use only with the cart stand t...

Page 4: ...rmly The fall of camera may cause personal injury Do not place conductive objects e g screwdrivers coins metal parts etc or containers filled with water on top of the camera Doing so may cause personal injury due to fire electric shock or falling objects Do not install the unit in humid dusty or sooty locations Doing so may cause fire or electric shock If any unusual smells or smoke come from the ...

Page 5: ...l it in a place with good ventilation Avoid aiming the camera directly towards extremely bright objects such as sun as this may damage the CCD image sensor Apparatus shall not be exposed to dripping or splashing and no objects filled with liquids such as vases shall be placed on the apparatus The Mains plug is used as a disconnect device and shall stay readily operable at any time When using the c...

Page 6: ...ted actions may cause damage to the hard drive or the product Also it can cause a dysfunction to the hard disk while using the product Please turn off the power using the Remote Controller or Mouse After entering password in the pop up menu you can turn off the power switch You may want to install a UPS system for safe operation in order to prevent damage caused by an unexpected power stoppage Any...

Page 7: ...y energy and if not installed and used in accordance with the instruction manual may cause harmful interference to radio communications Operation of this equipment in a residential area is likely to cause harmful interference in which case the user will be required to correct the interference at his own expense Package Contents Please unwrap the product and place the product on a flat place or in ...

Page 8: ...ker Mouse and Power Cable 14 Connecting the Alarm I O 15 Network Connection GETTING STARTED 17 17 Starting the System 17 Log On 18 Log In 18 Log Off 18 Power Off LIVE 19 19 Live Screen Configuration 20 View the Launcher Menu 21 Display 21 Record 22 Playback 22 Playback Screen DVR SETUP 23 23 Before Starting Setting Up 23 System Setup 24 System 27 Camera 30 Display 33 Sound 34 User 36 Network 40 Ev...

Page 9: ...CH PLAY 51 51 Search WEB VIEWER 53 53 Introduction 56 Live Viewer 59 Search Viewer 60 Search by Time 60 Search by Event 61 Setup 67 Information 68 Using the iPhone APPENDIX 69 69 Product Specification 71 Open Source License Report on the Product ...

Page 10: ...s a menu item This will operate as Book mark Reverse button during playback Speed Playback Used for quick forward playback Used for quick backward playback Freeze Freezes the screen or resumes playing Return Used to move one level up in the menu screen LED NETWORK Displays both network connection and data transfer status REC Flashes while the recording is in progress ALARM Flashes if an event occu...

Page 11: ...k up the video signal stored in the HDD using an external memory device and to connect USB memory c VIDEO IN Composite video signal input port BNC type port VIDEO OUT Composite video signal output port BNC type port AUDIO IN Audio signal input port RCA jack AUDIO OUT Audio signal output port RCA jack VGA OUT Video output port for video output to a VGA monitor ALARM IN Alarm input port RELAY Alarm ...

Page 12: ...input of the selected channel is displayed in full screen MENU You will see various menu items including settings search and backup Directions Used to move between menu items in searching for or playing recorded video BACKUP Switches to backup mode ID Sets the ID Select 2 digits from 0 9 while pressing the ID Key RETURN Cancels the setting and moves to the previous screen ENTER Selects a menu item...

Page 13: ... 00 for the Remote ID respectively To change the Remote ID of the IR REMOTE CONTROLLER press and hold the ID button while entering a desired combination of two digits from 00 to 99 To change the ID of the DVR refer to REMOTE CONTROLLER REMOTE CONTROLLER ID Page 26 Press the ID button of the IR REMOTE CONTROLLER to check the ID If the system number defined in REMOTE CONTROLLER is different from the...

Page 14: ...line two strands to the alarm input port and connect the other to the G port Connecting the alarm output signal Connection port for the alarm output signal NO Normal Open Sensor is open in normal condition it generates alarm if the sensor is closed COM Connect the grounding cable NC Normal Close Sensor is closed in normal condition it generates alarm if the sensor is open by interruption connectin...

Page 15: ...ta in the DVR Connect the network port on the rear DVR panel to the router or hub Connect the network port on the local PC to the router or hub Enter IP ADDRESS WEB SERVER PORT for the DVR on the local PC The Web Viewer screen of the DVR appears For more information refer to Network Connection and Settings Page 38 1 2 3 M DIGITAL VIDEO RECORDER POWER ALARM REC NETWORK DISPLAY SEARCH MENU Local PC ...

Page 16: ...more than one internet device to use such as a PC and a DVR or several DVRs you must use an IP Router different from a simple Network Hub You must set up the Router to work with the DVR and you must use a network capable PC within The local Router network to do the setup If you are using an existing Router which is already set up you may not need to redo the basic setup of the Router again but it ...

Page 17: ...To make use of the DVR you must log on after the system started You must log on before you can use the features of the DVR Select a user account that you want to log on with Enter the password The default user is admin and password is 4321 1 2 1 2 admin USER ID PASSWORD 1 2 3 4 5 6 7 8 9 0 A B C D E F G H I J K L M N O P Q R S T U V W X Y Z _ a ENTER CANCEL LOG ON ...

Page 18: ...o restrict access from other users Press the button on the launcher menu or press the POWER button on the remote control Press the LOG OFF button It automatically logs off POWER OFF You can shut down the system only if you have logged in to the DVR Press the button on the launcher menu or press the POWER button on the remote control Press the POWER OFF button Enter the password and press the ENTER...

Page 19: ...Camera Name Displays the name of the camera b Recording Modes C C Indicates continuous recording A A Indicates alarm recording M M Indicates motion detection recording I I Indicates instant recording c Launcher Menu Displays the current time menu and status ow MENU BACKUP SEARCH DISP REC b c ...

Page 20: ...PLAY OSD STATUS BAR TIMEOUT Page 30 Name Description Logout Power off The logout or power off dialog appears b Date Time Displays the current time c MENU Displays the system record setup menu window appears BACKUP Accesses the backup screen SEARCH Accesses the search screen DISP Displays a dialog to switch between split mode and sequence REC Starts the manual recording Network Status Indicates the...

Page 21: ...creen mode switches to Single while transition You can adjust the screen transition interval in SYSTEM SETUP DISPLAY MONITOR SEQUENCE DWELL Page 31 You can also add a sequence using the same menu RECORD In addition to the existing recording you can proceed with recording directly in Live mode Press the REC button from the Launcher menu or press the REC on the remote control This can be done by rig...

Page 22: ... point PLAYBACK SCREEN You can adjust the play speed of the instant recording screen that is currently played 2010 01 01 10 28 02 Shows the playback time Plays backward in the following speed X2 X4 X8 X16 X32 X64 Reduces the speed in forward playback Plays backward Pauses playing temporarily Plays forward Plays forward in the following speed X2 X4 X8 X16 X32 X64 Reduces the speed in backward playb...

Page 23: ...tem Change the setting and press ENTER before your change can be applied To return to the previous menu press the RETURN menu The player will return to the previous menu without saving your changes SYSTEM SETUP You can configure the System menu settings to your preference To start the SYSTEM SETUP Press the MENU button on the remote control or press the MENU button on the launcher menu The SETUP m...

Page 24: ...er If you press the SYNC button while connected to Internet the time will be set from the time server If the player has an existing recording data in the same time schedule you are prompted to delete it Please check the followings if NTP does not work properly IP ADDRESS GATEWAY SUBNET MASK 1st DNS SERVER 2nd DNS SERVER of IP SETUP in NETWORK menu TIME ZONE SETUP Set the GMT standard time of your ...

Page 25: ... factory default SYSTEM DATA Save the system setup data or import the system information of other device SAVE Stores the setting information of the DVR into the storage device Connect the storage device to the USB port of the system LOAD Applies the setting information in the storage device to the DVR Connect the device to store the system data to the USB port PASSWORD Turns on or off the popup of...

Page 26: ...tings will be applied Press the CLOSE button to display the confirmation dialog and return to the previous menu 1 2 3 4 5 6 7 1 2 1 2 3 4 DEV CANCEL APPLY CLOSE SYSTEM REMOTE CONTROLLER ID 0 DATE TIME SYSTEM MANAGEMENT REMOTE CONTROLLER SYSTEM ID SYSTEM INFORMATION SYSTEM NAME FIRMWARE UPDATE CANCEL APPLY CLOSE SYSTEM DATE TIME SYSTEM MANAGEMENT REMOTE CONTROLLER ON FACTORY DEFAULT SYSTEM DATA PAS...

Page 27: ...eric characters for the ID password and camera name you can use the cursor or the remote control Use the direction buttons on the remote control to move to a desired item and press the ENTER button Or simply double click a desired item Use the direction button to move to a desired character and press the ENTER button or simply click the character Selecting will switch the selected character to the...

Page 28: ...tup screen and press the ENTER button Use the direction buttons to move to a desired item of the camera channel to adjust its color and press the ENTER button The color adjustment menu appears Use the up down button in the bottom right corner to select a channel that you want to adjust the color of Select an item and use the numeric values to adjust the color option values BRIGHTNESS Adjusts the b...

Page 29: ...t the motion area Move the cursor to the selected area Click the yellow cell again The yellow rectangle will disappear with the motion area deselected To select deselect all Right click any area or press the RETURN button on the remote control From the context menu that pops up select a desired item SELECT ALL Selects all areas DESELECT ALL Deselects all areas CANCEL Cancels your settings SAVE EXI...

Page 30: ... DISPLAY Set to display the motion event in the motion sensor area when it occurs MOTION COLOR Select a color of a detected motion that is displayed on the screen LANGUAGE Select a menu language When your settings are completed press the APPLY button on the bottom Your settings will be applied Press the CLOSE button to display the confirmation dialog and return to the previous menu MONITOR You can...

Page 31: ...l the screen will switch to a split mode for the display When your settings are completed press the APPLY button on the bottom Your settings will be applied Press the CLOSE button to display the confirmation dialog and return to the previous menu SEQUENCE You can select a split mode of the sequence and add or adjust the sequence dwell time Using the mouse may help easy setup ADDING SEQUENCE Use th...

Page 32: ...ection buttons to move to a desired item and press the ENTER button to set the value SEQUENCE TITLE Select the TITLE input box ACTIVATION Set to perform the sequence MODIFY You can change the sequence mode setting For setting the sequence mode refer to ADDING SEQUENCE Page 31 DELETE Deletes the selected sequence list CANCEL Cancels your changes When your settings are completed press the APPLY butt...

Page 33: ...o ports 1 through 4 When your settings are completed press the APPLY button on the bottom Your settings will be applied Press the CLOSE button to display the confirmation dialog and return to the previous menu BUZZER You can use the remote control to activate the buzzer Using the mouse may help easy setup Use the direction buttons to move to BUZZER in the left corner of the SOUND setup screen and ...

Page 34: ...rovide necessary information for the user to add USER ID Enter the user ID PASSWORD Enter the password GROUP Select a group where the user belongs from MANAGER and USER E MAIL Enter the email address at which you will be notified that an event occurs E MAIL NOTI You can select to receive the email notification when an event occurs When done press the OK button The added user account will be listed...

Page 35: ...the mouse may help easy setup Use the direction buttons to move to USER AUTHORITY in the left corner of the USER setup screen and press the ENTER button Select all the menu items that a user can access with the MANAGER or USER account by checking the applicable checkboxes When your settings are completed press the APPLY button on the bottom Your settings will be applied Press the CLOSE button to d...

Page 36: ...SERVICE PORT Indicates a port used when the remote management software program accesses the DVR WEB SERVER PORT Indicates a port used to connect to the DVR using the web browser AUTO PORT Registers connectable address from outside to DDNS HOST NAME automatically DELETE PORT Unblock registered port forwarding status PORT TEST Check the current RTSP PORT HTTP PORT status by itself whether it is conn...

Page 37: ... the confirmation dialog and return to the previous menu 1 2 1 2 3 4 IP SETUP DDNS E MAIL CANCEL APPLY CLOSE NETWORK HELP DDNS DDNS SERVER ON websamsung net TEST IP SETUP DDNS E MAIL NETWORK CANCEL APPLY CLOSE HELP DHCP When enabled the DVR will obtain an IP address automatically if connected to a DHCP server or router WEB SERVICE When enabled allows remote connections using internet Explorer or o...

Page 38: ... account password of the sender FROM Provide the sender email that will be displayed in the email notice TEST E MAIL Sends a test email to check if the current setting can send emails normally When your settings are completed press the APPLY button on the bottom Your settings will be applied Press the CLOSE button to display the confirmation dialog and return to the previous menu Network Connectio...

Page 39: ...local connection properties from the Network Connection on the local PC Ex IP 192 168 0 200 Subnet mask 255 255 255 0 Gateway 192 168 0 1 Provide the IP router address to display the login dialog where you enter the router ID and password Access the DHCP setup menu to switch the router mode to DHCP server mode and provide the start address and the end one Enter the start 192 168 0 100 and the end ...

Page 40: ...rea of the router set the port forwarding for the router The DVR will use RTSP SERVICE PORT and WEB SERVER PORT for this purpose You must set the port forwarding for both ports For more information refer to Network Setup Guide that comes with the DVR To check the connection status Provide the IP address for the local PC or remote PC When the login dialog appears and prompts you to enter the ID and...

Page 41: ...ther ENABLE or DISABLE If the alarm sensor is set to ENABLE and you have set to perform recording if an alarm occurs the Live screen displays the alarm recording standby mode Page 47 TYPE Specify the sensor type N O Normal Open The sensor stays open at all times while the alarm operates if the sensor is closed N C Normal Close The sensor stays closed at all times while the alarm operates if the se...

Page 42: ...e confirmation dialog and return to the previous menu BUZZER OUT You can specify the alarm input channel and the event conditions for the buzzer Using the mouse may help easy setup Use the direction buttons to move to BUZZER OUT in the left corner of the EVENT SENSOR setup screen and press the ENTER button Use direction buttons to move to a desired item and press the ENTER button to set the value ...

Page 43: ...EVENT Turn on or off the notification of a HDD event if it occurs BOOTING EVENT Turn on or off the notification of an email when the system boots SNAPSHOT NOTI Specify the sending of the snapshot when an event occurs ALARM VIDEO LOSS MOTION Set the event notification for each channel if an event occurs such as alarm video loss or motion detection FREQUENCY Set the notification interval for events ...

Page 44: ... is set to OFF OVERWRITE If set to ON recording will proceed by overwriting the existing data even if the size of the recording data exceeds the HDD capacity If set to OFF and the HDD is full the DVR stops recording and sounds the buzzer or alarm that is set to operate in EVENT SENSOR Page 40 A message of DISK FULL is displayed on the screen FORMAT Format the hard disk drive Press the START button...

Page 45: ...desired item and press the ENTER button to set the value SCHEDULE MODE Specify the schedule mode The specified schedule mode will be applied to Continuous Motion Record and Alarm Record PRE EVENT RECORDING TIME Specify the pre event recording time that will be applied if an event occurs Recording will start before the specified time if an event occurs POST EVENT RECORDING TIME Specify the end reco...

Page 46: ...d the window is closed When your settings are completed press the APPLY button on the bottom Your settings will be applied To set the record mode You can specify the record mode for each channel or time range From the CONTINUOUS MOTION RECORDING menu screen select ACTIVATION Your change to the recording size will be applied to the time bar Drag the cell that you want to adjust the size or use the ...

Page 47: ...djust the size The size adjustment window appears Use direction buttons to move to a desired item and press the ENTER button to set the value SIZE Set the recording resolution FPS Set the frame rate per second QUALITY Set the recording quality Select one from LOW STANDARD HIGH HIGHEST The recordable time may differ depending on the recording quality AUDIO Select whether to include audio input to t...

Page 48: ...IO Select whether to include audio input to the recording Remaining Rate If you change the settings of the resolution and the remaining rate the frame rate available for each resolution will be recalculated When the size adjustment is done press the OK button When your settings are completed press the APPLY button on the bottom Your settings will be applied Press the CLOSE button to display the co...

Page 49: ...ou save the backup data FROM Specify the backup start time TO Specify the backup end time LOG If you want to receive the system log file check the log item and proceed with the query session CODEC Before you can play the backup data properly with Media Player check the item that you want to play and download the codec as well Check before proceeding with the query session PAL Only If D S T set to ...

Page 50: ...rection buttons to select a backup data item in the list To check the data information press the INFORMATION button Select DELETE if you want to delete data and select WRITE if you want to save the data Press CLOSE to exit the backup 6 7 1 2 3 4 5 NEW BACKUP RESERVED DATA MANAGEMENT BACKUP AVI BACKUP LIST BACKUP DATE BACKUP TAG WRITTEN SIZE INFORMATION DELETE WRITE CLOSE NEW BACKUP RESERVED DATA M...

Page 51: ... calendar of the search bar Playback Select a data item to play Press the PLAY button on the bottom The data item will be played Use the lower play bar to adjust the speed or switch the play mode It will turn orange when you place the cursor over it Each time you right click it the screen mode will switch to 1 p 4 split mode in sequence Click it to return to the Single mode and click it again to m...

Page 52: ...ST Displays the list items with the most recent one on the top FARTHEST Displays the list items with the oldest one on the top PAGE LEFT Moves to the leftmost of the log list PAGE RIGHT Moves to the rightmost of the log list Use the direction buttons to move to a search item or simply double click it The selected data item will be played For using the play button bar refer to Playback Page 51 1 2 ...

Page 53: ...he minimum suggested hardware and operating system requirements needed to run the Web Viewer OS Windows XP Professional Windows Vista Home Basic Premium Windows 7 Web Browser MS Explorer 5 5 up 32 bit only CPU Intel Pentium 2 0 GHz Memory 512 MB Monitor High Color 16 bit 1024 768 HDD 50 MB Installation space required Additional HDD space required for recording Recorded file size will vary dependin...

Page 54: ...is the last 6 digits of the MAC address which you can check in SYSTEM SYSTEM MANAGEMENT SYSTEM INFORMATION Page 25 As the administrator you should provide the admin ID and the password As a registered user you should provide the user ID and the password Click Install ActiveX Control Click Install When you see the Security Alert popup due to the Windows firewall function click Unblock to access the...

Page 55: ...English _55 Click Next when IMM4 Codec Setup Wizard appears Click Install Click Finish to exit setup The installation is completed You will see the main screen of the Live Viewer 6 7 8 9 WEB VIEWER ...

Page 56: ...s the screen mode to Single 4 split mode Status Indicates the status of each channel Log Shows the log Reload loads the DVR information again Refresh Time Specify the refresh time Capture Image Captures the selected screen ActiveX Setting Specify the saving path of the recorded or captured screen Print Prints out the current screen Save Saves the Live video that is displayed on the screen Channel ...

Page 57: ...ng between split modes Click the mode switch buttons to switch the screen mode as follows To record video Click The video of the selected channel will be saved in the default saving path of the PC Click ActiveX Setting to display the Settings menu where you can change the default path To print the screen You can print out the Live screen that is currently displayed Click When the Print dialog appe...

Page 58: ...indow appears specify Render and Path for the video or the screen to capture To change the saving path click Save Folder and specify a new path In Windows Vista you can not change the file path Click Save Your changes will be saved To view the status Click the Status tab on the bottom You can check the event occurrence status on each channel of the connected DVR To view the log Click the Log tab o...

Page 59: ...deo c Play Bar Buttons used to control the playback screen Split Screen Switches the screen mode to Single or 4 split mode For more information refer to Live Viewer At a Glance Date Time Select a time range to play Record Properties Set the recording properties as necessary Timeline Shows the playback channel time range and recording properties which you can change Backup Backs up the current vide...

Page 60: ...ay Use the play bar to adjust the play direction and speed as necessary For more information about the play bar refer to Playback Screen Page 22 SEARCH BY EVENT You can search for recording data in the DVR by sorting them by the event Select an event to search by clicking the checkbox Specify the time range in Period Specify the display sequence of the items found Nearest Displays the most recent ...

Page 61: ... Tree Select a desired menu item c Details Detailed information of the selected menu item Ok Cancel Saves or cancels your settings Camera Setting You can configure the settings of the camera that is connected to the DVR From the left menu tree select Camera Make your changes as necessary in details For more information refer to CAMERA Page 27 Click Ok Your changes will be saved 1 2 3 WEB VIEWER b ...

Page 62: ...ected If a detection area is specified the system will detect a motion in that area if it occurs From the left menu tree select Camera Click Motion Click a motion area and drag it up to a desired point The selected cells will turn in a different color which will be specified as a detection area For more information refer to MOTION SENSOR Page 29 Click Ok Your changes will be saved OSD setting You ...

Page 63: ... in details For more information refer to AUDIO and BUZZER Page 33 Click Ok Your changes will be saved Date Time setting From the left menu tree select System Make your changes as necessary in details For more information refer to DATE TIME Page 24 Click Ok Your changes will be saved Management setting From the left menu tree select System Click Management Check the system information in System In...

Page 64: ...or more information refer to RECORDING OPERATION Page 45 Click Ok Your changes will be saved Continuous Motion Recording Setting From the left menu tree select Record Click Continuous Motion Make your changes as necessary in details For more information refer to CONTINUOUS MOTION RECORDING Page 46 Click Ok Your changes will be saved Alarm Recording Setting From the left menu tree select Record Cli...

Page 65: ...ent Setting From the left menu tree select User Click Management Make your changes as necessary in details For more information refer to USER MANAGEMENT Page 34 Click Ok Your changes will be saved User Authority Setting From the left menu tree select User Click Authority Make your changes as necessary in details For more information refer to USER AUTHORITY Page 35 Click Ok Your changes will be sav...

Page 66: ...nges as necessary in details For more information refer to E MAIL Page 38 Click Ok Your changes will be saved HDD Event Setting From the left menu tree select Sensor Click HDD Event Make your changes as necessary in details For more information refer to HDD EVENT Page 40 Click Ok Your changes will be saved Alarm Input Setting From the left menu tree select Sensor Click Alarm Input Make your change...

Page 67: ...t Make your changes as necessary in details For more information refer to BUZZER OUT Page 42 Click Ok Your changes will be saved E mail notification setting From the left menu tree select Sensor Click E mail Notification Make your changes as necessary in details For more information refer to E MAIL NOTIFICATION Page 43 Click Ok Your changes will be saved INFORMATION Click the Information tab to di...

Page 68: ...e Go button http set IP Address Port No Default 8080 Ex http f05bb96 websamsung net 8080 Enter the User name and Password then user can see the Image Default ID admin PW 4321 Touch Refresh button to get the image 1 2 3 4 CH select Frame Rate Manual Max 2 1 0 5 0 3 0 1 In choosing Manual it updates picture DVR Information ...

Page 69: ... H 264 Base profile Audio Codec G 711 64kbps Video REC PB Speed NTSC 120ips 352 240 60ips 704 240 30ips 704 480 PAL 100ips 352 288 50ips 704 288 25ips 704 576 Rec Quality Level Highest High Standard Low Performance Pentaplex Live Playback Recording Network Smart Phone of Video Record 4CH REC Mode Continuous REC Schedule REC Alarm REC Motion REC Time Laps REC NTSC 1 2 3 7 15 30ips PAL 1 2 3 7 13 25...

Page 70: ...otocol DHCP DNS DDNS NTP Backup USB 2 0 I F Front 1 Rear 1 External HDD USB Memory Back up File Format AVI Time Time Adjsutment GMT Time Zone DST NTP Support Other Functions Other Functions S W upgrade USB memory Network Live Network monitoring without HDD Support multi language NTSC ENGLISH FRANÇAIS ESPAÑOL PAL ENGLISH FRANÇAIS DEUTSCH ESPAÑOL ITALIANO TÜRK РУССКИЙ SVENSKA ČESKÝ E MAIL JPEG Alarm...

Page 71: ...st shipment of this product by sending email to help cctv samsung com If you want to obtain the complete Corresponding Source code in the physical medium such as CD ROM the cost of physically performing source distribution might be charged GPL Software linux kernel Sysvinit dosfstoOls wget msmtp busybox cdrtools dvd rw tools iconv smartctl uboot minicom openssl bash lm_sensors LGPL Software glibc ...

Page 72: ...erms of Sections 1 and 2 above on a medium customarily used for software interchange or a b c a Accompany it with a written offer valid for at least three years to give any third party for a charge no more than your cost of physically performing source distribution a complete machine readable copy of the corresponding source code to be distributed under the terms of Sections 1 and 2 above on a med...

Page 73: ... 9 The Free Software Foundation may publish revised and or new versions of the General Public License from time to time Such new versions will be similar in spirit to the present version but may differ in detail to address new problems or concerns Each version is given a distinguishing version number If the Program specifies a version number of this License which applies to it and any later versio...

Page 74: ...your program into proprietary programs If your program is a subroutine library you may consider it more useful to permit linking proprietary applications with the library If this is what you want to do use the GNU Lesser General Public License instead of this License GNU GENERAL PUBLIC LICENSE Version 3 29 June 2007 Copyright 2007 Free Software Foundation Inc http fsf org Everyone is permitted to ...

Page 75: ... with no transfer of a copy is not conveying An interactive user interface displays Appropriate Legal Notices to the extent that it includes a convenient and prominently visible feature that 1 displays an appropriate copyright notice and 2 tells the user that there is no warranty for the work except to the extent that warranties are provided that licensees may convey the work under this License an...

Page 76: ...tion 7 apply to the code keep intact all notices of the absence of any warranty and give all recipients a copy of this License along with the Program You may charge any price or no price for each copy that you convey and you may offer support or warranty protection for a fee 5 Conveying Modified Source Versions You may convey a work based on the Program or the modifications to produce it from the ...

Page 77: ...represent the only significant mode of use of the product c d e Installation Information for a User Product means any methods procedures authorization keys or other information required to install and execute modified versions of a covered work in that User Product from a modified version of its Corresponding Source The information must suffice to ensure that the continued functioning of the modif...

Page 78: ...se then your license from a particular copyright holder is reinstated a provisionally unless and until the copyright holder explicitly and finally terminates your license and b permanently if the copyright holder fails to notify you of the violation by some reasonable means prior to 60 days after the cessation Moreover your license from a particular copyright holder is reinstated permanently if th...

Page 79: ... license you grant is automatically extended to all recipients of the covered work and works based on it A patent license is discriminatory if it does not include within the scope of its coverage prohibits the exercise of or is conditioned on the non exercise of one or more of the rights that are specifically granted under this License You may not convey a covered work if you are a party to an arr...

Page 80: ...turn for a fee END OF TERMS AND CONDITIONS GNU LESSER GENERAL PUBLIC LICENSE Version 2 1 February 1999 Copyright C 1991 1999 Free Software Foundation Inc 51 Franklin Street Fifth Floor Boston MA 02110 1301 USA Everyone is permitted to copy and distribute verbatim copies of this license document but changing it is not allowed This is the first released version of the Lesser GPL It also counts as th...

Page 81: ...ariant the GNU Linux operating system Although the Lesser General Public License is Less protective of the users freedom it does ensure that the user of a program that is linked with the Library has the freedom and the wherewithal to run that program using a modified version of the Library The precise terms and conditions for copying distribution and modification follow Pay close attention to the ...

Page 82: ...fy that version instead if you wish Do not make any other change in these notices a b c d Once this change is made in a given copy it is irreversible for that copy so the ordinary GNU General Public License applies to all subsequent copies and derivative works made from that copy This option is useful when you wish to copy part of the code of the Library into a program that is not a library 4 You ...

Page 83: ... the Library together in an executable that you distribute a b c d e 7 You may place library facilities that are a work based on the Library side by side in a single library together with other library facilities not covered by this License and distribute such a combined library provided that the separate distribution of the work based on the Library and of the other library facilities is otherwis...

Page 84: ...serving the free status of all derivatives of our free software and of promoting the sharing and reuse of software generally NO WARRANTY 15 BECAUSE THE LIBRARY IS LICENSED FREE OF CHARGE THERE IS NO WARRANTY FOR THE LIBRARY TO THE EXTENT PERMITTED BY APPLICABLE LAW EXCEPT WHEN OTHERWISE STATED IN WRITING THE COPYRIGHT HOLDERS AND OR OTHER PARTIES PROVIDE THE LIBRARY AS IS WITHOUT WARRANTY OF ANY K...

Page 85: ...G NEGLIGENCE OR OTHERWISE ARISING IN ANY WAY OUT OF THE USE OF THIS SOFTWARE EVEN IF ADVISED OF THE POSSIBILITY OF SUCH DAMAGE This product includes cryptographic software written by Eric Young eay cryptsoft com This product includes software written by Tim Hudson tjh cryptsoft com Original SSLeay License Copyright C 1995 1998 Eric Young eay cryptsoft com All rights reserved This package is an SSL...

Page 86: ... OR OTHERWISE ARISING IN ANY WAY OUT OF THE USE OF THIS SOFTWARE EVEN IF ADVISED OF THE POSSIBILITY OF SUCH DAMAGE The licence and distribution terms for any publically available version or derivative of this code cannot be changed i e this code cannot simply be copied and put under another distribution licence including the GNU Public Licence ...

Page 87: ...environmentally safe recycling Business users should contact their supplier and check the terms and conditions of the purchase contract This product and its electronic accessories should not be mixed with other commercial wastes for disposal Correct disposal of batteries in this product Applicable in the European Union and other European countries with separate battery return systems This marking ...

Page 88: ...in this document but no formal guarantee shall be provided Use of this document and the subsequent results shall be entirely on the user s own responsibility Samsung Techwin reserves the right to change the contents of this document without prior notice Warranty If the product does not operate properly in normal conditions please let us know Samsung Techwin will resolve the problem for free of cha...

Page 89: ...SUNG TECHWIN AMERICA Inc 1480 Charles Willard St Carson CA 90746 UNITED STATES Tol Free 1 877 213 1222 FAX 1 310 632 2195 www samsungcctvusa com SAMSUNG TECHWIN EUROPE LTD Samsung House 1000 Hillswood Drive Hillswood Business Park Chertsey Surrey UNITED KINGDOM KT16 OPS TEL 44 1932 45 5300 FAX 44 1932 45 5325 www samsungtechwin com www samsungsecurity com www samsungipolis com ...

Reviews: