8 English
Maint
enanc
e
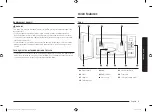
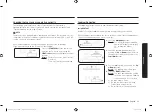
Installation site
10 cm
behind
20 cm
above
10 cm on
the side
85 cm of the
floor
•
Select a flat, level surface approx. 85 cm
above the floor. The surface must support
the weight of the oven.
•
Secure room for ventilation, at least 10 cm
from the rear wall and both sides, and
20 cm from above.
•
Do not install the oven in hot or damp
surroundings, such as next to other
microwave ovens or radiators.
•
Conform to the power supply
specifications of this oven. Use only
approved extension cables if you need to
use.
•
Wipe the interior and the door seal with a
damp cloth before using your oven for the
first time.
Turntable
Remove all packing materials inside the
oven. Install the roller ring and turntable.
Check that the turntable rotates freely.
Maintenance
Cleaning
Clean the oven regularly to prevent impurities from building up on or inside the
oven. Also pay special attention to the door, door sealing, and turntable and roller
ring (applicable models only).
If the door won’t open or close smoothly, first check if the door seals have built up
impurities. Use a soft cloth in soapy water to clean both the inner and outer sides
of the oven. Rinse and dry well.
To remove stubborn impurities with bad smells from inside the oven
1.
With an empty oven, put a cup of diluted lemon juice on the centre of the
turntable.
2.
Heat the oven for 10 minutes at max power.
3.
When the cycle is complete, wait until the oven cools down. Then, open the door
and clean the cooking chamber.
To clean inside swing-heater models
To clean the upper area of the cooking
chamber, lower the top heating element by
45° as shown. This will help clean the upper
area. When done, reposition the top heating
element.
CAUTION
•
Keep the door and door sealing clean and ensure the door opens and closes
smoothly. Otherwise, the oven’s lifecycle may be shortened.
•
Take caution not to spill water into the oven vents.
•
Do not use any abrasive or chemical substances for cleaning.
•
After each use of the oven, use a mild detergent to clean the cooking chamber
after waiting for the oven to cool down.
Installation
MS23K3513AS_OL_DE68-04431M-02_BG+HR+MK+RO+SQ+SR+SL+EN.indb 8
5/21/2018 4:38:12 PM
Summary of Contents for MS23K3513 series
Page 26: ...Бележка MS23K3513AS_OL_DE68 04431M 02_BG HR MK RO SQ SR SL EN indb 26 5 21 2018 4 37 15 PM ...
Page 27: ...Бележка MS23K3513AS_OL_DE68 04431M 02_BG HR MK RO SQ SR SL EN indb 27 5 21 2018 4 37 15 PM ...
Page 54: ...Memorandum MS23K3513AS_OL_DE68 04431M 02_BG HR MK RO SQ SR SL EN indb 26 5 21 2018 4 37 23 PM ...
Page 55: ...Memorandum MS23K3513AS_OL_DE68 04431M 02_BG HR MK RO SQ SR SL EN indb 27 5 21 2018 4 37 23 PM ...
Page 82: ...Белешки MS23K3513AS_OL_DE68 04431M 02_BG HR MK RO SQ SR SL EN indb 26 5 21 2018 4 37 32 PM ...
Page 83: ...Белешки MS23K3513AS_OL_DE68 04431M 02_BG HR MK RO SQ SR SL EN indb 27 5 21 2018 4 37 32 PM ...
Page 110: ...Notă MS23K3513AS_OL_DE68 04431M 02_BG HR MK RO SQ SR SL EN indb 26 5 21 2018 4 37 42 PM ...
Page 111: ...Notă MS23K3513AS_OL_DE68 04431M 02_BG HR MK RO SQ SR SL EN indb 27 5 21 2018 4 37 42 PM ...
Page 138: ...Shënime MS23K3513AS_OL_DE68 04431M 02_BG HR MK RO SQ SR SL EN indb 26 5 21 2018 4 37 51 PM ...
Page 139: ...Shënime MS23K3513AS_OL_DE68 04431M 02_BG HR MK RO SQ SR SL EN indb 27 5 21 2018 4 37 51 PM ...
Page 166: ...Beleška MS23K3513AS_OL_DE68 04431M 02_BG HR MK RO SQ SR SL EN indb 26 5 21 2018 4 38 00 PM ...
Page 167: ...Beleška MS23K3513AS_OL_DE68 04431M 02_BG HR MK RO SQ SR SL EN indb 27 5 21 2018 4 38 00 PM ...
Page 194: ...Beležke MS23K3513AS_OL_DE68 04431M 02_BG HR MK RO SQ SR SL EN indb 26 5 21 2018 4 38 09 PM ...
Page 195: ...Beležke MS23K3513AS_OL_DE68 04431M 02_BG HR MK RO SQ SR SL EN indb 27 5 21 2018 4 38 09 PM ...
Page 222: ...Memo MS23K3513AS_OL_DE68 04431M 02_BG HR MK RO SQ SR SL EN indb 26 5 21 2018 4 38 17 PM ...
Page 223: ...Memo MS23K3513AS_OL_DE68 04431M 02_BG HR MK RO SQ SR SL EN indb 27 5 21 2018 4 38 17 PM ...

