background image

 trouBlEsHootiNG 

No operation can be performed with the remote control.


y

Check the batteries in the remote control. They may need replacing.


y

Operate the remote control at a distance of no more than 6.1 m.


y

Remove the batteries and hold down one or more buttons for several minutes to drain the microprocessor 
inside the remote control to reset it. Reinstall the batteries and try to operate the remote control again.

Play mode differs from the [Media] Menu selection.


y

Some of the functions selected in the 

[Media]

 Menu may not work properly if the content file is not encoded 

with the corresponding function.

The screen aspect ratio cannot be changed.


y

This is not a problem with the STB.

No sound comes out from TV or audio equipment.


y

If the cable is connected normally, check if the 

MUTE

 function is enabled. If the 

MUTE

 function is enabled, 

press the 

MUTE

 button on the remote control to disable it.

Blank screen, No HDMI output or No SCART output.


y

Check if your TV set is power ON


y

Check if your STB is power ON


y

Check the connection between the TV input port set and the STB output port.


y

Check if your TV input source is correct


-

When you use HDMI, then the TV input source must be [HDMI] or the connected [HDMI (port No)] if 
there are one more HDMI input ports.


-

When you use SCART, then the TV input source must be [AV]. The use of SCART isn’t recommended due to 
the low resolution.


y

If the HDMI output is set to a resolution your TV cannot support (for example, 1080p), you cannot see a 
picture on your TV.


y

Press the 

MENU

 button and then select 

[Auto] 

or the TV possible resolution option in 

[Settings] 

>

 [Picture] 

>

 [Screen resolution]

 in another TV which supports the setup resolution on the STB(for example, 1080p).


-

When you select 

[Auto]

, the maximum resolution is set up available on TV.


y

Press the 

MENU

 button and then select 

[Settings] 

>

 [System]

 > 

[Reset to default settings]

 in another TV 

which supports 1080p. When the factory default settings are restored, all stored user data is deleted.

Forgot password


y

Call the service center of Samsung Germany. 


-

Samsung Germany Call center: 01806 7267864

A

ppendix

If you experience other problems.


y

Go to the table of contents and find the section of the user manual that contains the explanations regarding 
the current problem, and follow the procedure once again.


y

If the problem still cannot be solved, please contact your nearest Samsung authorized service center.


-

Samsung Germany Call center: 01806 7267864

Abnormal HDMI output screen.


y

If random noise appears on the screen, it means that TV does not support HDCP (High-bandwidth Digital 
Content Protection).


y

Plug Out/In the TV and the STB again.

First installation screen is shown again after performing the [Reset to default settings].


y

It is a correct operation. When you perform the 

[Reset to default settings]

 in 

[Settings] 

>

 [System]

, All 

settings including the PIN will revert to the factory settings. When the factory default settings are restored, 
all stored user data is deleted.

During the booting, ‘No signal’ screen keeps over one minute.


y

Check if your STB is power ON


y

Check the connection between the TV input port set and the STB output port.


y

Plug out the STB for over 2 seconds and then plug it in.

64


Summary of Contents for gx-sm550sh

Page 1: ...re users safety and to prevent property losses Please read this document carefully for proper use Ed 03 USER MANUAL GX SM550SH Samsung Electronics UK Ltd Euro QA Lab Blackbushe Business Park Saxony Way Yateley Hampshire GU46 6GG United Kingdom ...

Page 2: ...government office for details of where and how they can take these items for environmentally safe recycling Business users should contact their supplier and check the terms and conditions of the purchase contract This product and its electronic accessories should not be mixed with other commercial wastes for disposal This guide may be changed for product improvement standardization or other techni...

Page 3: ...OR ADJUSTMENTS OR PERFORMANCE OF PROCEDURES OTHER THAN THOSE SPECIFIED HEREIN MAY RESULT IN HAZARDOUS RADIATION EXPOSURE DO NOT OPEN COVERS AND DO NsOT REPAIR YOURSELF REFER SERVICING TO QUALIFIED PERSONNEL This product satisfies CE regulations when shielded cables and connectors are used to connect the unit to other equipment To prevent electromagnetic interference with electric appliances such a...

Page 4: ...n it is on Do not use or store the STB in hot cold damp or dusty places Do not block the ventilation holes of the STB Leave a space of at least 5cm around all sides Never place the STB on soft furnishings or carpets Do not put anything on the STB which might spill liquid into it or place it in an environment where it may be subject to moisture or rain Do not place the STB on top of other powered e...

Page 5: ...ver with Optical input 16 Connecting to a Network Router 17 Wired Network 17 Connecting the Power 18 Settings 19 The Setup Procedure 19 Run the first installation procedure 19 Scanning 21 Software Upgrade 23 Main Menu 24 Accessing the Settings Screen 25 Remote Control 25 Channel 26 ASTRA channel list update 26 Auto tune 26 Manual tune 27 Installation type 27 Guide timeline 30 HbbTV 30 Sound 31 Pre...

Page 6: ...HDD USB storage settings 35 Media renderer 35 Media renderer name 36 UPnP blocked devices 36 Smart card 37 Smart card information 37 Change Smartcard PIN Code 37 System 38 Product information 38 Auto Turn off 38 Timeout to power off 38 Network settings 39 Reset to default settings 40 Software upgrade 41 Change STB PIN Code 43 Open source licenses 43 Using the Basic Functions 44 Watching TV Channel...

Page 7: ...select all deselect all timers 57 To delete the timer 58 To sort timers 58 To add timer 58 To edit timer 58 Media Play 59 Playing Files on a USB Device 59 Controlling Playback 60 To delete the files 60 To copy the files 60 To move the files 60 To create a new folder 61 To sort the files 61 To select all the files 61 To deselect all the files 61 Using the DLNA 62 Appendix 64 Troubleshooting 64 Spec...

Page 8: ...e Allows you to play media files using a USB storage device Convenient recording function You can record TV or radio programs on an external USB storage device by pressing the REC button on the remote control or scheduling recording of programs via the EPG for instance Dolby Digital Plus Sound Produces realistic digital sound by connecting the product to a STB amplifier through the HDMI port which...

Page 9: ... which can result as insufficient power supply for the drives after connecting too many devices at once to passive HUB Recommended is usage of the HUB with external power supply There is no limitation neither size nor speed for the drive to be used in media library to store pictures or music Nevertheless there are minimum requirements to assign device to PVR functionality This minimum requirements...

Page 10: ...ote Control Batteries for Remote Control AAA Size Power Adapter SCART Gender Cable HD Supplement User Manual Smart Card You can purchase the cable accessories not supplied with the product from a local Samsung dealer Not supplied cable HDMI cable Coaxial cable LAN cable Optical cable 08 ...

Page 11: ...product on Rear Panel This section describes the names and functions of the ports on the rear panel 6 EXT TV 3 OPTICAL OUT 7 DC POWER 2 ANT IN 1 Smart Card Slot 5 LAN 4 HDMI OUT 1 To insert the Smart Card 2 To connect the Satellite antenna cable from your cable system 3 A digital audio output port which is connected to an audio system with an OPTICAL OUT port with an optical cable 4 To connect to ...

Page 12: ... for current channel Rewind Rewind the program recording Go back 24 hours Play Pause Play and pause the program recording Change to Time Shift mode Stop Stop the playback or recording Forward Fast forward the program Move forward 24 hours in EPG Put the STB in stand by mode no signal to TV Return to the previous menu To execute as corresponding colors shown on the menu Used to select an audio trac...

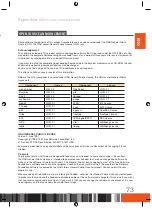
Page 13: ...n your television on 2 Point the remote control towards the television 3 Press the TV button to set the remote to TV mode 4 Press and hold the TV button and then enter the two figure code in the table to the right that corresponds to the brand of your television by pressing the appropriate number buttons If your television is compatible with the remote control it will turn off The remote is now pr...

Page 14: ...06 19 20 21 22 78 LOEWE TV 06 69 LOEWE OPTA TV 06 57 MAGNAVOX TV 40 METZ TV 57 MITSUBISHI TV 06 48 62 65 MIVAR TV 52 77 NEC TV 83 NEWSAN TV 68 NOBLEX TV 66 Brand Code NOKIA TV 74 NORDMENDE TV 72 73 75 PANASONIC TV 53 54 74 75 PHILIPS TV 06 55 56 57 PHONOLA TV 06 56 57 PIONEER TV 58 59 73 74 RADIOLA TV 06 56 RADIOMARELLI TV 57 RCA TV 45 46 REX TV 74 SABA TV 57 72 73 74 75 SALORA TV 74 SANYO TV 41 4...

Page 15: ...with the EXT TV Port Scart Connection This section describes how to connect to a TV with Scart cable TV SCART Gender Cable 1 Connect the small end of the Scart cable gender supplied to the EXT TV port at the rear of your STB 2 Connect the large end scart jack of the Scart cable gender to your TV using an scart cable not supplied 3 Turn on the product and TV 4 Press the input selector on your TV re...

Page 16: ... other connections When you change connections turn off all devices before you start An HDMI cable outputs digital video audio so you don t need to connect an audio cable If you use an HDMI to DVI cable to connect to your display device you must also connect the Digital Audio Out on the product to an audio system to hear audio Depending on your TV certain HDMI output resolutions may not work Pleas...

Page 17: ...e control or to control the TV using the STB remote control in the case of the automatic power on function Supported functions are Automatic power off when the Standby button is pressed on the TV the TV goes to standby mode together with the STB Automatic power on when the Standby button is pressed on the STB the STB wakes up from standby mode together with the TV Remote control command sending th...

Page 18: ... power cord until you have made all the other connections When you change the connections turn off all devices before you start 3 Press the input selectors of the connected audio system and TV until the video signal from the product appears on your TV and you hear the audio signal through your audio system Method 1 Connecting to an HDMI supported AV receiver Use an HDMI cable not included Method 2...

Page 19: ...ice Router Broadband service with integrated router Broadband modem Internet access to Samsung s software update server may not be allowed depending on the router you use or your ISP s policy For more information contact your ISP Internet Service Provider DSL users please use a router to make a network connection To use the Samsung Link function with your PC you must connect your PC to your networ...

Page 20: ...e first installation screen To turn off the product press the Power button on your remote control To turn it on press the Power button again Power Adapter If power is disconnected from the STB while it is operating normally the product will turn on automatically when power is reconnected If the STB has been turned off or left unplugged for more than 1 week the device may lose authorization for sat...

Page 21: ... on automatically and the first installation screen appears If the installation screen does not appear change the TV s source setting to the source you ve connected the product to for example HDMI 1 HDMI 2 For instructions see your TV s user s manual 3 Use the buttons to select an installation mode and then press the v button Auto Manuelles Select Weiter Next and then press the v button on the rem...

Page 22: ...the v button Select Next and then press the v button on the remote control For more information about quick scanning see Quick Scanning on page 21 Auto Search This option will linearly scan all transponders on the Astra and HotBird satellites one by one For advanced configuration of SatCR or satellite dish with positioned motor please skip this step and configure the settings manually When you pre...

Page 23: ...sponder 1 111 12 60375 GHz Horizontal 22000 KS s 5 6 DVB S QPSK 2 108 12 55150 GHz Vertical 22000 KS s 5 6 DVB S QPSK 3 57 10 83225 GHz Horizontal 22000 KS s 3 2 DVB S2 8PSK If the STB is in the SatCR environment then there can t be any scanned channel In that case you have to upgrade the software according to the USB update way NOT the OTA update way The USB update is described in Settings System...

Page 24: ...creen appears with showing the numbers of the TV and radio channels found Select Save and press the v button to confirm Auto scanning can take several minutes depending on the satellite selected Manual Scanning Manual scanning allows the user to scan particular transponders Predefined transponder parameters may be used or the transponders to be scanned may be set manually 22 ...

Page 25: ...r STB with the latest software to use all the functionalities The detail upgrade way is described in Settings System Software upgrade 2 SatCR environment users have to do the USB Update way for the first time Refer to page 42 to do the software upgrade by the USB Update way 23 ...

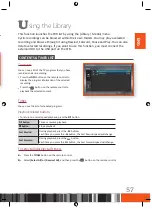
Page 26: ...channels memorized See page 53 3 Library Provides access to and allows management of the list of recorded material See page 57 4 Media Plays videos photos or music content from an external USB storage device See page 59 5 Info Displays information about the channel currently being watched See page 46 6 Settings Set various functions to suit your personal preferences See pages 25 43 24 ...

Page 27: ...ase refer to the remote control illustration and the Settings Control Button table in the below Remote Control 1 2 3 4 Settings Control Button Table 1 MENU Button Press to show the Main menu 2 RETURN Button Return to the previous menu 3 v Enter DIRECTION Buttons Press the buttons to move the cursor or select an item Press the v button to activate the currently selected item or confirm a setting 4 ...

Page 28: ...ase select Save and press the v button to save them If a channel list has already been scanned you can choose the Update option to update the channel list Updating of the channel list is also performing automatically when the STB is booted and when the STB wakes up from the standby mode Auto tune When you select this option the STB automatically scans and indexes all channels received through the ...

Page 29: ...press the v button to confirm Installation type Your product allows controlling the position of the satellite positioner You can choose one of the two possible installation types LNB or SATCR Changing between those installation types will cause removing all services and Favorite Lists You will be asked to confirm whether this operation should be proceeded or not 1 If the Installation type option i...

Page 30: ...tings or Installer settings Installer settings These settings should be done while mounting the antenna with a motor and shouldn t be changed during normal use It is to set limits on the positioner motor if the satellite dish can t move over whole driver angle 180 degrees These limits are important because if on the way of the dish from one side you have the wall and someone remove the limits from...

Page 31: ... is set to SATCR additional Signal Cable settings option will appear in Channel menu Signal Cable settings SatCR allows the connection up to 8 STBs via single coaxial cable There are 4 and 8 slot devices available on the market Each device must have assigned to unique slot number and its corresponding frequency Splitters must be used to connect STBs to common coaxial cable SatCRs support switching...

Page 32: ...e program list on a channel guide screen The longer the interval the more programs can be checked on a single screen HbbTV You can launch a Hybrid Broadcast Broadband TV interactive service while watching a TV program To use an HbbTV service you have to select On for this option and connect the STB to the internet 30 ...

Page 33: ... be controlled by the STB If this setting is set to On you can control the volume but the digital audio output becomes available in PCM format instead Audio primary You can change the audio language other than your preferred Audio language Audio secondary You can change the language for the Audio secondary which is available if an Audio secondary service is provided by the program provider Audio p...

Page 34: ... mode is not recognized automatically although service is in the 3D format you can force this mode manually SBS 3D Convert SIDE BY SIDE 3D format to the 3D view SBS 2D Convert SIDE BY SIDE 3D format to the 2D view TB 3D Convert TOP BOTTOM 3D format to the 3D view TB 2D Convert TOP BOTTOM 3D format to the 2D view If you use one of the forced 3D formats not Auto you should remember to set 3D mode to...

Page 35: ...on Refer to the above table of HDMI video conversion TV Scart SCART analogue output may provide CVBS signal only or both CVBS and RGB Generally RGB signal provides better quality Setting this option does not affect HDMI digital output Information banner timeout This allows you to change the display time for the service information that appears at the top of the screen when you change channels or p...

Page 36: ...s allows you to enable disable subtitles or change to Hearing Impaired Subtitles primary This allows you to change the primary language for the subtitles Subtitles secondary This allows you to change the secondary language for the subtitles Subtitles are available when a secondary language service is provided by the program provider Text subtitle encoding This allows you to choose the subtitle enc...

Page 37: ...d in advance before your scheduled recording should be started Final guard time This allows you to set how many minutes will be recorded more after your scheduled recording should be ended HDD USB storage settings When a USB Hard Disk Drive is not connected this option is not available When connecting a USB HDD it is possible to choose the option and to get information about used and free space an...

Page 38: ...ddress of STB This name can be changed via Settings menu Library Media Renderer name UPnP blocked devices The list of Media Controllers that were blocked by is shown When one Media Controller Tab Phone or Other application tries to render contents in STB a banner is shown if you allow it If not then the device is added to the list of the blocked devices 36 ...

Page 39: ... information When you select this option the STB displays the information about inserted Smart Card Change Smartcard PIN Code This option allows changing of an inserted Nagravision Smart Card s PIN code The Smartcard s PIN Code is not the same as the STB s PIN code and is not set to 0000 when performing a reset to default settings 37 ...

Page 40: ...me the product saves energy by turning off the STB automatically If the STB has been turned off or left unplugged for more than 1 week the device may lose authorization for satellite TV services To restore satellite TV services please contact your satellite TV service provider Timeout to power off This lets you set the STB go into the deep standby mode automatically from the standby mode The deep ...

Page 41: ...elect Settings System and then press the button 3 Select Network settings and then press the button 4 Select Automatic in the Network Settings screen 5 Select OK and then press the v button The STB detects the wired connection verifies the network connection and then connects to the network Manual If you have a static IP address or the Automatic procedure does not work you ll need to set the Netwo...

Page 42: ...mber buttons 5 Select Reset to defaults and then press the v button to confirm 6 When the factory reset is completed the product will restart and the first installation procedure starts again on the screen You must enter your 4 digit PIN by using the number buttons on the remote control to access the Reset function If you have not set a PIN use the default PIN 0000 Please note that once you perfor...

Page 43: ...pdate the image from USB if connected or from the satellite OTA Update You can use manual update to update the software through your network connection 1 Press the MENU button on the remote control 2 Select Settings System Software upgrade and then press the v button 3 Choose OTA mode by pressing the button 4 Select Search and press the v button 5 A Searching for new software window appears on the...

Page 44: ...ond pop up to download and save the firmware file to your PC 8 Copy the files LoaderImage bin and MainAppImage bin to the main directory of your USB flash drive 9 Insert the USB flash drive into the USB port of the STB 10 In the STB s menu go to Settings System Software upgrade 11 Select USB in the mode and select Search and then press the v button on the remote control 12 The STB searches for the...

Page 45: ...en press the button 3 Select Change STB PIN Code and then press the button 4 Under Current STB PIN code enter the old PIN by using the number buttons on your remote 5 Under New STB PIN code enter the new PIN by using the number buttons 6 Under Confirm new STB PIN code enter the new PIN again 7 Select Save and then press the v button on your remote When the PIN is changed successfully then PIN code...

Page 46: ...button Press this button to display detailed channel information 5 TOOLS button Press this button to use additional options 6 AUDIO button Lets you select another audio track in a different language if the TV program provides multi track sound 7 SUB button Lets you turn on off DVB or TXT subtitles in a different language if the TV program provides subtitle tracks 8 TEXT button Press this button to...

Page 47: ... button to disable the audio Press the MUTE button again or VOLUME buttons in order to enable the audio Audio language You can select another audio track in a different language available for current channel Press the AUDIO button to display audio language banner Use the button to select preferred language and then press the v button Press the AUDIO button again or EXIT button to close the banner ...

Page 48: ...data on signal strength and quality Channel Information You can see the channel info banner by pressing once the INFO button while watching a program You can see the next programs on current channel and another channel by using the buttons You can check the current program s status channel title and broadcast time Start time Program time Current program progress Channel change End time Current tim...

Page 49: ...igital Sound Lock channel Dolby Digital Plus Sound HD channel Audio description SD channel DVB Subtitle Parental Lock Digital text Watch timer New recording Record Timer Video aspect ratio Subtitle available Audio stereo Audio mono Recording in progress AAC sound Video source resolution AAC sound Digital Theater Systems Multi Sound 47 ...

Page 50: ... see the synopsis of current watching program by pressing the INFO button twice Press the EXIT button to close the banner Signal Information You can see the signal information by pressing the INFO button three times Press the INFO button again or EXIT button to close the banner d T t 48 ...

Page 51: ...orward one day by using yellow or blue button Search by Day Time Category Search Text Genre using the TOOLS button Press the EXIT button to return to the program you have been watching To set a reminder or recording highlight the upcoming program that interests you and press the v button You can also set a recording by highlighting a program and pressing the REC button You can view the list of sch...

Page 52: ...ograms You can search program by selecting the appropriate search options Day Time Genre Category Search text 1 Press the TOOLS button on the remote control 2 Select the desired option and set it as you want If you press the v button on the Search Text menu you can search for program by entering words or characters by using the virtual keyboard popped up 3 Select OK and then press the v button 4 T...

Page 53: ...rd functionality may be blocked or its speed may be limited by the content provider s request In such case proper info banner will appear To go back to the live program press the button You can increase the rewind fast forward speed by pressing the or button again You can use the or button to jump backwards or forwards When this mode is on pressing INFO button shows the channel information Current...

Page 54: ... red icon in the information banner and the channel list If the program is to be broadcasted at a later time or day the STB will automatically book it and will record it when it is broadcasted You can see the recorded programs list in the Library List by pressing the MENU button and select the Library category Press the button or REC button in the program you are recording to stop video recording ...

Page 55: ...ngs of ASTRA 19 2 TV may differ from the locations of installed ASTRA satellite antenna Locking channels You can lock a specific channel Once locked you must enter your PIN code in order to view those locked channels Select a channel in the Channel list and then press the Red button on the remote control to lock a channel Favourites list You can designate frequently watched channels as Favourites ...

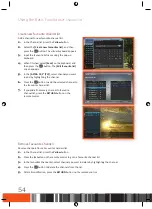
Page 56: ... channel you want to add by highlighting the channel 6 Press the v button to add the selected channel to the favourite channel list 7 If you add all necessary channel to favourite channel list press the RETURN button on the remote control Remove Favourite Channels Remove channels from a Favourite channels list 1 In the Channel list press the Yellow button 2 Press the button on the remote control t...

Page 57: ...st ENG Sorting channel list Sort the channels in the Channel list You can order the list by name or number 1 In the Channel list press the TOOLS button on the remote control 2 Select the sort option you want and then press the v button 55 ...

Page 58: ...service you can launch it at any time by pressing the RED button on the remote control while watching a TV program If an HbbTV Hybrid Broadcast Broadband TV option is supported by the program you can start HbbTV by using the RED button on the remote control when HbbTV supporting program is displayed on screen To use the HbbTV service connect your STB to the internet Refer to Page 17 CONNECTING TO ...

Page 59: ...y the program information of the selected recording Press the v button on the remote control to playback the selected content Timer You can see the list of scheduled programs Playback related buttons To return to normal speed playback press the p button p button Pause or resume playback button Stops playback Fast Rewind During playback press the button Each time you press the button the Fast Rewin...

Page 60: ...h the v button on the remote control To add timer 1 Press the TOOLS button on the remote control 2 Select Add timer and then press the v button on the remote control 3 You can now select the Type Bouquet channel Date Start Stop Frequency Initial guard time Final guard time and title of the new timer To edit timer 1 Select a timer by pressing the Yellow button on the remote control 2 Press the TOOL...

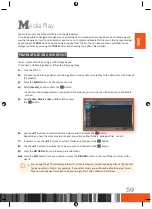
Page 61: ...edia and then press the v button When the USB storage device is connected to the product you can see the USB directory on the Media screen 5 Select Photo Music Video or All and then press the v button 6 Use the buttons to select the desired device and then press the v button Depending on how the contents are arranged you will see either folders individual files or both 7 If necessary use the butto...

Page 62: ... Yellow button on the remote control 2 Press the TOOLS button on the remote control 3 Select Delete on the pop up window 4 Confirm with the v button on the remote control To copy the files 1 Select files by pressing the Yellow button on the remote control 2 Press the TOOLS button on the remote control 3 Select Copy on the pop up window Press the Green button to create a new folder Press the Red bu...

Page 63: ... TOOLS button on the remote control 2 Select Sort on the pop up window and then press the v button on the remote control 3 Choose the sorting mode and the sorting order you want to do 4 Confirm with the v button on the remote control To select all the files 1 Press the TOOLS button on the remote control 2 Select Select all on the pop up window and then press the v button on the remote control To d...

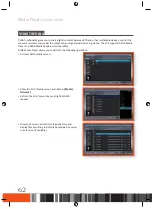
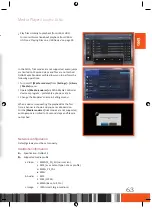
Page 64: ...TB supports DLNA Media Player and DLNA Media Renderer device profiles DLNA Media Player allows you to perform the following operations Discover DLNA media servers Show the list of media servers available in Media Network Refresh the list of servers by sending M SEARCH request Browse all servers as classic storage directory and display files according to DLNA type provided by server or extension if...

Page 65: ...NA Media Controller device or program preferably a phone or a tab Change the Renderer s name in Settings menu When a device is requesting the playback for the first time a banner is shown and you can make decision For the Media renderer trick modes are not supported audio jumps are limited to 15 second steps and files are not cached Network configuration Default gateway must be set properly Additi...

Page 66: ...put y y Check if your TV set is power ON y y Check if your STB is power ON y y Check the connection between the TV input port set and the STB output port y y Check if your TV input source is correct When you use HDMI then the TV input source must be HDMI or the connected HDMI port No if there are one more HDMI input ports When you use SCART then the TV input source must be AV The use of SCART isn ...

Page 67: ...rt HDCP High bandwidth Digital Content Protection y y Plug Out In the TV and the STB again First installation screen is shown again after performing the Reset to default settings y y It is a correct operation When you perform the Reset to default settings in Settings System All settings including the PIN will revert to the factory settings When the factory default settings are restored all stored ...

Page 68: ...eo Output port Audio Video 1 x HDMI 1 4 USB port USB 2 0 Host x 1 1A Power Power Consumption Power On Max 25 W Power Off 0 5 W Power Rating DC 14 V 1 786 A Network Wired LAN RJ 45 Ethernet Port x 1 100M BASE TX Satellite RF Input Tuning Range 950 MHz to 2150 MHz Input Signal Level 25 dBm to 65 dBm Symbol Rates 1 45 MS s RF Demodulation DVB S QPSK DVB S2 QPSK 8PSK DiSEqC Support DiSEqC 1 2 LNB Curr...

Page 69: ...LY OR IMPLIEDLY FOR ANY PURPOSE SAMSUNG EXPRESSLY DISCLAIMS ANY IMPLIED WARRANTIES INCLUDING BUT NOT LIMITED TO WARRANTIES OF MERCHANTABILITY OR FITNESS FOR A PARTICULAR PURPOSE SAMSUNG DOES NOT GUARANTEE THE ACCURACY VALIDITY TIMELINESS LEGALITY OR COMPLETENESS OF ANY CONTENT OR SERVICE MADE AVAILABLE THROUGH THIS DEVICE AND UNDER NO CIRCUMSTANCES INCLUDING NEGLIGENCE SHALL SAMSUNG BE LIABLE WHET...

Page 70: ...gitalempfänger das Wiedergabegerät z B TV und die Programmangebote sind ausdrücklich nicht Leistungsgegenstand Zertifizierte Digitalempfänger sind im Handel erhältlich Ihre Installation obliegt dem Nutzer Im Falle technischer oder allgemeiner Probleme mit dem Digitalempfänger liegt die Verantwortung für den Kundenservice beim Hersteller des Digitalempfängers 1 6 Die Anzahl und Zusammenstellung der...

Page 71: ...Zeitraum einer bestehenden Freischaltung verkürzen Der Erwerb einer HD Karte beinhaltet jedoch nicht den Anspruch auf Verlängerung derselben 3 5 Die Programmangebote und Services Dritter und deren Empfang bzw Nutzung können gesonderte Kosten auslösen für die der Nutzer selbst verantwortlich ist 4 Beachtung von Urheberrechten 4 1 Die HD Software und die HD Karte sind rechtlich geschützt Soweit Prog...

Page 72: ...ht der Verstoß so schwer wiegt dass HDP eine Fortsetzung des Nutzungsverhältnisses nicht zumutbar ist 7 5 Bei einem auf dem Verschulden des Nutzers beruhenden Nutzungsausschluss gemäß Ziffer 7 3 bleibt der Nutzer auch für den Zeitraum des Nutzungsausschlusses und der Leistungsunterbrechung zur Zahlung der Vergütung verpflichtet 8 Gewährleistung 8 1 HDP erbringt Leistungen unter Inanspruchnahme von...

Page 73: ... HDP dem Nutzer eine HD Karte überlässt 9 6 Die Ziffern 9 1 9 2und 9 5 umfassen sämtliche vertraglichen und gesetzlichen Ansprüche die wegen der Nutzung des HD Services geltend gemacht werden können 10 Kündigung des Vertrages und Änderung des HD Services 10 1 Der Vertrag über die Nutzung des HD Service läuft für die jeweils vereinbarte Dauer ab Aktivierung der HD Karte Eine Verlängerung setzt vora...

Page 74: ...oder sicherheitstechnischen Normen dieses anderen Landes anzupassen Solche Veränderungen sind nicht auf Material oder Verarbeitungsfehler des Gerätes zurückzuführen und werden von dieser Garantie nicht abgedeckt Die Kosten für solche Veränderungen sowie für dadurch am Gerät entstandene Schäden werden nicht erstattet 5 Ausgenommen von der Garantieleistung sind a Regelmäßige Inspektionen Wartung und...

Page 75: ...L License Glibc LGPL 2 1 freetype FreeType License ATK LGPL 2 1 JSStringRefBSTR BSD License GDK LGPL 2 1 zlib zlib libpng License taglib LGPL 2 1 libpng zlib libpng License GNU GENERAL PUBLIC LICENSE Version 2 June 1991 Copyright C 1989 1991 Free Software Foundation Inc 51 Franklin St Fifth Floor Boston MA 02110 1301 USA Everyone is permitted to copy and distribute verbatim copies of this license ...

Page 76: ...the Program Whether that is true depends on what the Program does 1 You may copy and distribute verbatim copies of the Program s source code as you receive it in any medium provided that you conspicuously and appropriately publish on each copy an appropriate copyright notice and disclaimer of warranty keep intact all the notices that refer to this License and to the absence of any warranty and giv...

Page 77: ...t accept this License Therefore by modifying or distributing the Program or any work based on the Program you indicate your acceptance of this License to do so and all its terms and conditions for copying distributing or modifying the Program or works based on it 6 Each time you redistribute the Program or any work based on the Program the recipient automatically receives a license from the origin...

Page 78: ...TAINED BY YOU OR THIRD PARTIES OR A FAILURE OF THE PROGRAM TO OPERATE WITH ANY OTHER PROGRAMS EVEN IF SUCH HOLDER OR OTHER PARTY HAS BEEN ADVISED OF THE POSSIBILITY OF SUCH DAMAGES END OF TERMS AND CONDITIONS How to Apply These Terms to Your New Programs If you develop a new program and you want it to be of the greatest possible use to the public the best way to achieve this is to make it free sof...

Page 79: ...bilities for you if you distribute copies of the library or if you modify it For example if you distribute copies of the library whether gratis or for a fee you must give the recipients all the rights that we gave you You must make sure that they too receive or can get the source code If you link other code with the library you must provide complete object files to the recipients so that they can ...

Page 80: ...cense they are outside its scope The act of running a program using the Library is not restricted and output from such a program is covered only if its contents constitute a work based on the Library independent of the use of the Library in a tool for writing it Whether that is true depends on what the Library does and what the program that uses the Library does 1 You may copy and distribute verba...

Page 81: ...estricted regardless of whether it is legally a derivative work Executables containing this object code plus portions of the Library will still fall under Section 6 Otherwise if the work is a derivative of the Library you may distribute the object code for the work under the terms of Section 6 Any executables containing that work also fall under Section 6 whether or not they are linked directly wi...

Page 82: ... not distribute the Library at all For example if a patent license would not permit royalty free redistribution of the Library by all those who receive copies directly or indirectly through you then the only way you could satisfy both it and this License would be to refrain entirely from distribution of the Library If any portion of this section is held invalid or unenforceable under any particula...

Page 83: ...a pointer to where the full notice is found one line to give the library s name and an idea of what it does Copyright C year name of author This library is free software you can redistribute it and or modify it under the terms of the GNU Lesser General Public License as published by the Free Software Foundation either version 2 1 of the License or at your option any later version This library is d...

Page 84: ...compression or de archiving software is widely available for no charge 1 12 You or Your means an individual or a legal entity exercising rights under and complying with all of the terms of this License or a future version of this License issued under Section 6 1 For legal entities You includes any entity which controls is controlled by or is under common control with You For purposes of this defin...

Page 85: ... Modification has been made available to such recipients You are responsible for ensuring that the Source Code version remains available even if the Electronic Distribution Mechanism is maintained by a third party 3 3 Description of Modifications You must cause all Covered Code to which You contribute to contain a file documenting the changes You made to create that Covered Code and the date of an...

Page 86: ...uch a case You must make sure the requirements of this License are fulfilled for the Covered Code 4 Inability to Comply Due to Statute or Regulation If it is impossible for You to comply with any of the terms of this License with respect to some or all of the Covered Code due to statute judicial order or regulation then You must a comply with the terms of this License to the maximum extent possibl...

Page 87: ...ringement litigation then the reasonable value of the licenses granted by such Participant under Sections 2 1 or 2 2 shall be taken into account in determining the amount or value of any payment or license 8 4 In the event of termination under Sections 8 1 or 8 2 above all end user license agreements excluding distributors and resellers which have been validly granted by You or any distributor her...

Page 88: ...ribution and use in source and binary forms with or without modification are permitted provided that the following conditions are met 1 Redistributions of source code must retain the above copyright notice this list of conditions and the following disclaimer 2 Redistributions in binary form must reproduce the above copyright notice this list of conditions and the following disclaimer in the docume...

Page 89: ... word cryptographic can be left out if the rouines from the library being used are not cryptographic related 4 If you include any Windows specific code or a derivative thereof from the apps directory application code you must include an acknowledgement This product includes software written by Tim Hudson tjh cryptsoft com THIS SOFTWARE IS PROVIDED BY ERIC YOUNG AS IS AND ANY EXPRESS OR IMPLIED WAR...

Page 90: ...on unless otherwise stated in the file in its original unmodified form as distributed in the original archive If you are unsure whether or not a particular file is covered by this license you must contact us to verify this The FreeType Project is copyright C 1996 2000 by David Turner Robert Wilhelm and Werner Lemberg All rights reserved except as specified below 1 No Warranty THE FREETYPE PROJECT ...

Page 91: ... Our home page can be found at http www freetype org BSD License Copyright C 2007 Apple Inc All rights reserved Redistribution and use in source and binary forms with or without modification are permitted provided that the following conditions are met Redistributions of source code must retain the above copyright notice this list of conditions and the following disclaimer Redistributions in binary...

Page 92: ...Memo ...

Page 93: ...Memo ...

Reviews: