background image

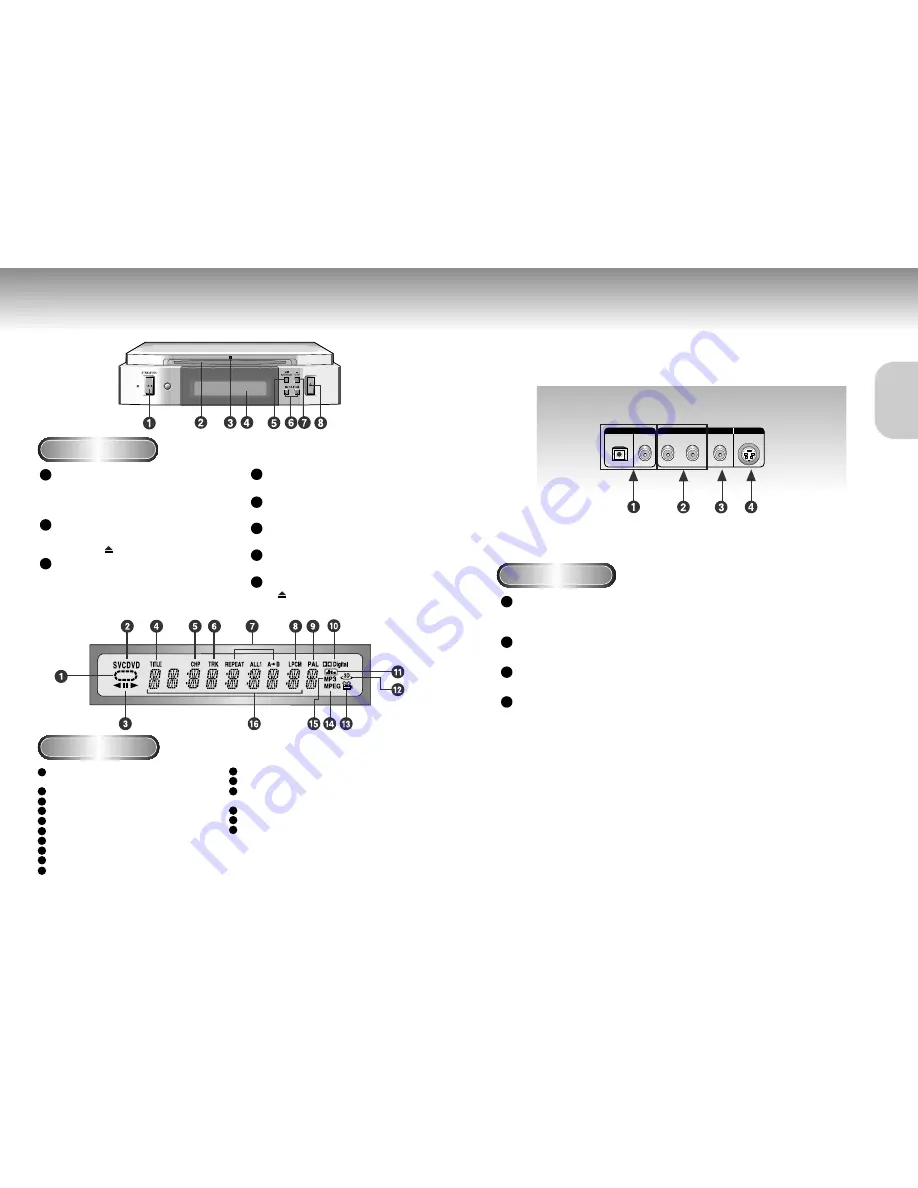
Description-Front Panel

Description-Rear Panel

Front Panel Display

Shows information about the operational status of

this unit.

Disc type indicators

Reverse play / Pause / Forward play

DVD : Title number 

DVD : Chapter number. 

Video/Audio CD : Track number

Repeat play mode

Linear PCM audio output

PAL indicator

Dolby Digital Disc

DTS (Digital Theater System) output

Lights when 3D surround is turned on.

Angle indicator. You can select multiple angles 

of a scene recorded by different cameras.

MPEG-2 Audio output

MP3 Audio output

Displays various messages concerning 

operations such as PLAY, STOP, LOAD, RANDOM, ...

no DISC

: No disc loaded.

EJECT

: The disc is open.

LOAD

: This unit is loading disc information.

DISC MENU

: Displays DVD menu screen.

OPTICAL

ANALOG AUDIO OUT

DIGITAL AUDIO OUT

VIDEO OUT S-VIDEO OUT

COAXIAL

R

L

10

11

1

2

3

4

5

6

7

8

9

10

11

12

13

14

15

16

Front Panel Controls

STANDBY/ON button

• Turns the power on or off. The red lamp lights up

while in the standby mode.
When power is turned on, the red lamp lights off.

Disc Slot

• Used for loading the disc or for removing the disc

using the [       ] button.

DISC IN:

the indicator lights up

DISC OUT: 

the indicator lights off

During IN/OUT operation: 

the indicator flashes

DISPLAY

• Operation indicators are displayed here.

PLAY/PAUSE button

• Begin or pause disc play.

SKIP button

• Use to skip a scene or music.

STOP button

• Stops disc play.

EJECT button

•       (eject) button

1

2

3

5

4

6

7

8

Rear Panel

DIGITAL AUDIO OUT JACKS
• Use either an optical or coaxial digital cable to connect to a compatible Dolby Digital receiver. 

Use to connect to an A/V Amplifier that contains a Dolby Digital or DTS decoder.

ANALOG AUDIO OUT JACKS
• Connect to the Audio input jacks of your television, audio/video receiver, or VCR.

VIDEO OUT JACK
• Use a video cable to connect to the Video input jack on your television.

S-VIDEO OUT JACK
• Use the S-Video cable to connect this jack to the S-Video jack on your television for a higher quality

picture. The S-Video must be selected in the VIDEO OUT SELECT.

1

2

3

4

SETUP

SETUP

Summary of Contents for DVD Playe

Page 1: ...D DVD PLA VD PLAYER YER D DVD P200 VD P200 D DVD P210 VD P210 AH68 01027P UK UK ...

Page 2: ...hen the unit malfunctions Your DVD player is intended not for industrial use but for domestic use only This product is for personal use only When condensation forms inside the player or on the surface of the disc due to sudden temperature changes from cold to hot the player may not operate correctly If this occurs leave the player at room temperature for about 2 hours or until the player becomes o...

Page 3: ...g a Connection 16 Preparation 18 Playing a Disc 19 Playing Step Motion Slow Motion 20 Using the Search Skip Functions 21 Using the Display Function 22 Repeat Play 23 Program Play Random Play 24 S FIT Play 25 Digest Play 26 Slow Repeat play 27 Using the Disc View Function 28 Selecting the Audio Language 29 Selecting the Subtitle Language 30 Changing the Camera Angle 31 Using the Bookmark Function 3...

Page 4: ...al solvents for cleaning might damage the printing or finish Cautions on Handling A new disc may have protrusions around its edge This disc may not play properly or cause sound to skip If a disc has such protrusions remove them with a ball point pen before using Some discs might be defective and have deformed inner holes Check if the inner portion of the CD is damaged broken or deformed About Sing...

Page 5: ...sed at the end of the recording session When recording or encoding MP files select bit rates of 128 kbps or greater When playing MP3 files recorded on CD R RW your DVD player can display a file name consisting of up to 8 alphanumeric characters Markings indicated on DVD discs The following markings are indicated on a DVD disc or its package Each marking represents the type of video or audio data r...

Page 6: ...or off The red lamp lights up while in the standby mode When power is turned on the red lamp lights off Disc Slot Used for loading the disc or for removing the disc using the button DISC IN the indicator lights up DISC OUT the indicator lights off During IN OUT operation the indicator flashes DISPLAY Operation indicators are displayed here PLAY PAUSE button Begin or pause disc play SKIP button Use...

Page 7: ... DIGEST Button page 26 PLAY PAUSE Button Use this to begin or pause dics play SKIP Buttons Use this to search through a particular scene or music RETURN Button Allows you to return to previous menu item DISPLAY Button Press this to display the current disc information ENTER DIRECTION Button UP DOWN or LEFT RIGHT Button This button functions as a toggle switch ANGLE Button page 31 Use this to acces...

Page 8: ...er on a DVD Use this to repeat play a track on a CD or whole CD JOG DIAL Operates frame by frame play In CD mode performs track search SHUTTLE DIAL Performs fast or slow motion play CENTER VOLUME Button TV POWER Button AMP Button SURROUND VOLUME Button 3D Button page 33 AMP VOLUME Button TV VIDEO Button TV CHANNEL Button DIGEST Button page 26 PLAY PAUSE Button Use this to begin or pause dics play ...

Page 9: ...particular components Method 1 Method 2 Analog Audio Out Dolby Digital Decoder Digital Audio Input Jack 2ch Amplifier Audio Input Jacks Digital Audio Out AUDIO CD DVD PLAYER CD DVD PLAYER TV Normal Widescreen Projection etc Good picture Basic Audio Better picture Method 1 Method 2 Audio Output Jacks OR OR AV Cable S Video Cable Video Output Jack S Video Jack TV Method 1 DVD Player TV with Video In...

Page 10: ...t DISPLAY OPTIONS then press the ENTER button 3 3 Use the cursor buttons to select TV ASPECT then press the ENTER button 4 4 Use the cursor buttons to select the desired screen setting then press the ENTER button 4 3 LETTER BOX Select this to view wide DVDs in the letter box mode on a conventional size 4 3 ratio screen TV 4 3 PAN SCAN Select this to view wide DVDs in the pan scan mode on a convent...

Page 11: ... the BACK SKIP button it moves to the previous MENU or the previous Track View display See page 28 20 21 DVD VCD CD 2X 4X 8X 16X 32X 128X 4X 8X 2X 4X 8X Playing Step Motion Slow Motion RESUME function When you stop disc play the player remembers where you stopped so when you press PLAY again it will pick up where you left off unless the disc is removed the STOP button is pressed twice or the playe...

Page 12: ...title chapter number and elapsed time will be displayed Use the button to select a title or a chapter number Use the button or Number buttons to enter a different title or chapter number then press the ENTER button To enter the time from which you want to start use the button to select then use the Number buttons to enter the time Then press the ENTER button 2 2 Press the DISPLAY button on the rem...

Page 13: ...eliminated due to their aspect ratio Program Play Random Play DVD VCD CD NOTE Depending on the disc the Program and Random Play function may not work When in VCD 2 0 mode MENU ON mode these functions do not work To resume normal play press the CLEAR button Program Play DVD VCD CD Random Play DVD VCD CD 1 1 Press the MODE button 2 2 Use the button to select PROGRAM Press the ENTER button 3 3 Use th...

Page 14: ...orts dancing musical instruments being played etc so you can study them more closely Digest Play 1 1 During play press the DIGEST button You ll see the 9 individual windows representing each of the chapters on the TV screen When each window is displayed the first 3 seconds of the chapter will be played 2 2 Press button to select the window you d like to see and press the ENTER button Up to 9 windo...

Page 15: ...ach track and the track number 1 1 During play press the TOP MENU button 2 2 Press the button to select TRACK VIEW Press the ENTER button 3 3 Select the desired view by pressing the or buttons 4 4 Press the ENTER button Displays the equally divided 9 views of the current playing track 1 1 During play press the TOP MENU button 2 2 Press button to select INDEX VIEW Press the ENTER button 3 3 Select ...

Page 16: ...player s output This is useful for matching the player s output level to other equipment in your system Volume control is only operative when using the Analog Audio outputs There are up to 64 levels Lowering each level reduces the audio level by 0 5dB 30 31 Selecting the Subtitle Language You can select a desired subtitle quickly and easily with the SUBTITLE button Using the SUBTITLE button 1 1 Pr...

Page 17: ...UND or DOLBY DIGITAL However some of these discs do not contain rear channel sound signals Depending on the disc the 3D Sound function may not work NOTE Depending on the disc the zoom function may not work 32 33 Using the Bookmark Function The Bookmark function lets you select parts of a DVD or VCD MENU OFF mode so that you can quickly find the section at a later time Using the Bookmark Function D...

Page 18: ...a parental level even adjust the player to the type of television screen you have 1 1 With the unit in Stop mode press the SETUP button on the remote Player Menu Setup of the Display Language Use the Player preference menu to select the language for the player s on screen displays Disc Menu Setup of the Menu Language Use the Menu preference menu to select the language you want a DVD s disc menu to...

Page 19: ...enu screen during set up Press RETURN button If you have forgotten your password see Forget Password in the Troubleshooting Guide Setting Up the Language Features Using the Audio Language Using the Subtitle Language 1 1 With the unit in Stop mode press the SETUP button 2 2 Press the button to move to AUDIO 3 3 Press the ENTER button 4 4 Press the button to select English Select Original if you wan...

Page 20: ...asi PAL mode 38 39 Setting Up the Audio Options 1 1 With the unit in Stop mode press the SETUP button 2 2 Use the button to select AUDIO OPTIONS Then press the ENTER button 3 3 Use the button to select the desired item Then press the button Dolby Digital Out 1 PCM Converts to PCM 2CH audio Select PCM when using the Analog Audio Outputs 2 Bitstream Converts to Dolby Digital Bitstream 5 1CH Select B...

Page 21: ...n the remote control to select the Parental Mode The Parental Mode is now unlocked as indicated on the display Press the DOWN button to select Parental Press ENTER and the Create Password display will appear You can now set your rating level and change your password to a new number Go to the contents and find the section of the instruction book that contains the explanations regarding the current ...

Page 22: ...VD may contain several different titles on a single disc For example if a disc contains three different movies these movies are numbered as title 1 title 2 and title 3 You can select a title number for playback Dynamic Range The ratio in dB between the highest signal level that can be tolerated without distortion and the broadband noise level measured in the absence of the signal Chapter A title o...

Page 23: ... repair work will not be covered by this warranty 4 This product is not considered to be defective in materials nor workmanship by reason that it requires adaptation in order to conform to national or local technical or safety standards in force in any Country other than the one for which the product was originally designed and manufactured This warranty will not cover and no re imbursement will b...

Page 24: ...the control of Samsung 6 This warranty is valid for any person who legally acquired possession of the product during the warranty period 7 The consumers statutory rights in any applicable national legislation whether against the retailer arising from the purchase contract or otherwise are not affected by this warranty Unless there is national legislation to the contrary the rights under this warra...

Reviews: