R
ecording
English - 83
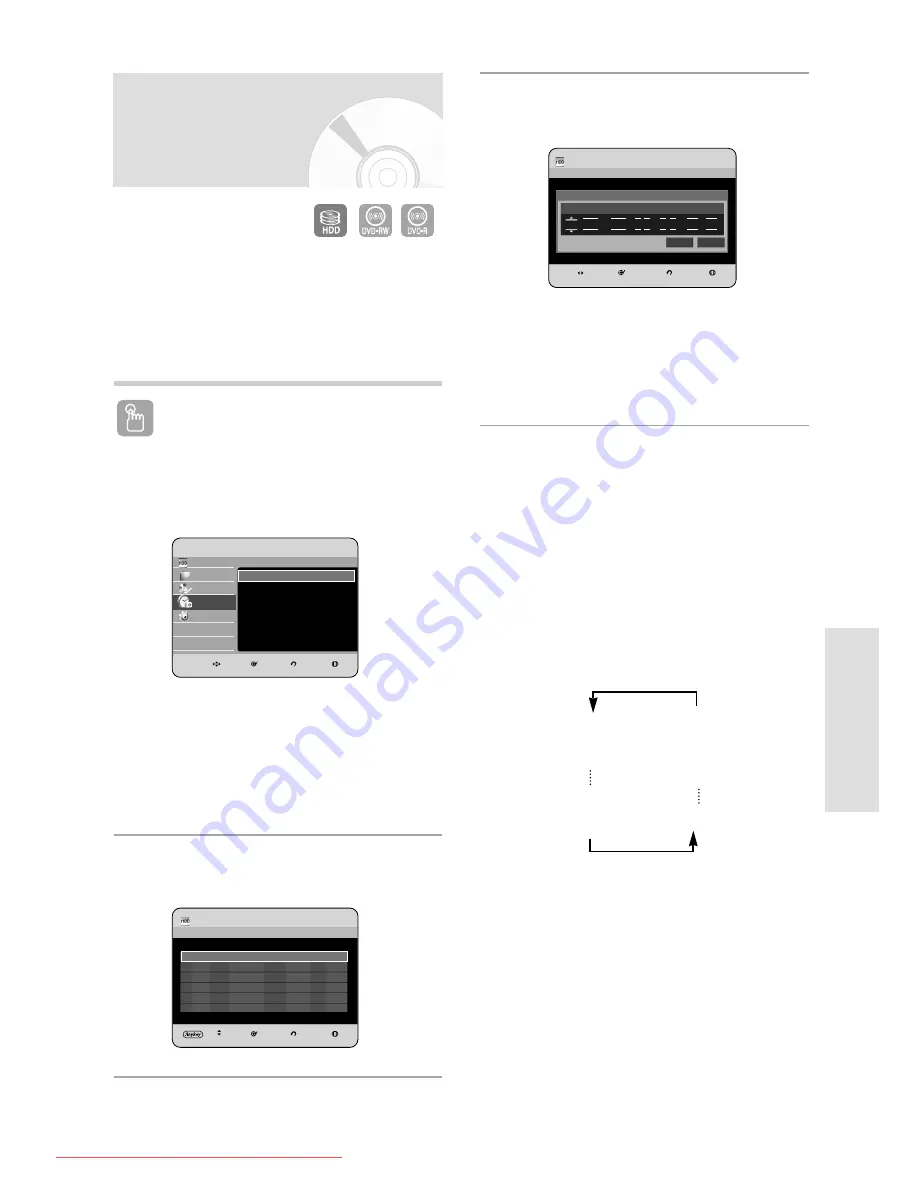
3
Press the OK button to select Add a list.
Using the ANYKEY button.
• Press the ANYKEY button.
• Press the
…†
buttons to select Add, then press
the OK or
√
button.
4
Set timer recording option.
• Fill the input items using the
…†œ √
buttons and
number buttons.
œ √
: Moves to the previous/next item.
…†
, 0~9 : Sets a value.
• To : Select the media to record HDD or DVD.
• Source : The video input source (AV1, AV2 or
AV3), or the broadcasting channel you want to
make a timer recording from.
• Date : Timer Recording allows setting the
recording time within one month period. Set the
recording day. (month/day)
JAN 31
Every SUN
JAN 30
Every SAT
JAN 29
MON-FRI
MON-SAT
JAN 02
JAN 01
Every Day
1. Check the antenna cable is connected.
2. Check the remaining time of the disc.
3. Check the date and time are correct.
Make sure the Clock (Setup-Clock Set) must be set
before you proceed with a timer recording.
(See pages 29
~
30)
Using the TIMER button
1
With the unit in Stop mode/Playback mode,
press the TIMER button.
The Programme screen is displayed.
Using the MENU button.
• With the unit in Stop mode/Playback mode, press
the MENU button.
• Press the
…†
buttons to select Programme, then
press the OK or
√
button.
2
Press the OK or
√
button to select Scheduled List.
Making a Timer
Recording
MOVE
SELECT
RETURN
EXIT
HDD
Scheduled List
Current Time 10:54
No.
To
Source
Date
Start
End
Mode
VPS/PDC
To
Source
Date
Start
End
Mode
V/P
HDD
PR 01
JAN 01
10 : 54
12 : 54
SP
Off
No.01 No Title
Recordable Time
HDD
35:45 SP
Recordable Time HDD 35:45 SP
Title
Save
HDD
Library
Disc Manager
Programme
Setup
HDD & DVD RECORDER
Programme
Scheduled List
√
Recorded List
√
MOVE
SELECT
RETURN
EXIT
Programme
Scheduled List
√
HDD
Scheduled List
Current Time 10:54
MOVE
SELECT
RETURN
EXIT
No.
To
Source
Date
Start
End Mode VPS/PDC
Recordable Time HDD 35:45 SP
Add a list
01180A_HR735_XEH-ENG_59~89 8/7/06 6:56 PM Page 83
Downloaded From Disc-Player.com Samsung Manuals


