Samsung Character, User Manual
The Samsung Character User Manual: A comprehensive guide for this innovative device. Available for free download on our website, it provides step-by-step instructions, troubleshooting tips, and useful insights to help you fully utilize its features. Find the manual at manualshive.com and unlock the full potential of your Samsung Character.
Share
Download


Reviews:
No comments
Related manuals for Character

FRV506
Brand: G53 Limited Pages: 10
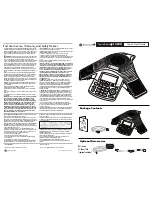
SoundStation 1725-30955-001
Brand: Polycom Pages: 2

PC1300B
Brand: Clas Ohlson Pages: 12

ComStation IP
Brand: Tunstall Pages: 118

7045Y
Brand: Alcatel Pages: 21

Fanvil XU Series
Brand: dais Technology Partners Pages: 6

MN01-LTE-M
Brand: M2M Pages: 2

Uplink LTE30VZ
Brand: Sirena Pages: 32

N910
Brand: Zte Pages: 88

6030
Brand: Nokia Pages: 20

C79
Brand: Zte Pages: 102

Tucana
Brand: Asus Pages: 83

J201S
Brand: Asus Pages: 71

J501
Brand: Asus Pages: 80

J202
Brand: Asus Pages: 71

P552W
Brand: Asus Pages: 117

J206
Brand: Asus Pages: 80

Z01GD
Brand: Asus Pages: 22


