background image

104

105

 Chapter 3.

Settings and Upgrade

Setting a Boot  Password

When setting a password, you have to enter a password to use the 

computer or enter the BIOS Setup. 
By confi guring a password, you can restrict system access to 

authorized users only and protect data and fi les saved on the 

computer.

Do not lose or forget your password. 


If you have forgotten your password, contact a Samsung 


service center. In this case, a service fee will be charged.
The screen images and terms may diff er from actual 


product depending on the computer model and driver 

version.

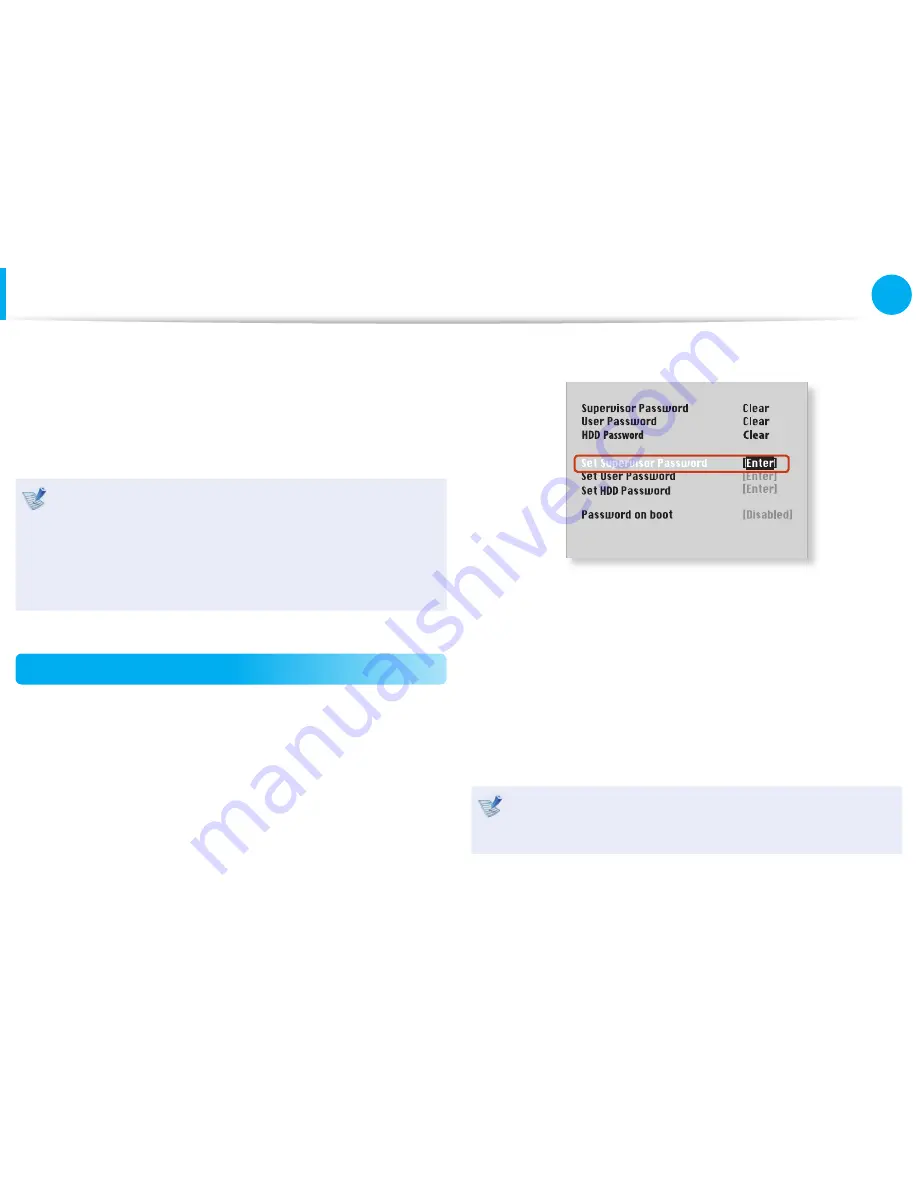
Setting a  Supervisor Password

A Supervisor Password is required to turn the computer on or to 

start the System Setup.
When setting a Supervisor Password, users other than a supervisor 

cannot use the computer.

1

  Select the 

Security

 menu in the BIOS Setup.

2

  In the 

Set Supervisor Password

 item, press <

Enter

>.

XXXXXXXX

3

  Enter a password, press <

Enter

>, re-enter the password for 

confi rmation, and press <

Enter

> again.

The password can be up to 8 alphanumeric characters. 

Special characters are not allowed.

4

  The supervisor password has been set. 

The supervisor password is required to turn the computer on 

or to enter the BIOS Setup.

For some models, if the password entered message appears 

in the

 Setup Notice

 window, the settings are not complete 

until the <

Enter

>


key is pressed.

Summary of Contents for 600B4B

Page 1: ...1 2 3 4 5 1 1 User Guide Getting Started Using the Computer Settings and Upgrade Backup Restore Appendix Contents Start ...

Page 2: ...he Volume 76 Wired Network 80 Wireless Network Optional 85 Sharing Content in a Home Network Easy Content Share Optional 91 HDD Protection Function Optional 92 Using the Security Device Optional Chapter 3 Settings and Upgrade 101 LCD Brightness Control 103 BIOS Setup 105 Setting a Boot Password 108 Changing the Boot Priority 109 Upgrading Memory 112 Battery 119 Using the Security Slot Chapter 4 Ba...

Page 3: ...Product Features 3 Tips 4 Before You Start 5 Safety Precautions 8 Proper Posture During Computer Use 23 Overview 26 Turning the Computer On and Off 35 Chapter 1 Getting Started ...

Page 4: ...quickly by using Samsung Recovery Solution program to restore the PC to the state when it was purchased Optional Samsung s Proprietary Software Optional items may be changed or may not be provided depending on the computer model By adopting the latest processor you can process tasks quickly and reinforce the security level using smart cards TPM and fingerprint recognition devices Optional NVIDIA O...

Page 5: ...he computer with the monitor and repeatedly press the F4 key while holding down the Fn key The internet connection has slowed down or error messages appear continuously while using the Internet Restore Internet Explorer to its initial state 1 Launch Internet Explorer click Tools Internet Options Advanced Load defaults 2 If the Internet Explorer setting again window appears select Set again 3 In th...

Page 6: ...lled operating system The User guide supplied with this computer may vary depending on your model Using the software The software described in the main text can be launched using the following menu path Start All Programs Start All Programs Samsung When the programs are not installed select Samsung Recovery Solution System Software to install the programs Only for models supplied with Samsung Reco...

Page 7: ...led on this computer or a software that does not support the OS the company will not provide technical support a replacement or refund and if our service engineer visits you due to this problem a service charge will be applied About the Product Capacity Representation Standard About HDD Capacity Representation The capacity of the storage device HDD SSD of the manufacturer is calculated assuming th...

Page 8: ...s less than the actual capacity of memory This is because BIOS or a video adapter uses a portion of memory or claims it for further use E g For 1GB 1 024MB memory installed Windows may report the capacity as 1 022MB or less For more information refer to the Samsung Recovery Solution section Before You Start ...

Page 9: ...ation for a long time This increases the risk that a malfunction or damage to the product will occur Avoid exposing any part of your body to the heat from the computer vent or AC adapter for a long time when the computer is on Exposing a part of your body close to the heat from the vent or AC adapter for long periods of time may cause a burn Avoid blocking the vent at the bottom or side of the com...

Page 10: ...bend the power cord excessively or do not place a heavy object over the power cord It is especially important to keep the power cord out of reach of infants and pets If the cord is damaged it may cause electric shock or fire Power Related The power plug and wall outlet figures may differ depending on the country specifications and the product model Do not touch the main plug or power cord with wet...

Page 11: ...ire hazard Keep the power cord or outlet clean so that they are not covered with dust Failure to do so may result in fire AC Adapter Usage Precautions Connect the power cord to the AC adapter firmly Otherwise there is a danger of fire due to an incomplete contact Use only the AC adapter supplied with the product Using another adapter may cause the screen to flicker Do not place heavy objects or st...

Page 12: ... Precautions Do not use the computer in a badly ventilated location such as on bedding on a pillow or cushion etc and do not use it in a location such as room with floor heating as it may cause the computer to overheat Take care that the computer vents on the side or the bottom are not blocked especially in these environments If the vents are blocked the computer may overheat and it may cause a co...

Page 13: ...t the product or battery or put the product or battery into a fire Do not put or use the product or battery in a hot location such as a sauna inside a vehicle exposed to the heat and so on There is a danger of an explosion or fire Take care not to allow metal objects such as a key or clip to touch the battery terminal metal parts If a metal object touches the battery terminals it may cause excessi...

Page 14: ...ire or damage to the product Donotplaceanycontainerfilledwithwateror chemicalsoverornearthecomputer If water or chemicals enter the computer this may cause fire or electric shock Thereafter if you connect the AC adapter the battery power will be supplied again Do not cut the battery power under normal conditions This may result in data loss or a product malfunction The location of the Emergency Ho...

Page 15: ...type remove the external battery Failure to do so may cause electric shock If the computer is broken or dropped disconnect the power cord and contact a service center for a safety check If the notebook computer has an external type removable battery separate the battery also Using a broken computer may cause electric shock or fire hazard Avoid direct sunlight when the computer is in an air tight l...

Page 16: ...s in clude airport walk through devices and se curity wands The airport security devices that check car ry on luggage such as conveyor belts use x rays instead of magnetism and will not damage a drive When carrying the notebook computer with other items such as the adapter mouse books etc take care not to press anything against the notebook computer If a heavy object is pressed against the noteboo...

Page 17: ...osal method may differ depending on your country and region Dispose of the used battery in an appropriate way Do not throw or disassemble the battery and do not put it into water This may cause an injury fire or explosion Use only a battery authorized by Samsung Electronics Failure to do so may cause an explosion Avoid contact with metal objects such as car keys or clips when keeping or carrying a...

Page 18: ...ature increases there is a danger of burning yourself Connect only permitted devices to the connectors or ports of the computer Failure to do so may cause electric shock and fire Close the LCD panel only after checking if the notebook computer is turned off The temperature may rise and it may cause overheating and deformation of the product Do not press the Eject Button while the Floppy Disk CD RO...

Page 19: ...n when cleaning the product and only use the computer when it is completely dried Failure to do so may cause electric shock or fire Emergency disk eject method using paperclip should not be used while the disk is in motion Make sure to use the emergency disk eject method only when the Optical Disk Drive has stopped There is a danger of injury Do not place your face close to the Optical Disk Drive ...

Page 20: ...nect a device that is not manufactured or authorized by Samsung Electronics enquire at your service center before connecting the device There is a danger of damaging the product Security and Movement Related When moving the product turn the power off and separate all connected cables first The product might be damaged or users may trip over the cables For long periods of not using the notebook com...

Page 21: ...elf The data may be lost when an external impact is applied to the disk while disassembling or assembling the computer The data may be lost when the computer is turned off or reset by a power failure while the hard disk drive is operating The data may be lost and irrecoverable due to a computer virus infection The data may be lost if the power is turned off while running a program Sudden impact or...

Page 22: ... power outlet If the plug pins are not inserted into the center of the holes the plug pins are only inserted up to half their length In this case reconnect the power plug You have to insert the power plug into the outlet when the power indicator LED of the power outlet is lit green If the power is connected properly the power indicator LED remains green Otherwise the power indicator LED is turned ...

Page 23: ...port of the computer Auto Adapter In flight Cigar Socket Cigar Plug DC Plug When using the Airplane Charging Converter Depending on the airplane you have to use the auto adapter and charging converter Connect the airplane charging converter optional to the auto adapter optional and then insert the airplane power input jack into the power outlet Charging Converter 1 Connect this end to the auto ada...

Page 24: ...er Posture Adjust the heights of desks and chairs appropriate to your height The heights are to be adjusted so that your arm forms a right angle when you place your hand over the keyboard while sitting down on a chair Adjust the height of chair so that your heel is comfortably placed on the floor Do not use the computer while you are lying down but only while you are sitting down Do not use the co...

Page 25: ...before using the computer When entering contents printed on a paper into the computer use a static paper holder so that the height of the paper is almost equal to that of the monitor Hand Position Keep your arm at a right angle as shown by the figure Keep the line from your elbow to your hand straight Do not place your palm over the keyboard while typing Do not hold the mouse with excessive force ...

Page 26: ... and driver updates without your intervention Please check the equalizer default setting before first usage Use Time Break Time Take a break for 10 minutes or more after a 50 minute period when working for more than one hour Illumination Do not use the computer in dark locations The illumination level for computer use must be as bright so for reading a book Indirect illumination is recommended Use...

Page 27: ...creen images are displayed here 3 Speaker A device used to generate sound 4 Power Button Turns the computer on and off 5 Keyboard A device to enter data by pressing the keys 6 Fingerprint Sensor Optional This is the device that recognizes fingerprints Use the device with the security program 7 Status Indicators Shows the operating status of the computer The corresponding operating LED is lit when ...

Page 28: ...ral wireless network settings at the same time This button is useful on the airplane to turn off every wireless network device You also can set up a specific wireless network device with the Fn key combination On Shows that any wireless network devices are turned on Off Shows that no wireless network device is turned on 16 Microphone You can use the built in microphone 17 Contactless Smart Card Re...

Page 29: ... HDD ODD This turns when either the HDD or ODD is being accessed 3 Charge Status This shows the power source and the battery charge status Green When the battery is fully charged or the battery is not installed Orange When the battery is being charged Off When the computer is running on battery power without being connected to AC adapter 4 Power This shows the computer operating status On When the...

Page 30: ...ed to connect a USB or eSATA device Windows XP does not support eSATA 3 Monitor Port A port used to connect a monitor TV or projector supporting a 15pin D SUB interface 4 Security Slot You can secure the computer by connecting a lock and cable to the Security Slot What is an e SATA port This is a new type of connection between a PC and peripheral devices It is generally used to connect a PC and an...

Page 31: ...al Plays CD or DVD titles Since an ODD Optical Disk Drive is optional the installed drive depends on the computer model 5 eSATA USB Common Port Optional This port can be used to connect a USB or eSATA device Windows XP does not support eSATA 6 USB Port You can connect USB devices to the USB port such as a keyboard mouse digital camera etc 7 Security Slot You can secure the computer by connecting a...

Page 32: ...t the Ethernet cable to this port 3 USB Port or Chargeable USB Port Optional USB ports to which you can connect USB devices as well as a Chargeable USB port are provided Using a Chargeable USB port you can access or charge a USB device The port can be distinguished by the figure printed on the port of the product USB 2 0 port Chargeable USB 2 0 port USB 3 0 port Chargeable USB 3 0 port 4 Digital V...

Page 33: ...nnect the Ethernet cable to this port 3 Fan Vents The internal heat of the computer is emitted through these holes If the vents are blocked the computer may overheat Avoid blocking the vents as this may be dangerous 4 Monitor Port A port used to connect a monitor TV or projector supporting a 15pin D SUB interface 5 Digital Video Audio Port HDMI Optional You can connect an HDMI cable to this port U...

Page 34: ... USB Port Optional USB ports to which you can connect USB devices as well as a Chargeable USB port are provided Using a Chargeable USB port you can access or charge a USB device The port can be distinguished by the figure printed on the port of the product USB 2 0 port Chargeable USB 2 0 port USB 3 0 port Chargeable USB 3 0 port 4 Fan Vents The internal heat of the computer is emitted through thes...

Page 35: ...tation to sold separately 4 CD drive ODD separation latch Optional This latch is to separate the CD or DVD drive from the computer 5 Memory Compartment Cover Hard Disk Drive Compartment Cover The main memory and hard disk drive is installed inside the cover 6 Keyboard draining hole When a small amount of liquid is spilt over the keyboard the liquid can be drained through this hole Since completely...

Page 36: ...ou turn the computer on for the first time the Windows activation screen appears Follow the activation procedures according to the instructions on the screen to use the computer Entering Sleep mode When the computer is turned on press the computer s power button once briefly Adjusting the screen brightness When the computer runs on battery power the LCD brightness is automatically set to low Press...

Page 37: ...y differ For Windows 7 Click Start Shut down mode to shutdown the computer 1 2 For Windows Vista Click on Start and then click on Shut Down as shown in the figure below to shut the computer down Power Button 1 2 3 Using the Power button in Windows Vista For Windows Vista the Power button is set to power saving mode Therefore if you click Start Power button the computer enters power saving mode To ...

Page 38: ...e shut down due to a system error turn it off by pressing and holding the Power Button for a minimum of 4 seconds Please note that turning the computer off by this method may cause a system problem Thereafter when turning the computer back on the disk checking program may launch to check for and correct any disk errors Turning the Computer On and Off ...

Page 39: ...on or off according to your selection While the Fast Start function is enabled You cannot change some power options in the Control Panel To change these first disable the Fast Start function The existing power saving mode and maximum power saving mode functions have been replaced by this function Battery and AC power should be removed before you open memory door to change or add memory The LCD may...

Page 40: ...onal 59 Connecting an External Display Device 62 Connecting an External Digital Device 71 Adjusting the Volume 72 Wired Network 76 Wireless Network Optional 80 Sharing Content in a Home Network Easy Content Share Optional 85 HDD Protection Function Optional 91 Using the Security Device Optional 92 Chapter 2 Using the computer ...

Page 41: ... discussed in the following sections The keyboard image may differ from the actual keyboard The keyboard may differ depending on your country The following mainly describes the shortcut keys Shortcut Keys You can use the following functions by pressing the keys below with the Fn key ...

Page 42: ...ower button Screen Brightness Control Controls the screen brightness CRT LCD Switches the screen output to the LCD or external monitor when an external monitor or TV is connected to the computer Touchpad Pointing Stick Turns the touchpad function or pointing stick function on or off Omnipass The Omnipass security program is executed ...

Page 43: ... will be launched Optional For some models Samsung Magic Doctor is launched Battery mode To use the battery efficiently you can change the battery mode according to your usage environment Mute Mutes or cancels mute Volume Control Controls the volume Wireless network You can turn the wireless network device on or off Only for models with a wireless network device ...

Page 44: ... models For 14 inch models press the NumLock key to use some of the keys as numeric keys For 15 6 inch models once the NumLock is on the numeric keypad in the right side of the keyboard is enabled NumLock ScrollLock Other Function Keys Performs the right click mouse function touchpad If the hot keys do not work properly you have to install the Easy Display Manager Keyboard ...

Page 45: ...s already installed in this product by default when you purchase this product When you reinstall Windows or change the operating system using the driver provided by the corresponding manufacturer is recommended Use the Touchpad with your fingers Using a sharp object may damage the Touchpad If you touch the Touchpad or press the Touchpad buttons while booting up the Windows boot time may be extende...

Page 46: ...use button Basic Touchpad Functions Moving the cursor on the screen Place your finger on the touchpad slightly and move your finger The mouse cursor will move accordingly Move your finger in the direction you wish to move the cursor Click Function Place a finger on the touchpad and click on an item once Alternatively press the left button once quickly and release it Tap Click or Touchpad ...

Page 47: ...k TapTap or Right Button Function This corresponds to clicking the right mouse button Press the right touchpad button once The corresponding pop up menu appears Click Drag Function Dragging refers to moving an item to another place after selecting it Press and hold down the left touchpad button over an item you want to drag and move the item to the new location Holding down the left touchpad butto...

Page 48: ... are similar use the computer referring to these descriptions Using the Touchpad you can use the following additional Gesture functions Scroll function Zoom functions Page Move Function Configuring the Gesture Function If the Gesture function is not activated you can activate it according to the following procedures 1 When using the Elan driver Click the Start Control Panel Hardware and Sound Mous...

Page 49: ...ft or right accordingly or Zoom Functions If you place two fingers over the Touchpad together or apart the current image or text is zoomed in or out Zoom out Zoom in or Page Move Function You can move to the previous or next page when you are looking at a photo or surfing the Internet For example if you lightly brush three fingers to the left while you are looking at a web site you will return to ...

Page 50: ...he touchpad by mistake This function is provided by the touchpad driver provided by the manufacturer When using the Elan driver Click Start Control Panel Hardware and Sound Mouse ELAN Options PalmTracking and then adjust the sensitivity When using the Synaptics driver Click Start Control Panel Hardware and Sound Mouse Device Settings Settings Pointing Sensitivity PalmCheck and then adjust the sens...

Page 51: ...Sound Mouse Auto locking when connecting USB mouse When using the Elan driver Click Start Control Panel Hardware and Sound Mouse ELAN and check the Disable When external USB mouse plug in option This will turn the touchpad and the pointing stick off when a USB mouse is connected When using the Synaptics driver Click Start Control Panel Hardware and Sound Mouse Device Settings and check the Disable...

Page 52: ...ng the driver provided by the corresponding manufacturer is recommended Use the pointing stick with your fingers Using a sharp object may damage the pointing stick If you touch the pointing stick or press the pointing stick buttons while booting up the Windows boot time may be extended Checking the pointing stick manufacturer Click the Start Control Panel Hardware and Sound Mouse Hardware tab and ...

Page 53: ... finger on the pointing stick and click on an item once Alternatively press the pointing stick left button once quickly and release it Tap Click or Double Click Function Put your finger on the pointing stick and quickly tap twice with your finger on an item you want Alternatively press the pointing stick left button twice quickly or ClickClick TapTap Right Button Function This corresponds to click...

Page 54: ...d move the item to the new location Holding down the pointing stick left button Move Scroll Function This function is the same as the scroll area of the Touchpad Press and hold down the scroll button and move the pointing stick up down left or right Then the screen is scrolled up down left or right accordingly or Holding down the scroll button Holding down the scroll button Pointing Stick Optional...

Page 55: ...the Synaptics driver Click Start Control Panel Hardware and Sound Mouse Device Settings Settings Touch Sensitivity and then adjust the sensitivity Pointing Stick On Off Function Locking with short keys If you don t want to use the pointing stick you can turn the pointing stick off Press the key combination once Then the screen appears where you can select a device mode Since pressing the key while...

Page 56: ...tings and check the Disable internal pointing device when external USB pointing device is attached in option This will turn the touchpad and the pointing stick off when a USB mouse is connected In case of some touch screen model checking option locks the touchpad and the pointing stick even though you did not connect a USB mouse This auto locking function is not provided for some models ...

Page 57: ...he figures may differ from the real ones Using a CD that is not in the shape of a circle is not recommended Inserting and Ejecting a CD 1 Press the Eject button of the optical disk drive at the side of the computer Emergency Hole Eject Button Status Indicator Emergency Hole Eject Button Emergency Status Indicator 2 When the CD tray opens insert a CD or DVD and push the tray in until it clicks 3 Pu...

Page 58: ...ce the computer upside down on a flat surface 2 Pull the CD drive separation latch outward then remove the CD drive 3 To install the CD drive again slide the CD drive separation latch into the system The CD drive separation latch move inward and fix the CD drive automatically Check if the CD drive separation latch has been moved inward ...

Page 59: ...em Since the procedures for other Windows operating systems are similar use the computer referring to these descriptions To insert a card 1 Insert a card into the slot on the side of the computer ExpressCard slot 2 If you insert a card into the slot Windows recognizes the card automatically or a message telling you to install a driver appears If the card is not automatically recognized install the...

Page 60: ...damage a card when moving the computer keep the card separately The figures used for the description are of a representative model Therefore the figures may differ from the real ones If a slot protection dummy card is inserted into your computer remove the dummy card before using the computer These descriptions are written based on Windows 7 the latest operating system Therefore some descriptions ...

Page 61: ...rive You can only use the card after formatting it The device name of the card drive may differ depending on your computer model Using a Mini SD Since the above cards are too small you cannot insert the cards into the slot directly Insert the card into the dedicated adapter available from most electronic retailers and then insert the adapter into the multi card slot To remove a memory card Take ho...

Page 62: ...ith the touchpad and select Format 3 Click Start to the formatting To use a card to exchange data with a digital device such as a digital camera formatting the data using the digital device is recommended When you try to use a card which is formatted in the computer in another digital device you may have to format the card again in the device You cannot format write or delete data from a SD or SDH...

Page 63: ...er when a display device is connected through the HDMI port rather than the analog monitor port RGB port Therefore when multiple ports are supported connect a display device to a port that provides the better visual quality Before you start check the port and cable of the external display device and then connect the display device to the computer Due to restrictions of the operating system the Dua...

Page 64: ...nitor TV Projector 2 Connect the power cord of the connected monitor TV or projector and turn the power on 3 Press the Fn F4 key combination once Then the Easy Display Manager screen appears where you can select a display device Since pressing the F4 key while holding down the Fn key changes the selection select a display device If the screen is not switched even if you press the Fn F4 key combina...

Page 65: ...iew For more detailed information refer to the Windows online help When Multi View is supported Optional LCD Only External Display Only Multi View What is Multi View This refers to the mode that outputs the screen to the notebook LCD and the additionally connected monitors RGB HDMI at the same time To configure Multi View Select NVIDIA Control Panel Multi Display Setting select the additionally co...

Page 66: ... that support a TV output port HDMI When a TV provides more than one HDMI port connect the computer to the DVI IN port When connecting the computer to a TV switch the external input mode of the TV to HDMI 2 Press the Fn F4 key combination once Then the Easy Display Manager screen appears where you can select a display device Since pressing the F4 key while holding down the Fn key changes the selec...

Page 67: ...ew For more detailed information refer to the Windows online help When Multi View is supported Optional LCD Only External Display Only Multi View What is Multi View This refers to the mode that outputs the screen to the notebook LCD and the additionally connected monitors RGB HDMI at the same time To configure Multi View Select NVIDIA Control Panel Multi Display Setting select the additionally con...

Page 68: ... and then clicking the symbol The screen images and terms may differ from actual product depending on the computer model and driver version For Intel graphics cards 1 Right click over the Desktop and select Graphics Properties If a window appears where you can select the mode select Basic Mode and click OK 2 Click Display General Settings select Customize Aspect Ratio in the Scaling field fit the ...

Page 69: ...er the Desktop and select NVIDIA Control Panel 2 In the Select a Task window in the left panel select the Dispaly Adjust Desktop Size and Positon item and then click Resize Desktop 3 Resize the Desktop using the resize bars so that the four arrows at the corners of the Desktop are placed in the corners of the TV and then click OK Horizontal Resize Bar Vertical Resize Bar ...

Page 70: ...ol icon in the notification area at the bottom right of the Desktop and select Playback Devices Alternatively click the Control Panel Hardware and Sound Sound 2 Change the setting to Digital Audio HDMI HDMI Device or Digital Output Device click Set Default and click OK HDMI Output Device may not appear on the playback device list depending on the computer model In this case turn on the TV connect ...

Page 71: ...ams that will only run with the external graphics GPU To run a program using the external graphics GPU you have to register the program in the NVIDIA Control Panel Some programs are pre registered To register more programs complete the following steps 1 Right click over the Desktop and select NVIDIA Panel 2 Select 3D Settings Manage 3D settings in the left pane and select the Program Settings tab ...

Page 72: ... disk so that you can copy or move the files on the device 1 Connect the USB port of the notebook computer and the USB port of the digital device such as a camera using the USB cable Both the computer and the digital device must be turned on You have to additionally purchase the USB cable necessary to connect the computer and the device Camera Camcorder 2 The Auto run window appears Click Open fol...

Page 73: ...Windows XP Windows 7 Vista Using the Sound Recorder The procedures to record sound using the Windows Recorder are described below For Windows 7 Vista 1 Connect a microphone to the microphone jack You can also use the internal MIC 2 Right click over the Volume icon on the taskbar and select Recording Device 3 Check if the microphone is set as the default recording device If this is the case it is a...

Page 74: ...ording from Adjust Volume for 5 Select Mic Volume from Show the following volume controls and click OK 6 When Recording Control window appears check the Select checkbox Increase the recording volume to increase the recording sensitivity and close the window 7 Click Start All Programs Accessories Entertainment Sound Recorder 8 Click the Record button to perform recording The default recording durat...

Page 75: ...ion area at the bottom right of the Desktop and select Playback Devices Alternatively click the Control Panel Hardware and Sound Sound 2 Right click over the Speakers and select Properties 3 Select the SoundAlive tab and select one of the modes Basic Mode Music Select this mode to listen to music Movie Select this mode to watch a movie Speech Emphasizes voice over other sounds Silver Silver mode i...

Page 76: ...ct Playback Devices Alternatively click the Control Panel Hardware and Sound Sound Playback tab 2 Select the Speakers click Set Default and click OK Using the microphone jack 1 Right click over the Volume Control icon in the notification area at the bottom right of the Desktop and select Recording Devices Alternatively click the Control Panel Hardware and Sound Sound Recording tab 2 Select the Mic...

Page 77: ...lar use the computer referring to these descriptions The figures used for the description are of a representative model Therefore the figures may differ from the real ones 1 Connect a LAN cable to the computer s LAN port 2 For Windows 7 Click Start Control Panel Network and Internet Network and Sharing Center and click on Change adapter settings in the left menu pane For Windows Vista Click Start ...

Page 78: ...rnet Protocol Version 4 TCP IPv4 from the list of Network Components and click Properties For Windows XP Click General tab and select a LAN driver from Connect using Select Internet Protocol TCP IP and click Properties The Network Component name may differ depending on the Operating System Installed To add a network component click Install in the screen shown in the figure above You can add client...

Page 79: ... function Wake On LAN is a function that activates the system from Sleep mode when a signal such as a ping or magic packet command arrives over the network wired LAN 1 For Windows 7 Click Start Control Panel Network and Internet Network and Sharing Center and click on Change adapter settings in the left menu pane For Windows Vista Click Start Control Panel Network and Internet Network and Sharing ...

Page 80: ... using Hybrid power saving feature For Win7 Wake On LAN is not supported by Ping When connected to a 100Mbps 1Gbps wired LAN and the computer exits Sleep hibernation mode a message appears informing you of a connection to a 10Mbps 100Mbps wired LAN This happens because when the computer exits standby hibernate mode restoring the network takes about 3 seconds When the network is restored it operate...

Page 81: ...ss LAN is turned off press the key combination to turn it on What is an Access Point AP An AP is a network device that bridges wired and wireless LANs and corresponds to a wireless hub in a wired network Connect the computer with the wireless LAN function to the AP to use to the network connection Connecting to a Wireless LAN If there is an AP you can connect to the Internet via the AP using the W...

Page 82: ...e AP is displayed click the Close button You can access the network For Windows Vista 1 Right click over the Network Connections icon on the taskbar and click Connect to the Network 2 Select an AP to connect to and click Connect If there is a configured network key for the AP to connect to enter the network key and then click the Connect button 3 When Connected to the AP is displayed click the Clo...

Page 83: ... of the touch pad Then click View Available Wireless Networks 2 Select an AP to be connected and click Connect If a network key is set in the AP the network key input window will appear Enter the network key in the input window and click OK For a network key contact the network administrator 3 Once Connected to AP is displayed you can use a wireless network ...

Page 84: ... Fi Manager 1 Press the key combination Then the Wi Fi Manager window appears 2 Select Wi Fi and check if it is set to ON If this option is set to ON the Wi Fi function will run You can set this to ON or OFF AP List Normal Wireless Network Status If the wireless LAN icon is displayed in the system tray of the Taskbar it indicates that the computer is connected to the Internet properly see below Wi...

Page 85: ...ted by the wireless LAN icon in the system tray of the Taskbar In this case you have to check the IP address settings Please contact your network administrator and reconfigure the IP address Windows 7 Vista Windows XP Windows XP Windows 7 Vista When APs are found but your computer is not connected to the Internet This is the case when an AP with a weak signal has been set to a high priority Connec...

Page 86: ...n on whether a product supports DLNA refer to the respective user manuals To play videos photos and music files stored on a computer configure the settings in the order as shown below 1 Configuring the network settings for your computer and TV 2 Adding shared content on your computer 3 Playing content on your TV using your computer Configuring the network settings for your computer and TV To share...

Page 87: ...ram window the network settings have been configured successfully Devices that can share content If connected devices are not displayed refer to the Easy Content Share item in the Troubleshooting Guide Adding shared content on your computer Add the videos photos and music files that you want to play on your TV as shared items You can only play shared items on your TV 1 Click Settings at the top ri...

Page 88: ...lay content Playlist Add content to play Play control panel 2 Select the item you want to play in the playlist and then click Play 3 The selected file is played on the TV Using the Play Control panel you can control the item being played on the TV 4 To stop playing click Stop Easy Content Share does not support subtitles due to DLNA constraints To use the caption function refer to the Easy Content...

Page 89: ...stored on a computer when Easy Content Share is not installed You can also play the videos photos and music files stored on a computer when Easy Content Share is not installed on your TV by using Windows Media Player As described in the steps below configure the content sharing settings to play content on your TV The computer containing the shared content when Easy Content Share is not installed m...

Page 90: ...ent you must click each corresponding menu item Videos Photos or Music to register each type of content For Windows Media Player 11 1 Run Windows Media Player 2 Click Library Media Sharing The Media Sharing window is displayed Check the Share my media checkbox and then click OK 3 In the Media Sharing window click Settings The Media Sharing Default Settings window is displayed Check the Allow new d...

Page 91: ... of the computer where the item is stored is displayed next to it allowing you to identify the computer This is useful when multiple computers are providing content A folder added as a shared item The name of the PC where the content is stored Content sharing is only available with Windows Media Player 11 or later If your Windows Media Player is earlier than Windows Media Player 11 download and in...

Page 92: ...tion right click the icon and select Open Control Panel Sensitivity Operating Status High Select this option for operating environments with no possibility of shocks default Medium Select this option for operating environments with the possibility of slight shocks e g in a vehicle or on a lap Low Select this option for operating environments with a possibility of severe shocks not recommended If e...

Page 93: ...with Smart Card reader TPM chip and fingerprint recognition devices The type of authentication device may differ depending on the model The Omnipass security program may not be provided or a different version may be provided depending on the model The screen image terms and usage are subject to change depending on the version For more information refer to the help of the program Step 1 Registering...

Page 94: ...fore please be careful After initializing the TPM chip you cannot use the files and folders encrypted by the TPM function Therefore decrypt them before initializing the chip Either type A or B is provided depending on the model 1 Turn the computer on and if the booting screen SAMSUNG logo appears press the F2 key 2 Type A Model If the BIOS screen appears select Security TPM Configuration set the T...

Page 95: ...has been completed you can register a user 2 Registering a User Complete the following only when you want to register a user to the TPM chip 1 Click Start All Programs Infineon Security Platform Solution Manage Security Platform and select the User Settings tab 2 The security authentication configuration begins with the instructions of the Initialization Wizard Select a drive to save the authentic...

Page 96: ...art Card Optional Read the Smart Card information and register it to the Windows user account A smart card is a type of RFID device This product only supports smart cards from among RFID devices Either contactless reader or insertable reader is provided depending on the model 1 In the OmniPass program screen select Contactless Card Authentication and click Next 2 Contactless Smart Card Reader If y...

Page 97: ...e smart card information is automatically read Example Smart Card Example Smart Card 3 The authentication device has been registered Check whether to finish the registration or register more security authentication devices and click Next Supported cards Contactless Smart Card Reader ISO 14443 A C Card MiFare Card Jewel Card Felica Card Insertable Smart Card Reader ISO 7816 Spec Card ...

Page 98: ...ctions displayed on the screen At least 3 finger prints are captured Fingerprint Sensor The location of fingerprint sensor may differ from actual product depending on the computer model 4 Finally confirm that the captured fingerprints are your fingers If a green fingerprint is displayed on the screen it indicates that the selected finger has been properly registered Click Next If a red fingerprint...

Page 99: ...ou will be logged into Windows Encrypting Folder You cannot encrypt a file or folder that is stored directly under the C drive ex C Samsung 1 Place the pointer over a folder to be encrypted and select OmniPass Encrypt File s 2 Encrypt the folder through the authentication device registered to the Windows account that is logged in If there is more than one authentication device registered to the us...

Page 100: ...cation screen appears select an authentication device and enter the registered password 3 The folder opens Decrypting an Encrypted Folder 1 Place the pointer over an encrypted folder and select OmniPass Decrypt File s 2 If the authentication screen appears select an authentication device and enter the registered password 3 The folder is decrypted ...

Page 101: ...LCD Brightness Control 101 BIOS Setup 103 Setting a Boot Password 105 Changing the Boot Priority 108 Upgrading Memory 109 Battery 112 Using the Security Slot 119 Chapter 3 Settings and Upgrade ...

Page 102: ...ange up to 8 levels and the brightness increases by 1 level when pressing the key once Maintaining the changed LCD brightness even after turning the computer on again To maintain the LCD brightness set by using the brightness control keys or through the Power Options follow the procedures below For Windows 7 Vista 1 Click Control Panel Hardware and Sound Power Options 2 Click Change the settings o...

Page 103: ...er of bad pixels can cause problems in appearance but a small number of pixels doesn t affect the computer performance Therefore Samsung observes and manages the following dot principles Bright dot 2 or less Black dot 4 or less Combination of Bright and Dark 4 or less Instructions for Cleaning the LCD Clean the LCD panel with a soft cloth lightly moistened with computer cleansing detergent moving ...

Page 104: ...when configuring the BIOS The functions of the BIOS setup are subject to change for product function enhancement purposes The BIOS Setup menus and items may differ depending on your computer model Entering the BIOS Setup 1 Turn the computer on 2 When the booting screen SAMSUNG logo appears press the F2 key to enter the BIOS Setup The screen images in this document may differ from actual product 3 ...

Page 105: ...ables you to configure peripherals and booting related settings such as the boot priority Exit Used to exit the Setup either saving the changes or not System Setup Keys In the Setup you have to use the keyboard F1 Press to view the Setup Help Up Down Keys Press to move up and down F5 F6 Press to change the item value F9 Press to load the default Setup settings F3 Press to restore the previous valu...

Page 106: ...g a Supervisor Password A Supervisor Password is required to turn the computer on or to start the System Setup When setting a Supervisor Password users other than a supervisor cannot use the computer 1 Select the Security menu in the BIOS Setup 2 In the Set Supervisor Password item press Enter XXXXXXXX 3 Enter a password press Enter re enter the password for confirmation and press Enter again The ...

Page 107: ...ord on boot item to Enabled Once a boot password is set you have to enter a password to boot up the computer Setting up a Hard Disk Drive Password Optional If you set a password for a hard disk drive it cannot be accessed from another computer Press Enter in the Set HDD Password item and define a password as described in Step 3 of the Setting up the Supervisor Password The hard disk drive password...

Page 108: ... Set Supervisor Password item press Enter 2 In the Enter Current Password item enter the currently configured password and press Enter 3 Leave the Enter New Password item field empty and press Enter 4 Leave the Confirm New Password field empty and press Enter The password is deactivated For some models the password is only canceled if the Enter key is pressed in the Setup Notice window ...

Page 109: ...ion 1 Select the Boot menu in the BIOS Setup 2 Press Enter on the Boot Device Priority item XXXXXXXX 0WO QEM 1HH 6QWEJ 2CF QWUG PCDNGF PVGTPCN 0 PCDNGF 2 1241 KUCDNGF 5OCTV CVVGT CNKDTCVKQP 3 Press the down key to move to the SATA HDD item and press the F6 key to move up to the top item Boot Device Priority Set Boot Priority 1 SATA CD XXXXXXXXXXXX 2 SATA HDD XXXXXXXXXXXX 3 USB CD N A 4 USB KEY N A...

Page 110: ...nect main power plug and remove the battery before continuing To utilize the dual channel feature using memory modules with the same specifications of the same capacity and from the same manufacturer is recommended The images used for the illustration are of a representative model therefore the images may differ from the the actual product Adding or Replacing Memory Modules 1 Remove the screw on t...

Page 111: ... the angle of the memory slot For 12 5 inch models Memory Slot For 14 15 6 inch models Memory Slot 3 Push the memory module down so that it is completely fixed If the memory does not fit easily push the memory module down while pulling the memory module latches outward For 12 5 inch models Memory module latches For 14 15 6 inch models Memory module latches ...

Page 112: ... 4 Close the memory compartment cover and fasten the screw Removing a memory module Pull the memory module latches outward The memory module will pop up Remove the memory module out at an angle of 30 degrees For 12 5 inch models For 14 15 6 inch models ...

Page 113: ...he User Manual Never heat the battery pack put it near or in a fire or use at a temperature higher than 60 C as this may cause fire Never cause a short circuit between the battery pack terminals or disassemble the battery pack Carefully read and follow the precautions printed on the battery and the safety instructions in the User Manual before using the battery Please refer to the system operation...

Page 114: ... battery icon in the system tray of the Taskbar to confirm the remaining battery charge Battery Usage Time Information A battery is an expendable supply so when using it over a long time the capacity battery life is shortened If the battery life is reduced to under half of its initial time we recommend purchasing a new battery When not using the battery for a long time store the battery after char...

Page 115: ...y Display Manager program using the system software media Since the battery mode is optimized to extend the battery use time programs that require high performance may slow down when the computer is running on battery power In this case it is recommended connecting the AC adapter or selecting high performance mode For Windows 7 Vista 1 Click Start Control Panel Hardware and Sound Power Options Alt...

Page 116: ...n each power mode The higher the power saving effect increases the longer the graph bar is displayed When Using Games or Multimedia The system may not operate properly in maximum battery mode It is recommended to connect the AC adapter to the system or to use the system in general mode Usage Mode of Samsung Battery Manager The maximum battery mode optimizes the system operation speed to increase t...

Page 117: ... click the OK button You can use the battery in the selected mode Battery Normal Mode Battery Life Extension Mode Battery Normal Mode This mode maintains 100 of the battery charge when using the computer on AC power In this case although the battery use time increases the battery life is reduced Battery Life Extension Mode This mode maintains 80 of the battery charge when using the computer on AC ...

Page 118: ...product depending on the computer model and driver version 1 Disconnect the AC power adapter after turning off the computer 2 Restart your computer and press the F2 button when the Samsung logo appears to start the BIOS Setup 3 Move to the Boot Smart Battery Calibration item using the direction keys and press Enter XXXXXXXX 0WO QEM 1HH 6QWEJ 2CF QWUG PCDNGF PVGTPCN 0 PCDNGF 2 1241 KUCDNGF 5OCTV CV...

Page 119: ...the computer upside down on a flat surface 2 For 12 5 inch models Pull the battery latch outward then remove the battery For 14 15 6 inch models Lift the battery latch forward to remove the battery 3 To install the battery again slide the battery into the system The battery latches move inwards and fix the battery automatically ...

Page 120: ...uter by connecting a lock and cable to the Security Slot To use this feature you have to purchase the lock and cable additionally To use the lock and cable refer to the product manual Tie the lock and cable to a fixed object and install the other end of the cable to the security slot ...

Page 121: ...Chapter 4 Backup Restore Samsung Recovery Solution Optional 121 ...

Page 122: ...his document may differ from actual product If your computer does not have an internal ODD you need an external ODD connected to your computer to use the Backup Function or Restore Function using DVDs The System Software function may not be provided depending on the program version Samsung Recovery Solution Functions Backup Restore Functions Backup Function Backs up drive C or required folders and...

Page 123: ...can restore the computer to the Initial Status using the Complete Restore function An Initial Status Backup is only performed once immediately after the computer is purchased 1 If you turn the power on for the first time the Register Windows screen appears If you register Windows according to the instructions on the screen the computer will be restarted 2 After the computer has been restarted the ...

Page 124: ...the F4 key when the boot screen SAMSUNG logo appears After a moment the computer boots up in Restoration mode and the Samsung Recovery Solution screen appears For computers supporting the touch screen function the touch screen function does not work during Restore Mode In this case please use the touchpad or mouse 2 If the initial menu screen appears click Restore If you click Select by Symptom th...

Page 125: ...key during the booting sequence Since a Complete Restore deletes all user data as well as additionally installed programs please backup your important data first using the Data Backup function before running Complete Restore 4 The computer boots up into restoration mode and the restoration progress message appears If you click OK the restoration begins The restoration may take some time please wai...

Page 126: ...tion 2 Enter a description of the current status of the computer and click Next After connecting a DVD drive or removable storage device you can specify the DVD drive or removable storage device as the Save Path Select Drive D Select the DVD drive 3 When the option selection item appears select an option and click Next The LiveImaging and System Software Backup functions are supported as options f...

Page 127: ...and DVD RW formats If the LiveImaging option has been selected the Complete Backup operation begins without the computer being restarted 5 Continue with the Complete Backup operation by following the instructions 6 When the Restart the System message appears after the backup is complete click OK to restart the system If the LiveImaging option has been selected the computer is not restarted Samsung...

Page 128: ... click Complete Restore 3 Select a Complete Backup restoration point in the restoration point selection screen and click the Next button The system is restarted 4 The restoration progress message appears after the computer boots up in restoration mode If you click OK the restoration begins If multiple DVDs have been used for a Complete Backup whenever burning a DVD is completed the Insert the next...

Page 129: ...ed up and then click the Next button 3 Enter a description for the backup in the Description field so that you can easily recognize it later and specify the Save Path If your computer has a DVD Writer you can specify the DVD drive as the Save Path Select Drive D Select the DVD drive If you have specified a hard disk drive or a removable disk as the Save Path the SamsungRecovery SamsungData folder ...

Page 130: ...n backing up to another drive Proceed to Step 2 2 When the initial menu screen appears click Restore and then click Data Restore 3 Select a backup item to be restored in the backup list and click the Next button 4 Select a folder for the restoration and click the Next button Data Restore begins 5 When Data Restore is completed check if the data has been restored to the specified folder Samsung Rec...

Page 131: ...the function may not be supported depending on the version The System Software Installation Function only works in Microsoft Windows Installing System Software 1 When the initial menu screen appears click System Software System Software Installation 2 When the Samsung System Software screen appears check all the device drivers and application programs you want to install and then click Install Now...

Page 132: ... programs are saved to that folder Take care to not delete the folder 3 If you click the Next button the Software Backup begins If you have selected the DVD drive as the Save Path the Insert a blank DVD message appears Insert a blank DVD and click the OK button 4 After the backup the System Software Backup is completed message appears If you want to install the System Software Programs backed up o...

Page 133: ...ion of the hard disk drive HDD in Windows is different from the product specifications The capacity of the storage device HDD of the manufacturer is calculated assuming that 1KB 1 000 Bytes However the operating system Windows calculates the storage device capacity assuming that 1KB 1 024 Bytes and therefore the capacity representation of the HDD in Windows is smaller than the actual capacity This...

Page 134: ...Appendix Important Safety Information 134 Replacement Parts and Accessories 136 Regulatory Compliance Statements 138 WEEE Symbol Information 154 TCO Certified 155 Product Specifications 156 Glossary 158 Index 162 ...

Page 135: ...e using to power your equipment is easily accessible in case of fire or short circuit If your computer has a voltage selector switch make sure that the switch is in the proper position for your area Openings in the computer case are provided for ventilation Do not block or cover these openings Make sure you provide adequate space at least 6 inches 15 cm around the system for ventilation when you s...

Page 136: ... personnel if The power cord or plug is damaged Liquid has been spilled into the system The system does not operate properly when the operating instructions are followed The system was dropped or the casing is damaged The system performance changes The Instruction On Safety Operation of NotePC 1 When installing and operating devices please refer to safety requirements in the user guide 2 Devices c...

Page 137: ...RISK OF EXPLOSION IF BATTERY IS REPLACED BY AN INCORRECT TYPE DISPOSE OF USED BATTERIES ACCORDING TO THE INSTRUCTIONS Laser Safety All systems equipped with CD or DVD drives comply with the appropriate safety standards including IEC 60825 1 The laser devices in these components are classified as Class 1 Laser Products under a US Department of Health and Human Services DHHS Radiation Performance St...

Page 138: ...country where you use the computer For more information on power cord set requirements contact your authorized dealer reseller or service provider General Requirements The requirements listed below are applicable to all countries All power cord sets must be approved by an acceptable accredited agency responsible for evaluation in the country where the power cord set will be used The power cord set...

Page 139: ...lieves these devices are safe for use Regardless of the power levels care should be taken to minimize human contact during normal operation As a general guideline a separation of 20 cm 8 inches between the wireless device and the body for use of a wireless device near the body this does not include extremities is typical This device should be used more than 20 cm 8 inches from the body when wirele...

Page 140: ...ct manufacturer Technical Support for additional information United States of America USA and Canada Safety Requirements and Notices Do not touch or move antenna while the unit is transmitting or receiving Do not hold any component containing the radio such that the antenna is very close or touching any exposed parts of the body especially the face or eyes while transmitting Do not operate the rad...

Page 141: ...st accept any interference received including interference that may cause undesired operation This equipment has been tested and found to comply with the limits for a Class B digital device pursuant to Part 15 of the FCC Rules These limits are designed to provide reasonable protection against harmful interference in a residential installation This equipment generates uses and can radiate radio fre...

Page 142: ...the system label This device is restricted to indoor use due to its operation in the 5 15 to 5 25 GHz frequency range FCC requires this product to be used indoors for the frequency range 5 15 to 5 25 GHz to reduce the potential for harmful interference to co channel Mobile Satellite systems High power radars are allocated as primary users of the 5 25 to 5 35 GHz and 5 65 to 5 85 GHz bands These ra...

Page 143: ...ated with another transmitter and transmitting antenna FCC Part 68 If fitted with a modem device This equipment compiles with part of the FCC rules On the back of this equipment is a label that contains among other information the FCC registration number and ringer equivalence number REN for this equipment If requested this information must be provided to the telephone company This equipment uses ...

Page 144: ...s experienced with this equipment Modem for repair or warranty information please contact your local distributor If the equipment is causing harm to the telephone network the telephone company may request that you disconnect the equipment until the problem is resolved The user must use the accessories and cables supplied by the manufacturer to get optimum performance from the product No repairs ma...

Page 145: ...and its gain should be so chosen that the equivalent isotropically radiated power EIRP is not more than that required for successful communication To prevent radio interference to the licensed service this device is intended to be operated indoors and away from windows to provide maximum shielding Equipment or its transmit antenna that is installed outdoors is subject to licensing Pour empecher qu...

Page 146: ...65 à 5 85 GHz Ces stations radar peuvent provoquer des interférences avec ce périphérique et ou l endommager The maximum allowed antenna gain for use with this device is 6dBi in order to comply with the E I R P limit for the 5 25 to 5 35 and 5 725 to 5 85 GHz frequency range in point to point operation Le gain d antenne maximum autorisé avec ce périphérique est de 6 dBi afin de respecter la limite...

Page 147: ...prevent radio interference to licensed service this device is intended to be operated indoors and away from windows to provide maximum shielding Equipment or its transmit antenna that is installed outdoors is subject to licensing Afin de prévenir des interférences de radio au service autorisé ce dispositif est prévu pour être utilisé à l intérieur et éloigné des fenêtres pour fournir une protectio...

Page 148: ...d be made by an authorized Canadian maintenance facility designated by the supplier Any repairs or alterations made by the user to this equipment or equipment malfunctions may give the telecommunications company cause to request the user to disconnect the equipment Users should make sure for their own protection that the electrical ground connections of the power utility telephone lines and intern...

Page 149: ...arries the Class 2 identifier The following information is only applicable to systems labeled with the CE mark European Directives This Information Technology Equipment has been tested and found to comply with the following European directives EMC Directive 2004 108 EC Low Voltage Directive 2006 95 EC R TTE Directive 1999 5 EC Manufacturer Information Samsung Electronics Co Ltd 416 Maetan 3Dong Ye...

Page 150: ... or regions within countries under the heading European Economic Area Restrictions below EU R TTE Compliance Statements Česky Czech Samsung tímto prohlašuje že tento Notebook PC je ve shodě se základními požadavky a dalšími příslušnými ustanoveními směrnice 1999 5 ES Dansk Danish Undertegnede Samsung erklærer herved at følgende udstyr Notebook PC overholder de væsentlige krav og øvrige relevante k...

Page 151: ...an Notebook PC jikkonforma mal ħtiāijiet essenzjali u ma provvedimenti oħrajn relevanti li hemm fid Dirrettiva 1999 5 EC Magyar Hungarian Alulírott Samsung nyilatkozom hogy a Notebook PC megfelel a vonatkozó alapvetõ követelményeknek és az 1999 5 EC irányelv egyéb elõírásainak Polski Polish Niniejszym Samsung oświadcza Ŝe Notebook PC jest zgodny z zasadniczymi wymogami oraz pozostałymi stosownymi ...

Page 152: ...estrictions Local Restriction of 802 11b 802 11g Radio Usage Note to integrator The following statements on local restrictions must be published in all end user documentation provided with the system or product incorporating the wireless product Due to the fact that the frequencies used by 802 11b 802 11g wireless LAN devices may not yet be harmonized in all countries 802 11b 802 11g products are ...

Page 153: ... as follows Dans le cas d une utilisation privée à l extérieur d un bâtiment au dessus d un espace public aucun enregistrement n est nécessaire pour une distance de moins de 300m Pour une distance supérieure à 300m un enregistrement auprès de l IBPT est requise Pour une utilisation publique à l extérieur de bâtiments une licence de l IBPT est requise Pour les enregistrements et licences veuillez c...

Page 154: ...DTMF signaling Although this equipment can use either loop disconnect pulse or DTMF tone signaling only the performance of the DTMF signaling is subject to regulatory requirements for correct operation It is therefore strongly recommended that the equipment is set to use DTMF signaling for access to public or private emergency services DTMF signaling also provides faster call setup This equipment ...

Page 155: ...ot be mixed with other commercial wastes for disposal Pb Correct disposal of batteries in this product Applicable in the European Union and other European countries with separate battery return systems This marking on the battery manual or packaging indicates that the batteries in this product should not be disposed of with other household waste at the end of their working life Where marked the ch...

Page 156: ... reduced risk of eye strain Several requirements within the area of luminance contrast resolution and color Designed with the option to connect an external display keyboard and mouse recommended when working with a notebook or netbook for longer periods Ergonomic keyboard design for ease of use and good readability Fully tested according to rigorous safety standards Low Electric and Magnetic field...

Page 157: ... NVS 4200M Optimus Operating Environment Temperature 5 40 C for storage 10 35 C when operating Humidity 5 90 for storage 20 80 when operating Operating Voltage 100 240VAC Frequency 50 60Hz Output Power Optional 60W 90W Output Voltage Optional 19VDC 3 16A 60W 19VDC 4 74A 90W Optional components may not be provided or different components may be provided depending on the computer model The system sp...

Page 158: ...ademarks of the Intel Corporation Microsoft MS DOS and Windows are registered trademarks of the Microsoft Corporation All other product or company names mentioned herein are registered trademarks of their respective companies ENERGY STAR Partner As an ENERGY STAR Partner SAMSUNG has determined that this product meets the ENERGY STAR guidelines for energy efficiency ...

Page 159: ... used nowadays This computer uses DDR SDRAM Device Manager An administrative tool used to manage computer devices You can add or remove hardware or update a device driver using the Device Manager DHCP Dynamic Host Configuration Protocol This refers to automatically allocating IP addresses to the users on the network by the network administrators Direct X An application interface developed to enabl...

Page 160: ...ers to a small image that represents a file that users can use IEEE802 XX This is a set fo specifications developed by the 802 committee of IEEE for the LAN connection method called XX LAN Local Area Network A communications network connecting computers printers and other devices within a local area such as within a building A LAN enables all connected devices to interact with other devices on the...

Page 161: ...if there are 2 hard disk drives PCMCIA Personal Computer Memory Card International Association card This is an extended card slot specification for mobile computers such as a notebook computer Not only a memory device but also most peripherals such as hard disk drives LAN cards etc can be connected to this card slot Protocol A protocol is a set of rules used by computers to communicate with each o...

Page 162: ... a dot and each byte is represented as a decimal number USB Universal Serial Bus This refers to a serial interface standard developed to replace the conventional interface standards such as Serial and PS 2 The data transmission specifications are one of the interface standards used to connect a computer to peripheral devices These specifications include USB 1 0 1 1 2 0 and 3 0 It is appropriate to...

Page 163: ...1 M Memory 109 Monitor Connection Output 62 Multi Card Slot 59 O Overview 26 P Password 105 Product Specifications 156 R Recorder 72 S Safety Precautions 8 Samsung Recovery Solution 121 Scroll 48 Security Slot 119 Shortcut Key 40 SoundAlive 74 Status Indicators 28 Supervisor Password 105 T Touchpad 44 U User Password 106 V Volume Control 72 W Wired Network 76 Wireless Network 80 ...

Reviews: