EB 8091-1 EN
33
Servicing
2. Loosen the slotted nut (11) at the valve.
Remove the yoke (13) from the interme-
diate piece (4).
3. Loosen the fillister head screw (23) and
hexagon nut (26).
4. Remove the top section of the top anti-ro-
tation fixture (24.2) from the intermedi-
ate piece (4).
5. Unscrew the intermediate piece (4) out of
the insulating section (7) and carefully lift
it off the plug stem extension (22).
6. Remove the washer (27) from the insulat-
ing section (7).
7. Remove the bottom section of the top an-
ti-rotation fixture (24.2) from the insulat-
ing section (7).
8.
Remove the seal (5). Carefully clean the
sealing faces in the intermediate piece
(4) and insulating section (7).
9.
Loosen the fillister head screw (6) on the
bottom anti-rotation fixture (24.1). Re-
move the anti-rotation fixture from the in-
sulating section (7).
23
25
26
22
7
24.2
27
24.1
5
24.2
4
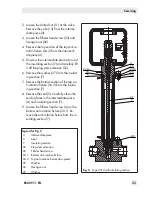
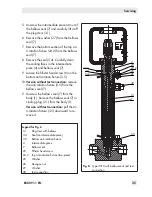
Fig. 5:
Type 3510 with insulating section
Legend for Fig. 5
4
Intermediate piece
5
Seal
7
Insulating section
22
Plug stem extension
23
Fillister head screw
24.1 Bottom anti-rotation fixture
24.2 Top anti-rotation fixture (two-piece)
25
Washer
26
Hexagon nut
27
Washer
Summary of Contents for 3510
Page 29: ...EB 8091 1 EN 29...

