


EB 8091-1 EN
23
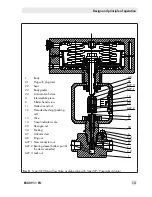
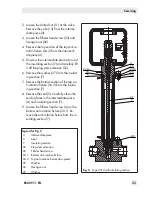
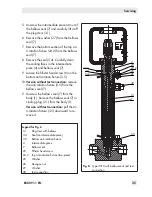
Mounting and start-up
5 Mounting and start-up
SAMSON valves are delivered ready for
use. In special cases, the valve and actuator
are delivered separately and must be assem-
bled on site. The procedure to mount and
start up the valve are described in the follow-
ing.
Risk of valve damage due to excessively high
or low tightening torques.
Observe the specified torques on tightening
control valve components. Excessively tight
-
ened torques lead to parts wearing out
quicker. Parts that are too loose may cause
leakage.
Observe the specified tightening torques
(
u
AB 0100).
Risk of valve damage due to the use of un-
suitable tools.
Only use tools approved by SAMSON
(
u
AB 0100).
5.1 Mounting the actuator onto
the valve
Proceed as described in the actuator docu-
mentation if the valve and actuator have not
been assembled by SAMSON:
−
Remove the mounted actuator before
mounting the other actuator (see associat-
ed actuator documentation).
−
Preloading the actuator springs increases
the thrust of a pneumatic actuator and re-
duces the travel range of the actuator (see
associated actuator documentation).
5.2 Installing the valve into the
pipeline
5.2.1 Checking the installation
conditions
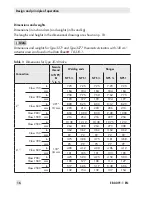
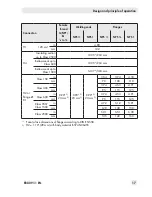
Pipeline routing
The inlet and outlet lengths vary depending
on the process medium. To ensure the control
valve functions properly, follow the installa-
tion instructions given below:
Î
Observe the inlet and outlet lengths (see
Table 3). Contact SAMSON if the valve
conditions or states of the medium pro-
cess deviate.
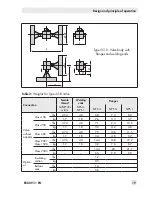
Î
Install the valve free of stress and with the
least amount of vibrations as possible. If
necessary, attach supports to the valve.
Î
Install the valve allowing sufficient space
to remove the actuator and valve or to
perform service and repair work on
them.
NOTICE
!
NOTICE
!
Note
Summary of Contents for 3510
Page 29: ...EB 8091 1 EN 29...


