EB 8091-1 EN
39
Servicing
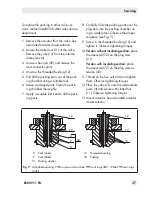
15. Place the intermediate piece (4) together
with the plug (2.1) onto the body. Use a
suitable tool to screw it into the body (1).
Observe tightening torques.
16. Push the anti-rotation fixture (2.4) over
the intermediate piece (4) and lock it in
place with the fillister head screw (6).
17. Place the yoke (13) onto the intermediate
piece (4) and secure with slotted nut
(11). Observe tightening torques.
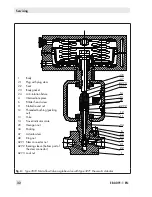
18. Screw in the threaded bushing (12) and
tighten it. Observe tightening torques.
19. Place sleeve (A27.2) on the plug stem
(2.1).
20. Thread on the hex nuts (20) and tighten
them. Observe tightening torques.
21. Mount actuator. See associated actuator
documentation.
7.3.2 Version with insulating
section
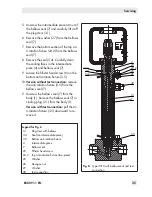
1. Remove the actuator from the valve. See
associated actuator documentation.
2. Loosen the slotted nut (11) at the valve.
Remove the yoke (13) from the interme-
diate piece (4).
3. Loosen the fillister head screw (23) and
hexagon nut (26).
4. Remove the top section of the top anti-ro-
tation fixture (24.2) from the intermedi-
ate piece (4).
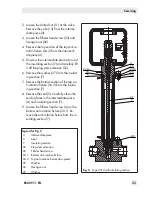
5. Unscrew the intermediate piece (4) out of
the insulating section (7) and carefully lift
it off the plug stem extension (22).
6. Remove the washer (27) from the insulat-
ing section (7).
7. Remove the bottom section of the top an-
ti-rotation fixture (24.2) from the insulat-
ing section (7).
8.
Replace the packing. See section 7.2.
9.
Replace seal as described in sec-
tion 7.1.2.
10. Loosen the fillister head screw (6) on the
bottom anti-rotation fixture (24.1). Re-
move the anti-rotation fixture from the in-
sulating section (7).
11. Unscrew the insulating section (7) from
the body (1). Remove the insulating sec-
tion (7) together with the plug (2.1) and
plug stem extension (22) from the body
(1).
12. Replace gasket as described in sec-
tion 7.1.2.
13. Unscrew the seat (2.2) using a suitable
tool.
14. Apply a suitable lubricant to the thread
and the sealing cone of the new seat.
15. Screw in the seat (2.2) using a suitable
tool. Observe tightening torques.
16. Unscrew the plug with plug stem (2.1)
from the plug stem extension (22) and
pull it out of the insulating section (7).
17. Apply a suitable lubricant to the end of
the plug stem of the new plug (2.1).
18. Slide the new plug with plug stem (2.1)
into the insulating section (7) and screw
it onto the plug stem extension (22). Ob-
serve tightening torques.
Summary of Contents for 3510
Page 29: ...EB 8091 1 EN 29...

