background image

74

Sagemcom · MF 4591

EN

Clearing Paper Jam in 

the Print Unit

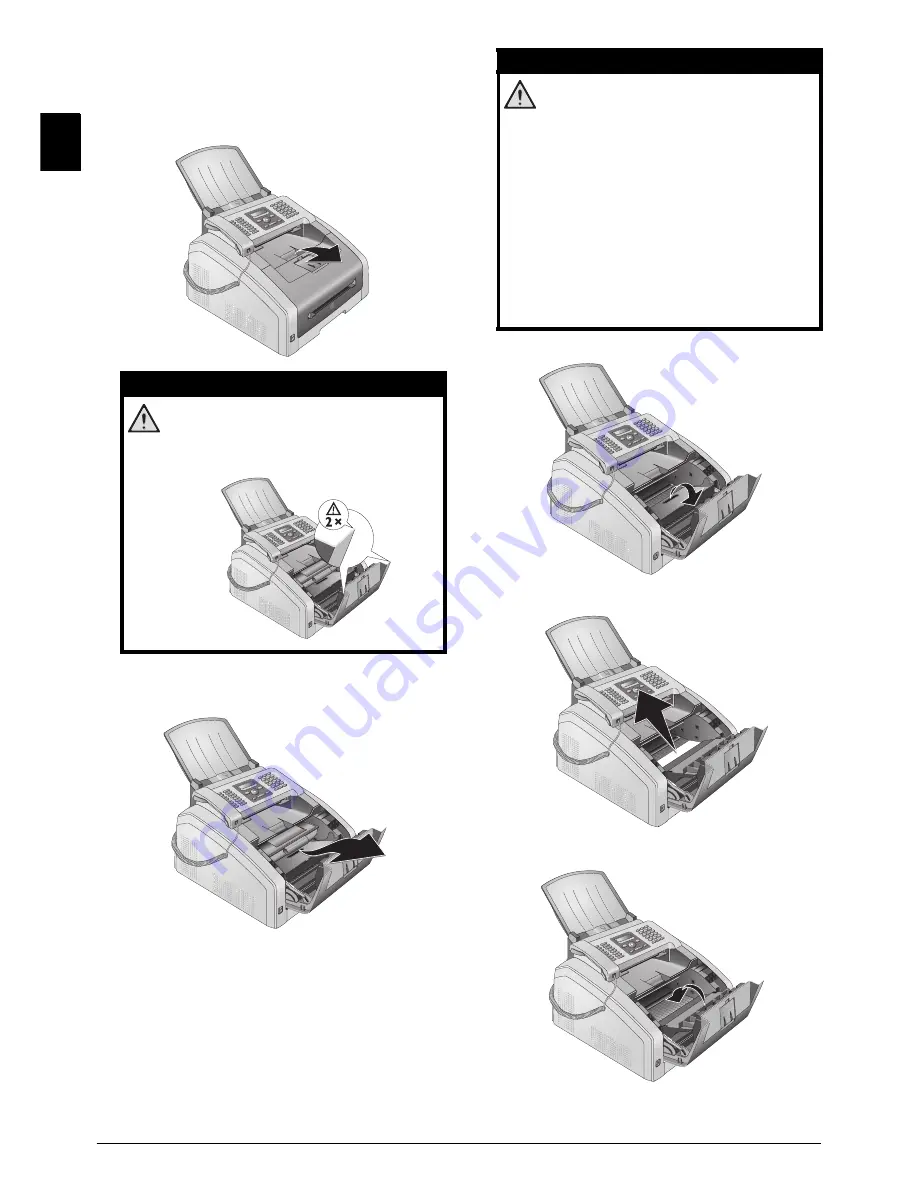
1. Open the device by lifting the device cover for-

wards

2. Remove the toner cartridge by gripping the han-

dle in the middle and pulling it forwards out of
the device

3. Open the paper jam flap.

4. Carefully pull out the paper.

5. Close the paper jam flap.

DANGER!

Edges on the Device Cover!

Take care of the edges on the device
cover. You could injure yourself if you
reach into the device from the side.

DANGER!

Escaping Toner Dust!

Carefully remove the toner cartridge
from  the  device  so  that  no  toner  dust
spills out. Take care where you place the
toner cartridge, escaping toner dust may
soil the surface.
Never open a toner cartridge. If toner
dust is released into the air, you should
avoid allowing it to contact your skin
and eyes. Do not inhale the released
toner dust. Remove the toner dust from
clothing or objects with cold water; hot
water would only cause the toner to set.
Never remove loose toner dust with a
vacuum cleaner.

Summary of Contents for MF 4591

Page 1: ...MF 4591 User Manual...

Page 2: ...r fax transmission for example different resolutions or the timer function You can secure your fax reception with a code In that case incoming faxes are not printed out but rather are stored in the fa...

Page 3: ...Feed 27 Loading Pre printed Material 27 Print a List of Available Documents on USB Storage Medium 27 Print Document from USB Storage Medium 28 Delete Files on USB Storage Medium 29 Inserting Slides an...

Page 4: ...per Settings 60 Set Resolution 60 Adjust contrast 61 Setting the Brightness 61 Setting Up PCL Fonts 61 Setting the Fax Reception Mode 62 Silent Fax Reception 62 Additional Options for Fax Transmission...

Page 5: ...t allow liquids to enter into the device Discon nect the device from the electrical power source and from the telephone network if liquids or foreign ob jects have entered the device and have your dev...

Page 6: ...wder in your eyes rinse them with a lot of water for at least 15 minutes Call a doctor immediately Toner Cartridge 1 Never open a toner cartridge Store both new and used cartridges in a place where th...

Page 7: ...nual Troubleshooting This symbol designates tips that will help you to use your device more effectively and easily CAUTION Damage to the Device or Loss of Data This symbol gives warning of damage to t...

Page 8: ...mbruch Scanner glass Scanner glass Toner Cartridge Toner cartridge Paper Jam Door Print Unit Paper jam door print unit Ger t offen nummeriert Connections on the Rear Side Connections on the Rear Side...

Page 9: ...g the menu functions confirming input Start Starting Transmission of Messages Starting Action o Starting transmission of message starting ac tion Fax FAX Start a fax transmission or fax reception Copy...

Page 10: ...inting the Fax Templates 5 Telephone Book Looking up an Entry Saving Entry Creating Group Edit Entry Deleting an Entry Printing the Telephone Book Load Telephone Book from USB Storage Medium Saving Te...

Page 11: ...cution page 37 72 Changing a Job page 37 73 Deleting a Job page 37 74 Printing a Job page 37 75 Printing the Job List page 37 80 Printing List of Settings page 66 81 Printing the List of Available Fun...

Page 12: ...journal and the call log by pressing Select with LOGS Confirm with OK Printing the Job List Printing the Job List You can also obtain a print jobs list by pressing Select with COMMAND LIST Confirm wi...

Page 13: ...nual with installation guide not depicted User manual with installation guide not depicted Installation CD Installation CD not depicted Verpackungsinhalt Missing Package Contents Spaltenumbruch Spalte...

Page 14: ...rial from the Paper Tray 1 Pull the paper tray out of the device DANGER Escaping Toner Dust Never open a toner cartridge If toner dust is released into the air you should avoid allowing it to contact...

Page 15: ...upport into the two openings in the cover The document support should snap se curely into place Dokumentenhalter aufstecken Fold Out the Print Out Support Fold Out the Print Out Support 1 Fold the add...

Page 16: ...ur PTT line socket Telefonkabel anschlie en Connection to an ISDN system PABX Systems 1 Connecting the Network Cable Connecting the Network Cable Network Connection Connecting the Network Cable Insert...

Page 17: ...ith several time zones you can select from preset time zones or enter the deviance of your time zone from UTC see also chapter Set the Time Zone page 59 In countries with one time zone the setting is...

Page 18: ...s Your computer must have one of the following oper ating systems Microsoft Windows Microsoft Windows 2000 SP 4 XP Vista Windows 7 Windows Server 2003 2008 Apple Macintosh Apple Macintosh OS 10 4 10 5...

Page 19: ...an inexpensive telephone service provider call by call as a telephone book entry select this entry and manually enter the subsequent telephone number or select another saved entry Insert Dialling Paus...

Page 20: ...lls Missed Calls Missed Calls You can find reference to missed calls in the redial caller list 1 Press 2 Page through the dialled numbers the calls re ceived and calls missed in the list using in dica...

Page 21: ...Confirm with OK 10 You can assign a ring tone to the number Use or the number buttons 1 to 7 to select a ring tone 11 Confirm with OK 5 Telephone Book of the Device Calling the Web Interface You can a...

Page 22: ...phone book entries for the corresponding let ters Select an entry using 2 Press COPY Spaltenumbruch Spaltenumbruch Groups Groups Groups You can create groups containing several numbers A message is se...

Page 23: ...ge medium to the USB host port as required 2 Press OK 518 and OK The telephone book is saved on the USB storage medium Load Telephone Book from USB Storage Medium Data Format 1 Make sure that a USB st...

Page 24: ...3 Confirm with OK Specify Search Directory 1 Press OK 5104 and OK 2 Specify the data structure directory on the LDAP where the device should search for the entries 3 Confirm with OK Enter the Port 1...

Page 25: ...per Tray 1 Pull the paper tray out of the device 6 Printer and Printing Media Paper Tray Paper Sizes Size A4 A5 B5 JIS Letter Legal 13 14 Exec Weight 60 105 g m Capacity 250 sheets Manual Paper Feed P...

Page 26: ...emove the protective cardboard from the paper tray before loading paper and replacing the paper tray into the de vice Remove the document support and the document outlet tray from the paper tray EX B5...

Page 27: ...Documents on USB Storage Medium Print a List of Available Documents on USB Storage Medium USB Storage Media Analysing USB Storage Medium Introduction You can print a list of all the TXT JPEG and TIFF...

Page 28: ...t port on the front of the device Access Function You can also call the function by pressing OK 211 and OK CAUTION Removing USB Storage Media Never pull out the storage medium while the device is acce...

Page 29: ...device is accessing it This could cause data to be damaged or lost CAUTION Compatible USB Storage Media Ensure that the power of a USB device does not exceed the permitted amp limit of the USB connect...

Page 30: ...Sudoku you would like to print maximum 9 copies 5 Confirm with OK 6 Using select if you would like to print the so lution 7 Confirm with OK Printing the Last Game Again 1 Press OK 862 and OK 2 Enter...

Page 31: ...o enter the desired number first or dial a saved entry and then press FAX or o The dialling process begins immediately Automatic Redial If the subscriber is busy the device dials the number again afte...

Page 32: ...use of the lower telephone tariffs or if the recipient can be reached at some spe cific time only you can send the fax at a later time within 24 hours 1 Insert the document 2 Enter the desired number...

Page 33: ...hich you can use are stored in your device With these templates you can quickly create for example a short fax note or an invitation 1 Press OK 45 and OK 2 Use to select the template you would like to...

Page 34: ...eate Cover Title Page with Editor Introduction With the cover sheet editor you can design your own cover pages for your faxes or use an existing docu ment as the cover sheet 1 Click on Cover page 2 Ac...

Page 35: ...sent fax after the sending process is com plete Print the send report The transmission report will be printed after each successful fax transfer as well as after interrupted transfers Print the send...

Page 36: ...ent the exact time at which you have received a fax transmission A memory buffer in the device en sures that the correct date and time of reception will be maintained even after a power loss Switches...

Page 37: ...After the job number and job status indicator you will find the fax number to which a fax is to be sent or from which it is to be polled Documents on the jobs list can fall into the following categor...

Page 38: ...ents 128 600 mm Paper Weight of the Documents 60 90 g m Capacity 30 page 60 90 g m Manufacturer s Recom mendation for Optimum Operation A4 A5 Letter Legal 80 g m CAUTION Unsuitable Documents Do not in...

Page 39: ...e 4 Enter the number of times you would like to copy the document maximum of 99 copies 5 Confirm with OK 6 Using select the paper source 7 Confirm with OK 8 For Paper in the Manual Paper Feed Use to s...

Page 40: ...art the copying process or OK to configure further settings see also chap ter Make Copies Using User Defined Settings page 39 Configure Settings for Second Profile Configure Settings for Second Profil...

Page 41: ...th OK Adjust contrast 1 Press OK 1064 and OK 2 Set the desired contrast using 1 Reduces the contrast typeface appears lighter 4 Factory settings Optimized adaptation for all documents 7 Increases the...

Page 42: ...USB 3 Confirm with OK 4 Press OK Make Scans Using User defined Settings 1 Press SCAN 2 Select with SCANTO PC USB 3 Confirm with OK 4 Select with SETTINGS 5 Confirm with OK 9 Scanner Specifications for...

Page 43: ...ress Press to insert language specific special characters Select with Confirm with OK You can move the cursor using Use C to delete individual characters Select the File Format For an image file you c...

Page 44: ...connected network computers using 5 Confirm with OK 6 Select with SETTINGS 7 Confirm with OK 8 Select the desired resolution using f DRAFT 100 Scanning with reduced resolu tion for use on the Interne...

Page 45: ...tocol Server FTP to archive them for example You require a user login name and password for the serv er The device logs on to the FTP server and transfers the created file 1 Insert the document 2 Pres...

Page 46: ...SFXsoftware you can scan documents and then edit them on the computer 1 Start the software Companion Center SFX by clicking on the Companion Center SFX icon on your desktop or selecting Start Programs...

Page 47: ...with the current date 8 Activate the function Open with if you want to open the scanned file after the scanning process is complete Select the desired program For ex ample you can open an image file...

Page 48: ...Next you will be asked to accept the licensing conditions Click on Yes 4 The software and drivers are installed This Proc ess May Take a Few Moments 5 At the conclusion of the install process you must...

Page 49: ...ck 2 an additional window will appear during the final installation Select No not this time and click on Next 9 Under Windows XP select Install software auto matically during the final installation an...

Page 50: ...rowser Access the Web Interface with an Internet Browser Introduction You need the current IP address of the device in order to access the web interface with an internet browser You will find the IP a...

Page 51: ...frastructure Wireless Network In an infrastructure network multiple devices com municate via a central access point gateway router All data are sent to the access point gateway router and distributed...

Page 52: ...r the IP address of the access point Access Point Router 3 Confirm with OK Enter Domain Name Server DNS Introduction The DNS translates IP addresses in the names of in ternet pages and vice a versa Yo...

Page 53: ...AC Address MAC Address The MAC address Media Access code is the alpha numerical address of the device with which it can be uniquely identified in the network 1 Press OK 0745 and OK 2 The MAC address o...

Page 54: ...tivate Push Button Configuration on the WLAN access point The WLAN access point and device connect automatically and create a WPA protected connection Using Network Scan Introduction Your device shows...

Page 55: ...ther 5 characters ASCII or 10 num bers hexadecimal With 128 bit encryp tion the WEP key must be either 13 characters ASCII or 26 numbers hexa decimal You can find the WEP key in the network settings o...

Page 56: ...a prima ry and secondary DNS Enter Primary DNS 1 Press OK 0844 and OK 2 Enter the address of the primary DNS 3 Confirm with OK Enter Secondary DNS 1 Press OK 0845 and OK 2 Enter the address of the sec...

Page 57: ...primary and secondary WINS server 1 Press OK 0861 and OK 2 Enter the address of the primary WINS server 3 Confirm with OK Enter the Secondary Windows Internet Name Service WINS Server 1 Press OK 0862...

Page 58: ...paper are printed 1 Press ECO 2 Select with PAPER SAVE 3 Confirm with OK 4 Select one sided print Simplex or double sided print Duplex using 5 Confirm with OK Selecting the Country Selecting the Count...

Page 59: ...ing the Server Access 1 Press OK 0103 and OK 2 Use to select whether you would like to turn the function on or off 3 Confirm with OK Enter the SNTP Server Address 1 Press OK 0101 and OK 2 Enter the na...

Page 60: ...or printed doc uments forms into the paper tray You can insert special paper formats envelopes slides sheets of la bels or printed documents into the manual paper feed 1 Press OK 202 and OK 2 Using s...

Page 61: ...or the Copier 1 Press OK 105 and OK 2 Using select the desired level of brightness 1 Reproduction is lighter 4 Factory settings Optimized adaptation for all documents 7 Reproduction is darker 3 Confir...

Page 62: ...set the device to this mode if you have additional devices connected to the EXT socket of your device If an additionally connected answer ing machine receives a call your device will check to determi...

Page 63: ...nsmission Report On Off After every transmission the device prints out a transmission report Two different settings are avail able 1 Press OK 4011 and OK 2 Use to select from the following settings AL...

Page 64: ...s OK 102 and OK 2 Select whether the copies should be output sort ed or unsorted using 3 Confirm with OK Additional Scanner Options Additional Scanner Options Select the File Format Introduction Using...

Page 65: ...m with OK 4 Use to select whether you would like to turn the function on or off 5 Confirm with OK Lock Settings Lock Settings This function blocks the changing of settings on your device The settings...

Page 66: ...t of Settings Prints the List of Settings Press OK 80 and OK to print a list of all set tings of your device Prints the List of Settings Printing a List of the Installed PCL Fonts Printing a List of t...

Page 67: ...elephone No Extension Set up Private Branch Exchange PABX You can set up your device for operation on an exten sion indicate the length of the internal numbers di rect dial number and save the code wh...

Page 68: ...with additional telephones To use this function additional telephones must be set to the tone dial ling mode DTMF MFV tones for this purpose see the operating manual of your additional telephone Start...

Page 69: ...nal Answering Machine 69 EN Answering Machine Records Fax Signals Answering Machine Records Fax Signals If the external answering machine records fax signals but your device cannot receive faxes inspe...

Page 70: ...ridge on that basis The toner level is stored in each toner cartridge Displaying the Toner Level Press OK 946 and OK The toner level of the toner cartridge is indicated by a percentile value between 1...

Page 71: ...d during a firmware update and reset to fac tory settings If the settings are deleted you will need to calibrate the scanner again see also chapter Calibrating the Scanner page 77 CAUTION Use Only Ori...

Page 72: ...care of the edges on the device cover You could injure yourself if you reach into the device from the side DANGER Escaping Toner Dust Carefully remove the toner cartridge from the device so that no to...

Page 73: ...o the device all the way to the stopping point CAUTION Toner Cartridge Not Inserted Correctly If the device cover would not close the toner cartridge is not inserted correctly Take the toner cartridge...

Page 74: ...could injure yourself if you reach into the device from the side DANGER Escaping Toner Dust Carefully remove the toner cartridge from the device so that no toner dust spills out Take care where you pl...

Page 75: ...tically fold into starting position when the paper jam cover is closed CAUTION Toner Cartridge Not Inserted Correctly If the device cover would not close the toner cartridge is not inserted correctly...

Page 76: ...the device off using the on off switch on the back before you remove the plug from the socket CAUTION Recommissioning Plug the power cable into the electrical out let Only after switch the device on...

Page 77: ...librating the Scanner Calibrating the Scanner Calibrating the Scanner If vertical lines appear on the printed pages or on the fax messages it is possible the scanner needs to be calibrated Instruction...

Page 78: ...ower Cycling Power Cycling Power Cycling If a problem occurs that cannot be corrected with the instructions in this user manual see also the help below follow the steps given here 1 Switch the device...

Page 79: ...receive whistling tone or silence You can eavesdrop while the connection is establish see also chapter Eavesdropping while Connection is Es tablished page 33 Faxes sent are of poor quality Modify the...

Page 80: ...be replaced Use only original con sumable materials Problems Printing or Copying Possible Cause s General Error Messages Possible Cause s INSERT PAPER Paper must be inserted into the manual paper feed...

Page 81: ...so chapter Power Cycling page 78 If the problem repeats please contact our technical customer service or your retailer General Error Messages Possible Cause s USB Storage Medium Error Mes sages Possib...

Page 82: ...process was interrupted Repeat the transmission process Call the number and check whether the number is a fax number and whether the connected fax device is ready to receive whistling tone or silence...

Page 83: ...ridge page 71 Check to see whether a paper jam has occurred see also chapter Fixing a Paper Jam page 73 Received document error The received fax message is possibly incomplete Ask the sender to check...

Page 84: ...e them for your telephone line The transmission of your telephone number can be turned on and off temporarily or it can be turned off permanently Calling Line Identification Restric tion CLIR CCITT Co...

Page 85: ...rect dial numbers In order to do this you must insert a dialling pause between the fax number and the sub address see Di alling Pause Fax Signal CNG Tone Calling Signal The tone that a fax machine sen...

Page 86: ...you Tone Dialling Dual Tone Multi Frequency In many countries tone dialling has replaced pulse dialling in which each number was sent as a corre sponding number of pulses With tone dialling a specific...

Page 87: ...ght 8 8 kg Mains Connection 220 240 V 50 60 Hz Power Consumption Stand by Mode 4 W Warm Up Phase 980 W Transmission receipt 15 W Printing 560 W Recommended Ambient 18 28 C Relative Humidity 30 70 non...

Page 88: ...Copies Subject to Change Technical specifications subject to change without notice Spaltenumbruch Spaltenumbruch Type Group 3 Compatibility ITU T T 30 Data Compression MH MR MMR JBIG Modulation V 17...

Page 89: ...ts of this guarantee This guarantee does not affect the Customer statuto ry rights B Exclusions From Guarantee Sagemcom shall have no liability under the guaran tee in respect of Damage defects breakd...

Page 90: ...gemcom disclaims any and all rights in those marks Reproduction Not Permitted The reproduction of certain documents e g by scan ning printing copying is prohibited in many coun tries The list of such...

Page 91: ...chanical photocopying recording or otherwise without the prior written permission of Sagemcom The information contained herein is designed only for use with this product Sagemcom is not responsi ble i...

Page 92: ...n external telephone Keep a printout of the settings as well as the serial number of the machine handy The serial number can be found on the type label Computer Connection Should problems with the com...

Reviews: