background image

RVS Systems  

4

Please read the entire manual and follow the instructions and 

warnings carefully. Failure to do so can cause serious damage and/or 

injury, including loss of life. Be sure to obey all applicable local

 traffic and motor vehicle regulations as it pertains to this product. 

Improper installation will void manufacturer’s warranty.

• 

The Rear View Camera System is 

designed to help the driver safe-
ly detect people and/or objects, 
helping to avoid damage or injury. 
However, you the driver, must use it 
properly. Use of this system is not a 
substitute for safe, proper or legal 
driving.

• 

Never back up while looking at the 

monitor alone. You should always 
check behind and around the vehi-
cle when backing up, in the same 
way as you would if the vehicle did 
not have the Rear View Camera 
System. If you back up while looking 
only at the monitor, you may cause 

damage or injury. Always back up 
slowly.

 The Rear View Camera System is 

not intended for use during exten-
sive back-up maneuvers or backing 
into cross traffic or pedestrian walk-
ways.

Please, always remember, the area 

displayed by the Rear View Camera 
System is limited. It does not display 
the entire panorama that is behind 
you. 

USAGE:

SAFET

Y   INF

ORMA

TION

Summary of Contents for RVS Systems RVS-M632

Page 1: ...ReverseWithConfidence 1 G Series Rear View Replacement Mirror Monitor with Built in Dash Camera RVS M632 Instruction Manual RVS Systems Inc 2015...

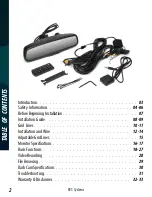
Page 2: ...lation 07 Installation Guide 08 09 Grid Lines 10 11 Installation and Wire 12 14 AdjustableGridLines 15 Monitor Specifications 16 17 Basic Functions 18 27 VideoRecording 28 File Browsing 29 DashCamSpec...

Page 3: ...intended to be installed as a supplement aid to your standard rear view mirror that already exists in your vehicle The Backup Camera System should not be used as a substitute for the standard rear vi...

Page 4: ...mustuseit properly Use of this system is not a substitute for safe proper or legal driving Neverbackupwhilelookingatthe monitor alone You should always check behind and around the vehi cle when backin...

Page 5: ...immediately Wherethepowercablemaytouch a metal case cover the cable with friction tape A short circuit or disconnected wire may cause a fire While installing the Rear View System be careful with the w...

Page 6: ...s 1797AtlanticAvenue Brooklyn NY11233 Tel 1 800 764 1028 IN NO EVENT SHALL SELLER OR MANUFACTURER BE LIABLE FOR ANY DIRECT OR CONSEQUENTIAL DAMAGES OF ANY NATURE OR LOSSES OR EXPENSES RESULTING FROM A...

Page 7: ...chmarktestbeforeinstallation toinsurethatallcomponentsareworkingproperly Step 1 Choose the monitor and camera locations Step 2 Install all cables in vehicle when necessary a 0 8 20mm hole should be dr...

Page 8: ...installation of the mirror Figure 1 1 Clip OnMonitor 1 The Mirror Monitor attaches to the existing rear view mirror in vehicle with the pressurized clips on the back of the monitor 2 Attach monitor t...

Page 9: ...via the RED power port on the RCA adapter PrecautionsForUseOfMirrorMonitor I The Mirror Monitor is made of glass Do not subject it to a mechanical shock by dropping it from a high place etc II Do not...

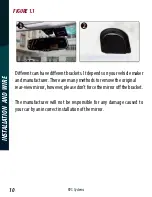
Page 10: ...kets Itdependsonyourvehiclemaker and manufacturer There are many methods to remove the original rear viewmirror however pleasedon tforcethemirroroffthebracket The manufacturer will not be responsible...

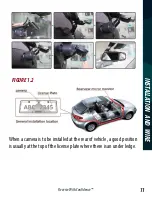
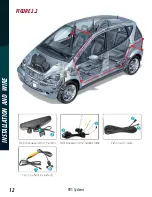
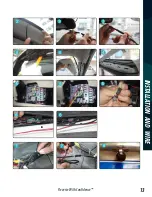
Page 11: ...everseWithConfidence 11 INSTALLATION AND WIRE FIGURE1 2 When a camera is to be installed at the rear of vehicle a good position is usually at the top of the license plate where there is an under ledge...

Page 12: ...RVSSystems 12 INSTALLATION AND WIRE FIGURE2 2...

Page 13: ...ReverseWithConfidence 13 INSTALLATION AND WIRE...

Page 14: ...e is 3M from the back of the car and the yellow line is 6 5 ft The distant red line is 1M from the backside of car while the close red line is 0 4M Both reference lines on the left and right should le...

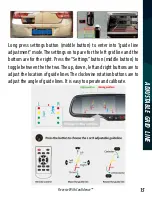
Page 15: ...de The settings on top are for the left grid line and the bottom are for the right Press the Settings button middle button to togglebetweenthethetwo Theup down leftandrightbuttonsareto adjust the loca...

Page 16: ...ze Display Screen Display Resolution Aspect Ratio Color Depth Pixel Pitch mm Power Consumption WorkingVoltage Video Input Signal System 4 3 TFT LCD 400 H x234 V 16 9 16 7M dithering 0 219x0 219 8W DC1...

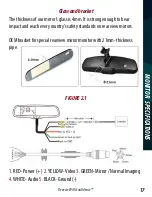
Page 17: ...rror s glass is 4mm It is strong enough to bear impact and reach every country s safety standards on rear view mirrors OEM bracket for special rearview mirror monitor with 21mm thickness pipe 1 RED Po...

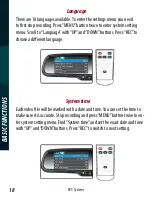
Page 18: ...setting menu Scroll to Language with UP and DOWN buttons Press REC to choose a different language Each video file will be marked with a date and time You can set the time to make sure it is accurate...

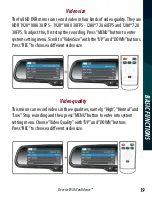
Page 19: ...t stop the recording Press MENU button to enter system setting menu Scroll to VideoSize with the UP and DOWN buttons Press REC to choose a different video size This mirror can record videos in three q...

Page 20: ...length of the video files 1 3 5 min Stop recording and then press MENU button to enter vid eo setting menu Choose Record Recycle with the UP and DOWN but tons Press REC to choose a suitable length of...

Page 21: ...corded press MENU on the remote control or the lock button to activate it This will create a 30 second event file The file will consist of video from 10 seconds before you press and 20 seconds after S...

Page 22: ...d DOWN buttons to switch between normal video file list and event video file list As memory of the SD card is limited some may want to only record the most rel evant video The motion detect setting ca...

Page 23: ...ery on your vehicle Please be sure not to use this function if you do not have a power regulator or backup power Parking mode means the DVR mirror can keep recording after ignition is off When parking...

Page 24: ...cannot be started next time Are you sure to keep the DVR mirror working It is defaulted to choose NO You can choose YES by pressing UP Down buttons Then you will find another warning Safe guard record...

Page 25: ...OWN buttons Press UP Down buttons to choose the right number and press REC button to switch the number to another After setting the Driver ID number press DOWN button to find Driver ID stamp OSD and c...

Page 26: ...ed or turned off with the auto power off function Stop recording and press MENU button to enter the video setting menu Scroll to Auto power off using the UP and DOWN buttons Press the REC button to ch...

Page 27: ...he time for auto screen off You can choose between 30 secs 1 min 2 mins 5 mins 10 mins Off The screen will now automatically turn off after reaching this set time of inactivity The screen can also be...

Page 28: ...rrent frame image if the system is not recording in HDR 1920 108030FPSmode When the car is in reverse the rear camera video will automatically display and record Under the stopping record mode press m...

Page 29: ...eo and press REC again to play pause the file Press MENU to enter the delete file setting and press REC to switch between off delete this file delete all files Press MODE to confirm In the file playin...

Page 30: ...Temperature Language AmbarellaA7LA30 32MB 1GB CMOSOV04689 H67A HDR1920X1080 30f 1920x1080 30f 1280x720 60f 1280x720 30f 4 3 16 9TFT Display SD card MAX32GB 12cm infinite JPEG Mp4 Built in microphone a...

Page 31: ...enu Camera input is not working and no video on screen 1 Wiring connected improperly or broken 2 Mirror is broken 1 Reinstall with a professional technician 2 Send system back for repairs Mirror froze...

Page 32: ...YSTEMS INC SYSTEM AFTER PARTIAL FAILURE OR USEWITH IMPROPER ACCESSORIES WARRANTY PERFORMANCE DURINGTHE ABOVEWARRANTY PERIOD SHOULDYOUR RVS SYSTEMS PRODUCT EXHIBIT A DEFECT IN MATERIAL ORWORKMANSHIP SU...

Page 33: ...EARVIEW SAFETY AND OR ITS AFFILIATES SHALL HAVE NO RESPONSIBILITY OR LIABILITY FOR DAMAGE AND OR INJURY RESULTING FROM ACCIDENTS OCCURRING WITH VEHICLES HAVING SOME OF RVS SYSTEMS PRODUCTS INSTALLED A...

Page 34: ...RVSSystems 34 If you have any questions about this product contact RVSSystems Inc 1797AtlanticAvenue Brooklyn NY11233 800 764 1028 BetterCameras BetterService IT SOURGUARANTEE...

Reviews: