


176.12
.A03
7 - 11
ADJUSTMENTS
7
Revision 01 Date 14.11.2001
T0430
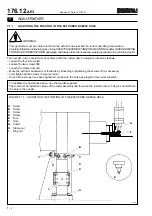
FIGURE 7.2.4 - TIMING THE MACHINE
1
2
3
7.2.4
TIMING PELLET CUTTING
While the pellets are being cut, they are turned so that they stay in the cutter but are brought slightly in front of its axis.
In order for the liners to be properly formed, the pellets must be placed in the middle of the caps and the spindle must
be slightly behind the center of the cap. This distance should be equal to the distance the pellet is positioned forward
in relation to the center of the spindle.
The approximate value for this “off-set” is 1.5 mm.
The exact setting is determined during machine inspection.
To adjust proceed as directed below:
- Use the handwheel to turn the drum until one of the screws (2) is brought in line with one of the holes (1).
- Fit the wrench (4) into the hole (1) and loosen the screw (2).
- Repeat for the other five screws (2).
- Make sure that, before loosening the last screw (2), the cam (3) is in line with the hole (1) where the wrench is not
fitted.
- Loosen the last screw (2).
- Move the wrench to the hole with the cam and turn it left or right to move the spindle (use the centerline as reference)
near to or away from the center of the cap.
- Once the spindle has been correctly positioned, move the wrench to the hole with the screw and fully tighten it.
- Fully tighten the other five screws.
4
Summary of Contents for PMV 224
Page 2: ...TABLE OF CONTENTS 176 12 A03 0 2 Revision 01 Date 14 11 2001 ...
Page 4: ...TABLE OF CONTENTS 176 12 A03 0 4 Revision 01 Date 14 11 2001 ...
Page 34: ...2 22 176 12 A03 Revision 01 Date 14 11 2001 2 MAIN FEATURES ...
Page 42: ...3 8 176 12 A03 Revision 01 Date 14 11 2001 SAFETY EQUIPMENT AND PRECAUTIONS 3 ...
Page 64: ...5 4 5 START UP 176 12 A03 Revision 01 Date 14 11 2001 ...
Page 70: ...6 6 176 12 A03 Revision 01 Date 14 11 2001 6 OPERATING INSTRUCTIONS ...
Page 126: ...8 30 176 12 A03 Revision 01 Date 14 11 2001 8 MAINTENANCE ...
Page 128: ...9 2 176 12 A03 Revision 01 Date 14 11 2001 9 DECOMMISSIONING ...


