


5 - 2
5
START-UP
176.12
.A03
Revision 01 Date 14.11.2001
5.4
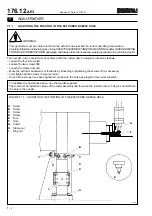
OPERATIONS TO BE PERFORMED BEFORE STARTING THE PRODUCTION CYCLE
(References given in figure 6.1).
Refer to Instructions Manual B for directions on how to enter the operating parameters described in this paragraph.
CONDITIONS
- The machine should be energised and at the correct operating temperature.
PREPARING THE PLASTICIZATION UNIT FOR OPERATIONS
- Load the feed hopper (if provided) by pressing button 21 at the same time as button 28 to start the granule loading
operation. When the hopper is full, granule feed will stop automatically.
- Wait until the temperature in each of the extruder zones has reached the set value.
- Start up the extruder and wait until the material loaded in the hopper flows towards the by-pass outlet.
- Stop the extruder.
CLEANING THE EXTRUDER NOZZLE
Discharge all the material from the extruder by pressing keys 17 and 28 simultaneously and several times. Remove
the plastic compound coming out of the extruder nozzle until the material coming out is clean.
Sequence of operations:
- turn key selector 19-23 to the manual position;
- press by-pass key 3 at the same time as key 28;
- press key 17 to clean the extruder nozzle at the same time as key 28 several times;
- remove the plastic compound coming out of the nozzle outlet.
COOLING DOWN THE FORMING UNIT BEFORE STARTING AN AUTOMATIC WORK CYCLE
- Go to the “Temperature” page (3 or A).
- Press key 16 at the same time as key 28 and wait until the plunger temperature reaches the set values.
Summary of Contents for PMV 224
Page 2: ...TABLE OF CONTENTS 176 12 A03 0 2 Revision 01 Date 14 11 2001 ...
Page 4: ...TABLE OF CONTENTS 176 12 A03 0 4 Revision 01 Date 14 11 2001 ...
Page 34: ...2 22 176 12 A03 Revision 01 Date 14 11 2001 2 MAIN FEATURES ...
Page 42: ...3 8 176 12 A03 Revision 01 Date 14 11 2001 SAFETY EQUIPMENT AND PRECAUTIONS 3 ...
Page 64: ...5 4 5 START UP 176 12 A03 Revision 01 Date 14 11 2001 ...
Page 70: ...6 6 176 12 A03 Revision 01 Date 14 11 2001 6 OPERATING INSTRUCTIONS ...
Page 126: ...8 30 176 12 A03 Revision 01 Date 14 11 2001 8 MAINTENANCE ...
Page 128: ...9 2 176 12 A03 Revision 01 Date 14 11 2001 9 DECOMMISSIONING ...


