


8
S
ECTION
F
OUR
: U
SING
N
AVIGATOR
C
ONTROLS
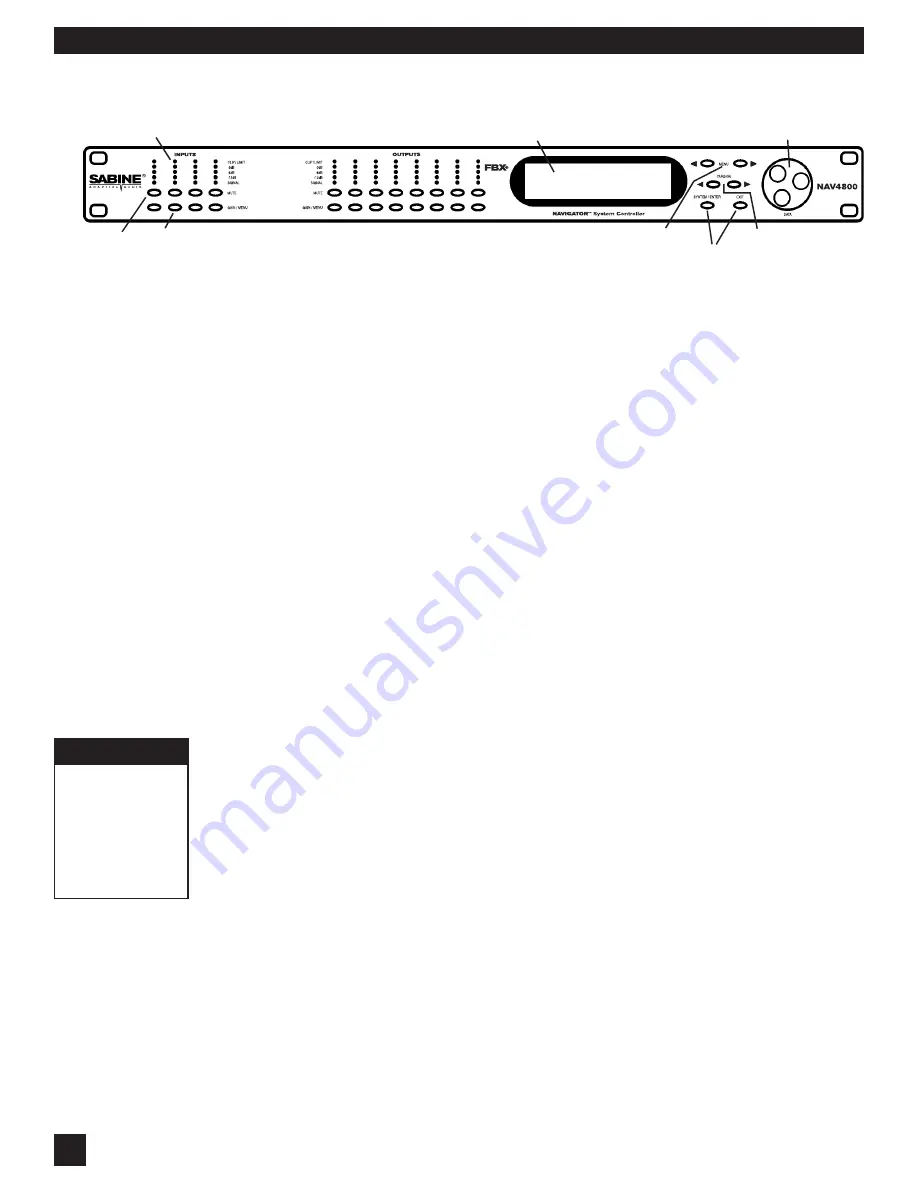
Section Four: Using Navigator Front Panel Controls
1. Mute keys
- Mute/Unmute input and output channels. When an input channel is muted, the
corresponding red LED will be lit.
2. Gain/Menu keys
- Selects the corresponding channel for the LCD menu display indicated by a green
LED. The last modified menu will be displayed on the LCD.
CHANNEL LINKING:
Linking multiple channels is accomplished by pressing and holding one channel’s
menu key, then pushing the other desired channels. Or you can press and drag your finger across several
channels. Linking is very powerful - it simplifies programming for common parameter values across
multiple channels. Multiple inputs can be linked together and multiple outputs can be linked together.
Inputs and Outputs are linked separately.
3. Peak Level LEDs
- Indicates the current peak level of the Signal:
Signal, -12dB, -6dB, -3dB, Clip/Limit. The Input
Clip
LED references to the device’s maximum headroom.
The Output
Limit
LED references to the threshold of the limiter.
4. LCD
-
Shows all the necessary information to control the unit.
5. Rotary Data Wheel
- Changes parameter data values. The wheel has travel velocity sensing which
allow for large incremental data modifications. For coarse modification of delay and frequency (1 Hz
resolution) values, pressing the
Enter/Sys
key simultaneously will increment/decrement the data value
by 100X.
6. Menu Control keys
- The two Menu control keys move through the menus in a linear format.
<<Menu:
Previous menu screen
Menu>>:
Next menu screen
7. Cursor Control Keys -
After choosing a menu to work with, use these keys to move around within
each screen.
<<Cursor:
Previous cursor position in the menu screen
Cursor>>:
Next cursor position in the menu screen
8. Enter/Sys:
Press this key to access the System Menu. These are the global parameters of the
device.
Enter
is used only in the
System Menu
to proceed with selected actions, and in the FBX screen
to initiate Setup mode.
Fast scrolling with the Enter/Sys key:
Press this key while turning the data wheel to modify delay
and frequency (1 Hz resolution mode) data values by 100X.
Exit:
Exit to the
Main Menu
2.
1.
3.
4.
5.
7.
6.
8.
SLKHBXOABCOADSXC
TECH TIP
For fast scrolling
of frequency or
delay values,
hold the Enter Key
while turning the
datawheel