


18
S
ECTION
F
IVE
: O
PERATING
THE
N
AVIGATOR
5.6. FBX OPERATING INSTRUCTIONS
Follow these steps to obtain the maximum gain before feedback, with minimal or no loss in the tonal
quality of your program. You should always setup one channel at a time by turning down the other
channels of the mixer or power amplifiers.
STEP ONE: EQUIPMENT SETUP
Set up your sound system and position all the speakers and microphones you anticipate using. When
possible, avoid placing microphones directly in front of speakers. Patch the Navigator into the system
(refer to section Three for installation configurations). Set your levels for nominal performance but avoid
raising the gain enough to induce feedback. If you are using a graphic EQ, adjust only for the desired
tonal qualities, but DO NOT NOTCH FOR FEEDBACK. If there is any equipment in the signal path that
incorporates a noise gate function, you MUST DISENGAGE these noise gates prior to the setup
procedure. You may reengage them upon setup conclusion. For best results setup your FBX on one
input channel at a time. You can mute the audio in the other input channels.
STEP TWO: CHOOSE YOUR FILTER TYPES and REMOVE BYPASS
The default filter setting for your Navigator are 6 FBX Fixed Filters and 2 FBX Dynamic Filters per input
channel. You may change that mix of filters, and this should be done before you enter Setup Mode. You
can always alter the mix of FBX filters and repeat the Setup procedure. To change filter types, choose
the FBX Menu in the Input Channel you are working on.
The factory default for the FBX is BYPASS: On, which means the FBX section is Bypassed. Before
you start FBX Setup, select the input channel you are working on, then go to the FBX Global Menu. Set
the BYPASS to Off, meaning the FBX section is now active.
STEP THREE: ENGAGE SETUP MODE - RESET FILTERS
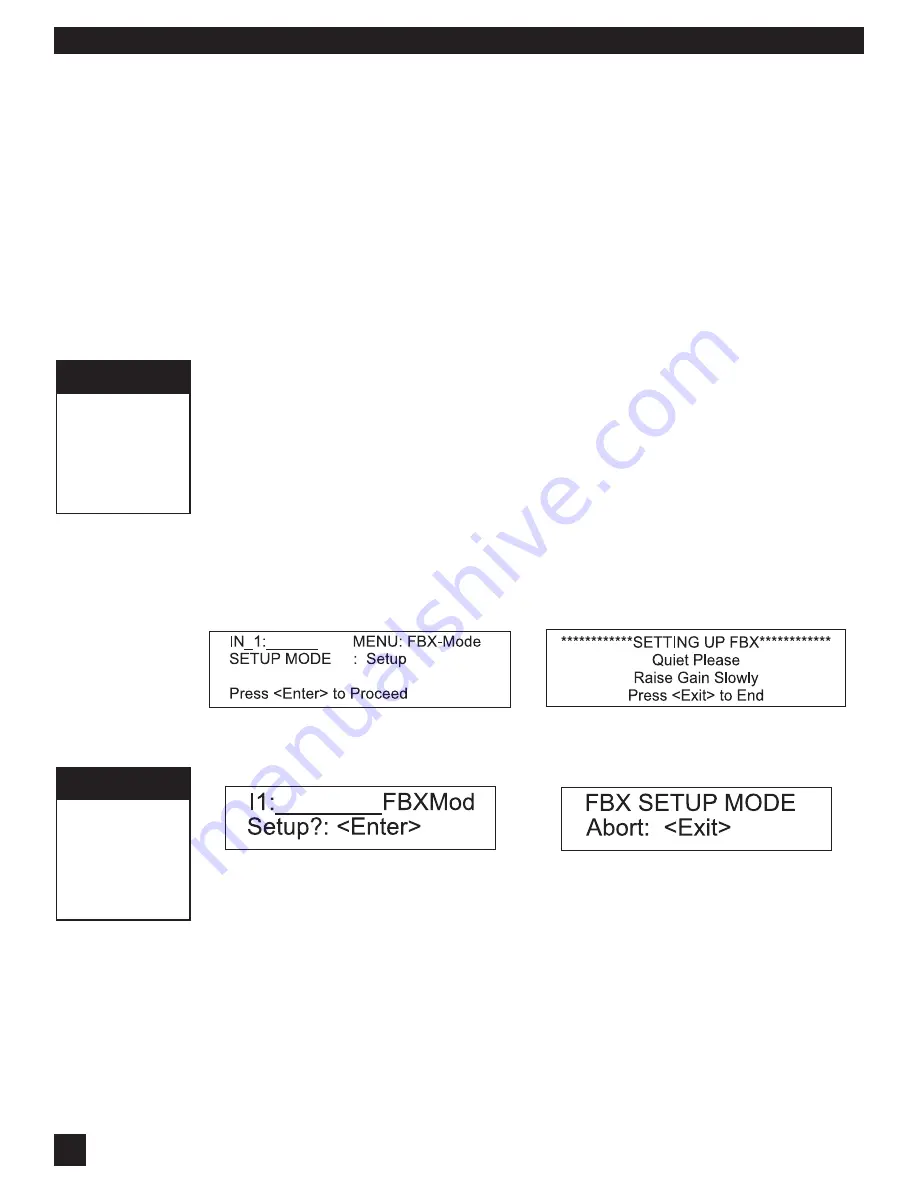
Choose an input channel and select the FBX-Mode Menu. Using the datawheel select “Setup” in the
SETUP MODE field, then press ENTER. Press ENTER again to confirm Setup Mode.
Setup mode
clears all Fixed & Dynamic filters. Do not use Setup mode during your performance.
STEP FOUR: RAISE MASTER GAIN
Make sure your power amplifier is turned up and your microphones are turned on. Slowly raise the master
gain of your mixer (or the submix for this input channel of the Navigator) until the first feedback begins.
The FBX will quickly remove the feedback by setting the first filter. Continue to raise the gain slowly.
Try to avoid making two or more frequencies feed back at the same time, which sometimes happens
if the gain is raised too quickly. As new frequencies feed back, new filters will be placed. (Note:
sometimes the same frequency will feed back a second time, and an earlier filter will notch more deeply.)
Continue raising the gain. Setup mode will end and Ready mode will be engaged in one of two ways:
1.
All of the Fixed filters and at least the first Dynamic filter are set. This will automatically turn
Setup
Mode
off and the FBX Menu window will be displayed. At this point
STOP RAISING THE GAIN!
Press enter to begin Setup -
NAV4800 (above), NAV3600 (below)
Raise gain slowly; Setup automatically ends
or got to Ready mode any time by pressing
Exit - NAV4800 (above), NAV3600 (below)
NAV3600
LCD Display has
only 2 lines. Use
Cursor key to
access all
parameters in
each window
FBX Bypass
Be sure and take
the FBX section
out of Bypass
before setup! Do
this in the FBX
Global Menu.