background image


14


Connections 

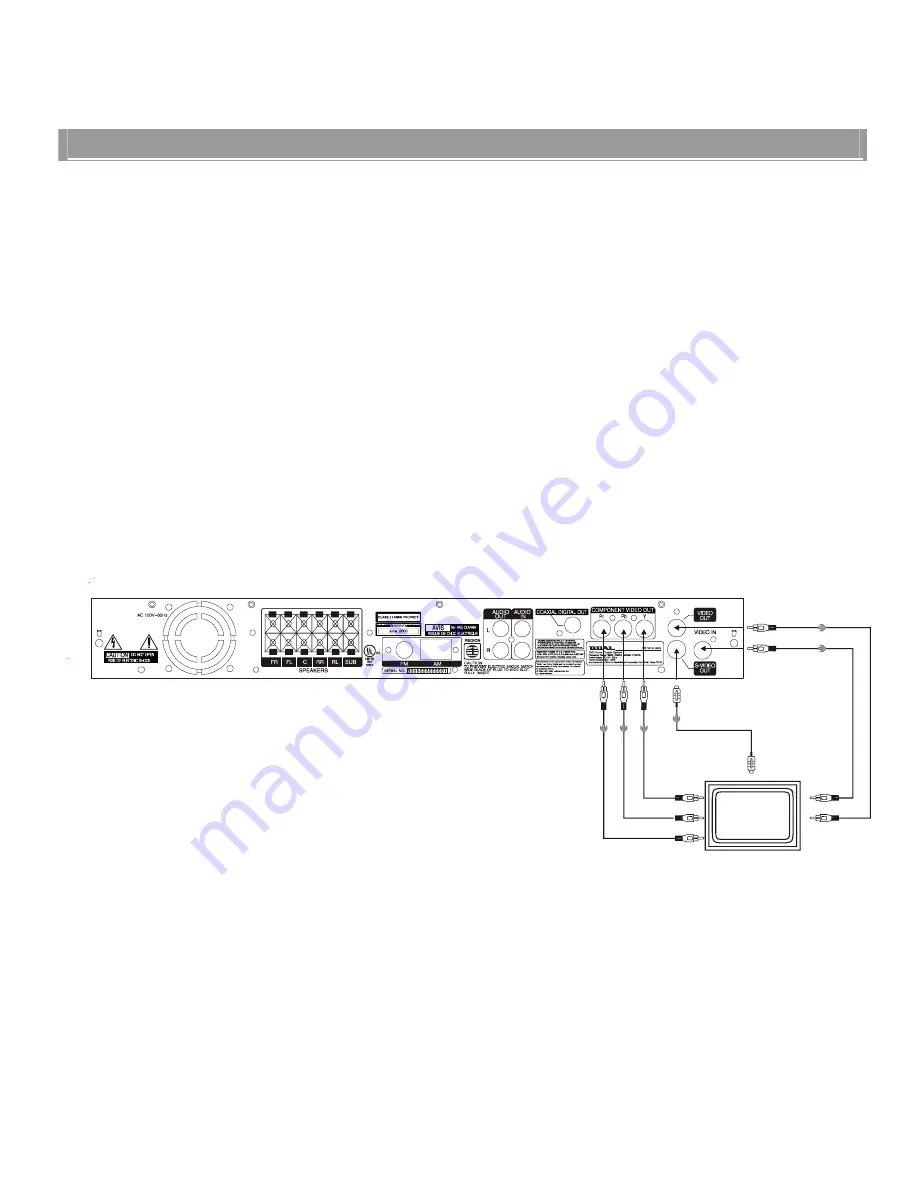
TV and optional component connections 

 Use the supplied audio cables to connect 

AUDIO IN


jacks to the corresponding AUDIO OUT jacks on the 
television, VCR or other audio/visual components. 


 Use the supplied audio cables to connect 

AUDIO 

OUT

 jacks to the corresponding AUDIO IN jacks on 

the television, tape or CD recorders. 


 Use the cables to connect 

VIDEO OUT

Pr/PB/Y

jacks to the corresponding component video inputs 

on the television or monitor. 

 
NOTE: Some televisions or monitors are equipped with 

component video inputs capable of reproducing a 

progressively scanned 480p video signal. Connection to 

these inputs allows you to view the highest quality 

pictures with high resolution. 


 Use the 75 ohm coaxial cable to connect 

COAXIAL 

OUT

 jacks to the corresponding Coaxial type digital 

audio input on an amplifier equipped with a Dolby 
Digital decoder. 


 Use the video cable to connect the

 VIDEO OUT

 jack 

to the Video input jacks on the television. 


 Use the S-Video cable to connect the 

S-VIDEO OUT


jack to S-Video input jack on the television. 


 Use the video cable to connect the

 VIDEO IN

 jack 

to the Video output on the television or VCR. 


TV with component video

To Y video input

To Pb video input

To Pr video input

To video output

To video input

To S-video output

FR

(8 OHMS)

FL

(8 OHMS)

C

(8 OHMS)

RL

(8 OHMS)

SUB

(4 OHMS)

RR

(8 OHMS)

Summary of Contents for HTS-1500

Page 1: ...1 31 5023 OWNER S MANUAL...

Page 2: ...t incorporates copyright protection technology that is protected by method claims of certain U S patents and other intellectual property rights owned by Macrovision Corporation and other rights owners...

Page 3: ...ray Nonuse Periods When the unit is not being used turn the power off When left unused for a long period of time the unit should be unplugged from the household AC outlet Condensation Moisture may for...

Page 4: ...TV display setting selecting the aspect ratio Selecting the on screen display OSD language Downmix setting Using test tone mode Center delay setting Rear delay setting Selecting the dynamic range Sele...

Page 5: ...ushion it from shock and vibration We suggest that you save this carton and packing materials for use in shipping if you move or should the system ever needs repair Your Home Theater System includes e...

Page 6: ...ome parts every 1 000 hours Note that this period varies depending on the environment temperature humidity dust etc in which the player is used Do not connect this unit directly to a VCR The playback...

Page 7: ...y Disc handling Holding discs To keep the disc clean handle the disc only by its edges Do not touch the surface Fingerprints or dirt on the disc may lower sound and picture quality or cause breaks in...

Page 8: ...select the audio channel to view or adjust its level 5 PLAY PAUSE To start or temporarily stop playback 6 STOP Stops playback of a disc and clears the stored program 7 SKIP TUNING In tuner mode press...

Page 9: ...nects to an optional receiver or amplifier 6 AUDIO IN Connects to the audio output of the television or VCR 7 COAXIAL OUT Connects to an optional receiver equipped with 5 4 digital COAXIAL inputs 8 VI...

Page 10: ...ed on the TV screen or and on the front panel display 10 SUBTITLE Selects a desired language for the subtitles while playing a DVD 11 ANGLE Changes the angles while playing a DVD 12 AUDIO ST MONO Sele...

Page 11: ...dio station Activate the slow motion play mode while playing a DVD 20 OPEN CLOSE To open close disc tray 21 GOTO Selects a start point to play 22 ENTER SET Move the cursor to select and execute the it...

Page 12: ...lue black C terminals Connect the grey black surround left speaker to the grey black SL terminals Connect the grey black surround right speaker to the grey black SR terminals Connect the green black s...

Page 13: ...connections Connect the supplied AM FM antennas for listening to the radio Connect the AM antenna to the AM terminals Connect the FM antenna to the Fm terminals FR 8 OHMS FL 8 OHMS C 8 OHMS RL 8 OHMS...

Page 14: ...ssively scanned 480p video signal Connection to these inputs allows you to view the highest quality pictures with high resolution Use the 75 ohm coaxial cable to connect COAXIAL OUT jacks to the corre...

Page 15: ...s while in a seated position If necessary the rear speakers may be placed slightly higher than the center and front speakers Note the area labeled C in the diagram below 30 o 60 o C D C D Balance To s...

Page 16: ...t Pan and Scan mode playback and will automatically playback in Letterbox mode and vice versa Be sure to set the screen mode on your wide screen TV to FULL If the WIDE option is selected with a standa...

Page 17: ...ed on the television screen and the front display panel as each speaker is being tested NOTE When performing this test it is common for the volume of the pink noise from the subwoofer to be lower than...

Page 18: ...has menu data recorded in multiple languages To adjust this setting use the setup menu select preferences to access the following screen The default setting is ENGLISH Selecting the parental control l...

Page 19: ...TER SET button once more to change the password from 9999 to the new 4 digit password you have entered NOTE To avoid locking this function forever do not lose or forget your new password Returning to...

Page 20: ...a disc on the disc tray NOTE Load the disc placing the label side face up and using the disc tray as a guide for proper alignment When playing a double sided DVD disc load it with the desired playing...

Page 21: ...racks Press the MEM or MEM button while playing a disc The playback will go to the previous or next title chapter or track Notes When using repeat title chapter or track playback mode press the MEM or...

Page 22: ...ting and programming the order of the tracks on a disc to be played you can create your own program One program can be stored in the system and contain up to 99 tracks Notes The program function is no...

Page 23: ...back Viewing disc information You have the option to view current information such as titles and chapters on DVD discs or tracks on VCD and CD discs When playing DVD discs 1 Press DISPLAY button once...

Page 24: ...control Some Video CD discs have PBC playback control menus that are displayed automatically upon playback Use these menus to select playback options DISPLAY MENU When playing VCD2 0 discs with PBC th...

Page 25: ...ing CD or MP3 discs This setting will be cancelled automatically when the disc tray is opened or the power is turned off Angle selection Some DVD discs contain scenes which have been shot simultaneous...

Page 26: ...mber of languages or audio tracks allowing you to select the desired language While playing DVD discs press the AUDIO button once to display the current language selection Continue pressing to select...

Page 27: ...el mono depending on disc Press the AUDIO button repeatedly during playback to switch to the audio output mode as follows MONO LEFT MONO RIGHT STEREO NOTE This system does not support CD G formatted d...

Page 28: ...vailable Note After pressing the TUNE or TUNE MEM or MEM buttons the listening mode will automatically change to stereo Storing radio stations You can easily enter and store up to 40 AM or FM radio st...

Page 29: ...eep timer Use this function to program the system to turn off automatically after a specified amount of time Press the SLEEP button repeatedly to select the following the time intervals in minutes 10...

Page 30: ...roduct It will make it easier to contact you should it ever be necessary The return of the card is not required for warranty coverage Limitation of Warranty THE WARRANTY STATED ABOVE IS THE ONLY WARRA...

Page 31: ...9 107 9MHz 200KHz steps AM 520 1710kHz 10KHz steps 26dB quieting sensitivity FM 20dB AM 3162 uV m Image rejection radio FM 25dB AM 28dB IF rejection radio FM 60dB AM 24dB Signal to Noise ratio FM 60dB...

Page 32: ...Weight 5 2 Kg SPEAKER Front Center System 1 way shielded Impedance 8 ohm Speaker drivers 3 full range Dimension W90 X H147 X D110 mm Weight 0 52Kg each Surround System 1 way no shielded Impedance 8 oh...

Reviews: