background image

125

System 

Recovery

Smart Media Console Installation Manual

System Recovery Steps

Screen

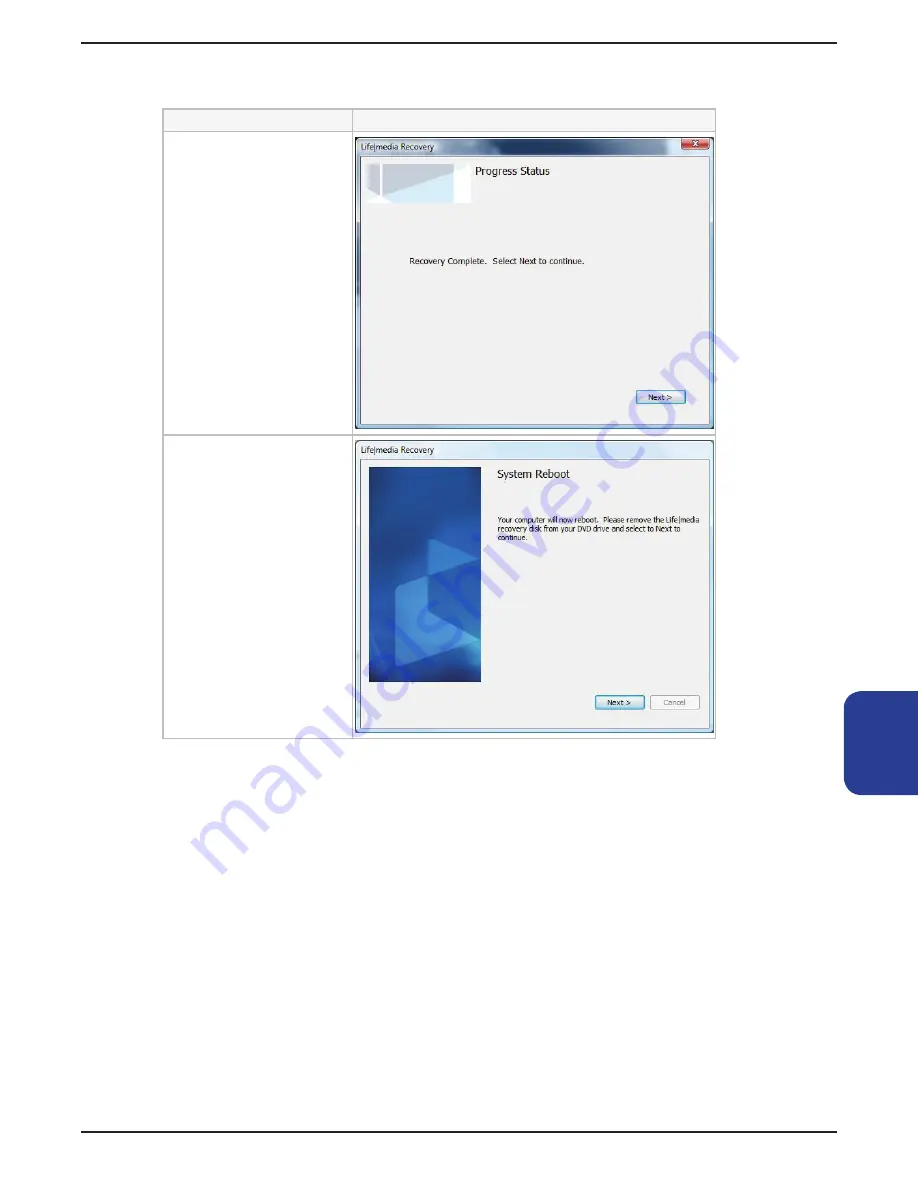
After the system files 

are restored, a progress 

status window appears 

indicating that the system 

recovery is complete�

Click 

Next

 to continue�

A System Reboot window 

appears indicating that the 

SMC is ready to reboot�

Remove the System 

Recovery DVD from the 

drive, and click 

Next

 to 

continue�

Your SMC reboots to the 

Windows User account 

setup screen�

At this point, you have restored the operating system� Next, you will set up the 

Windows User account (see Chapter 13, 

Initial Configuration

)�   

After you have set up the Windows User account, you will then set up Media 

Center (see Chapter 14, 

Setting Up and Optimizing Media Center

)� Make 

sure you have the Media Center settings (including CableCARD™ numbers, if 

equipped) before continuing� 

When Media Center setup is completed, you will install Life|ware, if applicable, 

from the Life|ware Setup icon on the Vista desktop (see the latest documentation 

for Installing Life|ware at www�life-ware�com)� Make sure you have the following 

information available before continuing:

Life|ware License Product Key 

• 

Life|ware Configuration “Config” folder on a USB device or other media.

• 

Summary of Contents for SMC-30

Page 1: ......

Page 2: ...Smart Media Console Installation Manual ii ...

Page 3: ... when permitted shall bear this notice and the Exceptional Innovation LLC copyright notice As and when provided to any governmental entity government contractor or subcontractor subject to FARs this documentation is provided with RESTRICTED RIGHTS Third Party Software and Hardware Other product and company names or logos mentioned herein may be the trademarks of their respective owners Distributio...

Page 4: ...Smart Media Console Installation Manual iv ...

Page 5: ...ories Not Included 6 Remote Control 9 Introduction 9 Installing the Remote Control Batteries 9 Remote Control Buttons 10 Wireless Keyboard 13 Introduction 13 Installing the Wireless Keyboard Receiver 13 Installing the Keyboard Batteries 14 Wireless Keyboard Buttons 14 Functions Connections Overview 17 Introduction 17 Front Panel 17 FireWire USB Connections 18 A V Input Connections 18 Additional Fr...

Page 6: ... 31 Audio Output Connectors 31 Y Adapter Cables 33 Audio Output Direct to TV 33 Audio Output to TV through A V Receiver 34 A V Receiver or Powered Speaker Audio Connections 35 2 1 Audio Connections 35 5 1 Audio Connections 36 7 1 Audio Connections 38 Connecting Digital Powered Speakers 39 Digital Home Theater Audio 41 FM Radio Antenna 43 Connecting Video 45 Introduction 45 Video Output Connections...

Page 7: ...nsmitters 59 IR Receivers 60 Installing IR Receivers 61 Connecting to the Network 63 Introduction 63 Ethernet Connection to the Network 63 Connecting to the Internet Through a DSL Cable Modem 64 Connecting to the Internet Through a Router and DSL Cable Modem 65 Connecting Other Devices and AC Power 67 Introduction 67 Home Control Network Diagram 68 Connecting Serial Devices to Serial Control Ports...

Page 8: ...timizing Display 103 Setting Up Music Pictures and Video Libraries 106 NVIDIA Display Setup 109 Introduction 109 Troubleshooting 111 Introduction 111 Audio 111 Video 113 Remote Control 114 Wireless Keyboard 114 System 115 Getting Help 120 Help and Support 120 Warranty 120 Life ware Updates 120 Microsoft OS Updates 120 Microsoft Website 120 EI Website 120 System Recovery 121 Introduction 121 When t...

Page 9: ...Smart Media Console Installation Manual ix Index 127 ...

Page 10: ...Smart Media Console Installation Manual x ...

Page 11: ... Do not use this apparatus near water and clean only with dry cloth Do not block any ventilation openings Install in accordance with the manufacturer s instructions Do not install this unit near any heat sources such as radiators heat registers stoves or other apparatus including amplifiers that produce heat Do not defeat the safety purpose of the polarized or grounding type plug A polarized plug ...

Page 12: ...le and located as close to the SMC as possible Never pull on the power cord Disconnect the SMC by grasping the power plug firmly and pulling it from the power outlet Install your SMC near an outlet that you can easily reach Use surge protection Connect all power cords for your system and its peripheral devices such as a printer or scanner to a surge protection device such as a power strip with sur...

Page 13: ...digital device pursuant to Part 15 of the FCC Rules These limits are designed to provide reasonable protection against harmful interference in an office and a residential installation This equipment generates uses and can radiate radio frequency energy and if not installed and used in accordance with the instructions may cause harmful interference to radio communications However there is no guaran...

Page 14: ...Smart Media Console Installation Manual 4 Getting Started ...

Page 15: ...nd Owner Manuals Cables and Cable Accessories Optional Cables Cable Accessories Included The cables and cable accessories in the following table are included with your SMC unit You must purchase additional cables separately See Optional Cables Cable Accessories Not Included for additional cables that you may need Cable Acc Name Description DVI to HDMI Adapter Adapter for changing DVI Output to HDM...

Page 16: ...igital Cable feed to COAX inputs on dual tuner cards AC Power Black ISO 3 prong grounded 120 240 VAC power cord Phoenix Power Connector Two conductor Phoenix power plug for 12 Volt Trigger Ports 2 plugs included Optional Cables Cable Accessories Not Included The cables and cable accessories in the following table are NOT included with your SMC unit If any of these cables are required by your insta...

Page 17: ... Out Used for Digital Video Camera Audio Video output IEEE 1394 4 pin to 6 pin front and rear panel USB USB 2 0 Used for USB peripheral device connectors RCA Video Composite RCA yellow end Plug cable into an RCA connector such as composite Video Out or TV Source Input connector VGA Output VGA video out 15 pin D sub Analog Used for VGA monitor Connect to input of VGA Monitor from DVI to VGA adapter...

Page 18: ...Smart Media Console Installation Manual 8 Contents ...

Page 19: ...d press a button Use the remote control at a maximum distance of 20 feet 7 meters from the sensor and at a maximum of 45 degrees 90 degrees total from the center of the sensor The remote control will not operate until the SMC is on and fully booted up Installing the Remote Control Batteries To install or replace the remote control batteries Slide the battery cover off the back of the 1 remote cont...

Page 20: ...out of its power standby state Does not turn SMC off Media Center Opens Media Center to the Main Menu Information Opens the Help Information window within Media Center TV On Off Moves TV into out of its power standby state Does not turn TV off CD DVD TV functions Includes Rewind Fast Forward Play Stop Pause Next Previous Track and Record Back Navigation Arrow and OK buttons move the cursor to navi...

Page 21: ...n a live TV program after pausing live TV DVD Opens Media Center s Play DVD window or a DVD movie s main menu if available Enter future use Volume Increases or decreases volume TV Guide Opens the TV Guide to display TV channels and programs to watch and record Recorded TV Shortcut to the fullscreen view of Recorded TV Keypad Clear Bottom Half of Remote Full View of Remote ...

Page 22: ...Smart Media Console Installation Manual 12 Remote 12 Remote ...

Page 23: ... B N M 1 2 3 4 6 7 8 9 0 5 F2 F3 F4 F5 F6 F7 F8 F9 F10 F11 F12 Insert Delete Home Backspace End Pg ch Up Pg ch Down Prt Scr SysRg Scroll Lock Enter Shift Shift Alt Alt Ctrl Caps Lock Tab Pause Break Installing the Wireless Keyboard Receiver To operate the wireless keyboard the wireless keyboard receiver must be installed into one of the USB ports on the rear panel see right You can install the USB...

Page 24: ...attery orientation If you have no batteries and must use a connected keyboard attach a USB keyboard to the back or front panel You can also use the remote for many functions Wireless Keyboard Buttons The top row keyboard button functions from left to right are Live TV Shortcut to the full screen view of live TV Also moves to the current point in a live TV program after pausing live TV TV Guide Ope...

Page 25: ...tops audio and video tracks and live or recorded TV Rewind Moves the media backward press button for 3 speeds Next Selects the next track or recording Fast Forward Moves the media forward press button for 3 speeds Previous Selects the previous track of recording The upper left and upper right keyboard button functions are Media Center Opens Media Center s main menu Left Right Mouse Left Right sele...

Page 26: ...Smart Media Console Installation Manual 16 Keyboard ...

Page 27: ...ures easily accessible from the front panel Front Panel The front panel SMC 50 series shown includes a right side area to connect FireWire and USB devices as well as a center area for RCA audio Composite video and S Video devices It also includes a 28 in 1 memory card reader for transferring files from cameras and other digital devices as well as a DVD CD player recorder Memory Card Reader S Video...

Page 28: ...o inputs one RCA video input and one S Video input in the center of the front panel Note Media Center does not currently offer a separate setup option for these inputs As a result these A V connections are for audio video capture from analog video devices such as video camcorders or VCRs via software designed for this task Because using these connections overrides tuner number one s NTSC Coaxial a...

Page 29: ...ry Stick Memory Stick Pro Pro Duo Pro MG Compact Flash SmartMedia Secure Digital MultiMediaCard and MagicGate that digital cameras and other digital devices use to store files To transfer files to or from a memory device simply insert the card into the correct slot wait until it is recognized and then use the Media Center to transfer files Note If your memory device includes an in use LED to indic...

Page 30: ...anel Note For best results point the remote at the receiver area and make sure that there are no objects or furniture in the line of sight between the receiver and the remote To the left of the IR receiver is a front load DVD CD Recorder Player for storing and recording video and music on CDs and DVDs To open or close the drive press the silver button just below the drive tray IR Receiver DVD CD P...

Page 31: ...r area for analog and digital audio outputs and network USB and FireWire IR Transmitter Receiver input and output ports Serial control ports and 12 Volt Trigger ports AC power input SMC 50 Serial Control Ports 12 Volt Triggers AC Power Input FireWire USB Network Audio Outputs Video Outputs A V Inputs SMC 50 Rear Panel Diagram Note VGA DB15 and DVI D jacks are disabled ...

Page 32: ...ction screens This diagram shows how USB FireWire IR Ethernet serial and 12 Volt Trigger devices microphone and audio outputs are connected to the rear panel of a SMC 50 SMC 50 AC Input Power 120 240 VAC 12 Volt Trigger Outputs to Relays Shades IR Input and Outputs RS232 Serial Device Control VGA Video and DVI Output inactive Digital Analog Audio Output to Receiver Speakers Mic Input Digital Video...

Page 33: ...ptions include DVI HDMI S Video composite and component video The following diagram shows how input sources and video displays would connect to a SMC 50 s rear panel A V inputs and video outputs DVI Cable to TV or Monitor S Video Component Video Cable to AV Receiver TV or Monitor HDMI Cable to Receiver TV or Monitor DVI HDMI Adapter Coaxial from HDTV Antenna Coaxial Input from Cable TV Satellite o...

Page 34: ...Smart Media Console Installation Manual 24 Connections ...

Page 35: ...n and Mounting The SMC is designed to be installed in a cabinet closet or entertainment center or in an equipment room A V rack The following are some location and operation guidelines to ensure reliable performance Exercise caution when lifting or moving the SMC unit Install SMC in an open back open front A V cabinet if at all possible Keep the rear of the A V cabinet open across the width of the...

Page 36: ...for proper ventilation Ensure clear access to the rear panel for cabling and power connections Environmental Conditions The SMC can be safely operated in environments that conform to these requirements Operating Room Temperature 45 F 7 C to 75 F 24 C Humidity 10 to 90 non condensing Remote Control Considerations When rack mounting or remoting an SMC you must take use of the remote into considerati...

Page 37: ...pment before connecting cables Connect cables firmly to avoid hum and noise Match the color codes for example yellow video white left channel audio red right channel audio If the SMC has dual tuners similar tuner inputs NTSC ATSC or Digital Cable should be connected to the same TV source via a cable splitter You can use a splitter to connect two cable or satellite set top boxes NTSC an HDTV antenn...

Page 38: ...cable TV receiver or digital video camera to the SMC and to an A V receiver and a TV SMC 50 Internet TV Program Guide Data Digital Video Camera FireWire Input to SMC Satellite Cable Box or TV Antenna Signal Input to SMC DSL Cable Modem or Router Program Guide S Video Component or HDMI Video Output to TV or Monitor Analog or Digital Audio Output to Receiver TV or Powered Speakers A V Flow Diagram f...

Page 39: ...MC are in different locations utilize RNET AV encoder decoders to complete the connections shown below RNET encoder decoders and all connecting cables and power supplies must be purchased separately The graphics on the following pages show the typical connections of a Russound Controller to SMC when Life ware is being used and when Life ware is not being used AV Source Connections Russound CAV6 6 ...

Page 40: ...le Installation Manual 30 Installation Typical Connection of a Russound Controller to SMC when NOT using Life ware AV Source Connections Russound CAV6 6 IR Cable SMC Y Adapter 1 8 Mini Stereo Plug to RCA Left Right Plug ...

Page 41: ...ectors and one optical digital audio output connector S PDIF The rear panel analog audio output connectors are mini stereo jacks that connect from SMC s rear panel to an audio video A V receiver powered speakers monitor speakers or TV The rear panel optical digital audio output connection accepts a special TOSLINK optical cable S PDIF Note Use the analog audio OR optical digital audio out connecti...

Page 42: ...s documentation Analog Audio Outputs Optical Digital Audio Output Audio Output Connections Surround Left and Right Inputs Rear Left and Right Inputs Front Left and Right Inputs Center to Center Input LFE to Subwoofer Input Optical Digital S PDIF Output to Optical Digital S PDIF Input Y Adapter 1 8 Stereo to RCA Connectors Left Center Channel Right Subwoofer Y adapter cable jack differentiation Tip...

Page 43: ...r cables with one male 1 8 inch 3 5 mm stereo mini jack on one end and two male RCA connectors on the other end if they will be long enough for the RCA male plugs to reach the powered speaker or A V receiver inputs Audio Output Direct to TV You can connect the SMC s audio output directly to a TV and use the TV s audio amplifiers and existing speakers For left right speakers Connect the male 1 8 in...

Page 44: ...ts audio inputs in order to hear sound To connect the SMC s audio outputs to a TV through an A V receiver Connect the male 1 8 inch 3 5 mm stereo mini plug end of a Y adapter to 1 the Front L R jack on the SMC s rear panel Connect the adapter s left side RCA plug to the A V receiver s left input and 2 the adapter s right side RCA plug to the A V receiver s right input Connect the male 1 8 inch ste...

Page 45: ... Connect the male 1 8 inch 3 5 mm stereo mini plug end of a Y adapter to 1 the Front L R jack on the SMC s rear panel Connect the adapter s left side RCA plug to the A V receiver or powered 2 speaker s left input and the adapter s right side RCA plug to the receiver or powered speaker s right input Connect the male 1 8 inch stereo mini jack end of a Y adapter to the 3 Center LFE jack on the SMC s ...

Page 46: ...peaker s left input and the adapter s right side RCA plug to the receiver or powered speaker s right input Connect the mini plug end of a Y adapter to the Center LFE jack 3 Connect the adapter s LFE RCA right 4 plug to the A V receiver or powered speaker s subwoofer input and the center RCA left plug to the receiver or powered speaker s center channel input Connect the mini plug end of a Y adapter...

Page 47: ...ofer Input Rear Left and Right Inputs Front left and Right Inputs 5 1 Audio Connections with A V Receiver A V Components Positioning with Surround Sound for 5 1 Audio Subwoofer Front left speaker Front right speaker TV Display Center Speaker Surround left speaker Surround right speaker ...

Page 48: ... s subwoofer input and the adapter s center RCA left plug to the receiver or powered speaker s center input Connect the mini plug end of a Y adapter to the Rear L R Surround jack 5 Connect the adapter s left side RCA plug 6 to the A V Receiver or powered speaker s left rear input and the right side RCA plug to the receiver or powered speaker s right rear input Connect the mini plug end of a Y adap...

Page 49: ...back speakers a center speaker and a subwoofer to the SMC unit Note Do not connect analog multi channel speaker outputs if you connect the digital output Insert optical cords until they click into place Do not bend or tie optical cords To connect SMC s digital output to a digital powered speaker amplifier s digital input Connect an optical digital audio cable to the 1 Optical S PDIF connector on t...

Page 50: ...l Cable to Speaker Amplifier Optical Input A V Components Positioning with Surround Sound for Digital Powered Speakers Subwoofer Front left speaker Front right speaker TV Display Center Speaker Surround left speaker Surround right speaker Surround back right speaker Surround back left speaker ...

Page 51: ... Do not bend or tie optical cords To connect digital audio from the SMC to an A V receiver with an optical audio input Connect an optical audio cable from the 1 Optical S PDIF connector on the SMC s rear panel to the digital input SPDIF on an A V receiver or digital audio system Select the A V receiver input 2 Use the A V receiver to adjust the volume 3 Digital Home Theater Audio Connection Optica...

Page 52: ...l 42 Audio A V Components Positioning Digital Home Theater Audio Subwoofer Front left speaker Front right speaker TV Display Center Speaker Surround left speaker Surround right speaker Surround back right speaker Surround back left speaker ...

Page 53: ... the position of the roof or dipole antenna for best reception Note To enable the FM Coaxial input for a tuner card you must also have an NTSC signal connected to that tuner Once the signal has been detected in the Media Center TV signal setup procedure the FM tuner will also work If no NTSC signal is connected the FM tuner will not be enabled SMC FM Radio Antenna Input FM Radio Antenna Connection...

Page 54: ...Smart Media Console Installation Manual 44 Audio ...

Page 55: ...video outputs to the SMC before turning the unit on so the video connection can be detected by the software during startup and display settings can be adjusted accordingly If you change the display or video output connections or have problems with video display quality you may need to go into the NVIDIA display setup to adjust the display settings refer to the Troubleshooting chapter on displays a...

Page 56: ...connections on your SMC may vary based on your model VGA Cable to Monitor using DVI to VGA Adapter DVI to VGA Adapter S Video or S Video to Component Video Adapter Cable to AV Receiver TV or Monitor DVI Cable to TV or Monitor DVI Cable to Receiver TV or Monitor Video Output Connections for SMC 50 The following graphics show the video output connections of the SMC 50 Important You can connect eithe...

Page 57: ...A V Receiver TV or Monitor Composite Cable to A V Receiver TV or Monitor DVI Cable to TV or Monitor HDMI Cable to A V Receiver TV or Monitor Video Output Connections for SMC 30 40 Video only See Note below Note Connect video outputs to the SMC before turning the unit on so the video connection can be detected by the software during startup If you change the display or video output connections or h...

Page 58: ...phics show the video output connections of the SMC 30 40 DVI Cable to TV or Monitor Composite Cable to A V Receiver TV or Monitor HDMI Cable to A V Receiver TV or Monitor Video Only S Video Cable to A V Receiver TV or Monitor Component Video Cables to TV or Monitor 48 ...

Page 59: ... Media Console s SMC rear panel Satellite or Cable Box TV Connection To connect a cable or satellite set top box to a rear panel tuner use either of the setups illustrated in the following graphics Coaxial cable from set top box to NTSC input on tuner card RCA Composite Video Cable from Set Top Box to S Video Input on Tuner Card using RCA to S Video Adapter ...

Page 60: ...nput on Tuner Card using RCA to S Video Adapter S Video Cable from Set Top Box to S Video Input on Tuner Card Red White RCA Cables from Set Top Box to Left Right Audio Inputs Not required for Coaxial connection Cable or Satellite Set Top Box PLUS Satellite or Cable Box TV Connection Wall Coaxial OR Coaxial Cable from set top box to NTSC input on tuner OR ...

Page 61: ...xial inputs NTSC TV Connection To connect a wall cable feed direct from cable provider cable or satellite set top box or standard definition TV antenna to the NTSC standard definition Coaxial input use the setup illustrated in the following graphics SMC NTSC TV Connection Coaxial to Wall Cable Cable Box Satellite Box or Antenna NTSC TV Connection Wall Coaxial ...

Page 62: ... NTSC setup for that tuner card Dual Tuner NTSC TV Connection You can connect a TV signal to both NTSC tuner inputs using a Coaxial splitter and watch one channel while recording another or record two channels at the same time Note Users can view one channel at a time while recording two channels but not change any of the channels while they are being recorded To connect a wall cable feed direct f...

Page 63: ... Sources ATSC High Definition TV Connection To connect an HDTV antenna to the ATSC high definition Coaxial input use the setup illustrated in the following graphics SMC ATSC High Definition TV Connection ATSC High Definition TV Connection Coaxial ...

Page 64: ...hannels at the same time Note You can view one channel while recording both channels but you cannot change any of the channels while they are being recorded To connect a cable feed from an HDTV antenna through a splitter to dual ATSC high definition Coaxial inputs use the setup illustrated in the following graphic Wall Coaxial Cables to ATSC Inputs Coaxial Coaxial Cable from HDTV Antenna Dual Tune...

Page 65: ... Note You can view one channel while recording all four channels but you cannot change any of the channels while they are being recorded To connect two cable or satellite set top boxes to both NTSC inputs and an HDTV antenna feed to both ATSC inputs use the setup illustrated in the following graphics Splitter Coaxial Cable from HDTV Antenna Splitter Wall Wall Coaxial Cables to Cable or Satellite S...

Page 66: ...cedure for your cable TV provider may differ from these instructions to help ensure a trouble free activation follow instructions provided by your cable provider Write down the serial number located on the CableCARD and then insert 1 the CableCARD into the Digital Cable Tuner Note If you have two Digital Cable Tuners that you want to use with Windows Media Center you can use a splitter to divide t...

Page 67: ... illustrate how to connect a digital Cable TV Coaxial input for a CableCARD tuner CableCARD Insertion Digital Cable TV Connection for CableCARD Dual CableCARDs Cable TV Wall Coaxial from Tuner Card Cable In to Digital Cable TV Provider Digital Cable TV Connection for CableCARD ...

Page 68: ... time Note You can view one channel while recording two channels but you cannot change any of the channels while they are being recorded To connect a digital cable feed direct from your cable TV provider through a Coaxial splitter to two digital cable tuners Coaxial cable inputs use the setup illustrated in the following graphics SMC Dual Digital Cable Tuner Connection Coaxial Splitter Wall Coaxia...

Page 69: ...ital cable or satellite set top box to the SMC you must also use the IR transmitter control cable to relay remote control commands through the SMC to the cable or satellite set top box s IR receiver Installing IR Transmitters Note Make sure to connect all IR receivers and transmitters before turning the SMC unit on so that these devices can be detected properly upon startup For a cable TV receiver...

Page 70: ...R remote receiver area on the set top box Repeat these steps for the second set top box if required 6 IR PORTS IN OUT I OUT 2 IR Device Connection Out from SMC to Satellite Digital TV or Cable Set Top Box Attach IR Control Cable Transmitter tip over Satellite Digital TV or Cable Set Top Box s IR Receiver IR Receivers The SMC s rear panel includes an IR receiver input for connecting one IR receiver...

Page 71: ...to the control cable plug the control cable into IR Port In on the SMC s rear panel and route the cable to the IR receiver Plug the other end into the appropriate jack on the receiver and place the receiver in a location where it allows an easy line of access for a remote control Note If necessary use a piece of double sided tape to hold the IR receiver in place Test IR receiver operation by point...

Page 72: ...Smart Media Console Installation Manual 62 IR Devices ...

Page 73: ...Life ware home control you must be connected to the network Ethernet Connection to the Network The SMC s rear panel includes an Ethernet connection near the USB and FireWire jacks To access TV program guide information you must connect the SMC to the Internet via a router and or DSL cable modem To access Life ware home control through this SMC unit you must connect it to the home network ...

Page 74: ...e to the Ethernet 1 port on the SMC s rear panel Connect the other end of the cable to the 2 Ethernet input of your DSL cable modem Note Make sure that the DSL cable modem has an outside Internet connection and that it s power and connection LED is on Internet Connection via DSL Cable Modem DSL Cable Modem Internet Wall CAT5e or CAT6 CAT5e or CAT6 cable to DSL Modem SMC Ethernet Connection ...

Page 75: ... the cable to an Ethernet port on the router Connect another LAN cable to the Ethernet input of 2 the DSL cable modem and connect the other end of the cable to an Ethernet port on the router Note Make sure the DSL cable modem has an outside Internet connection and that it s power and connection LED is on Internet DSL Cable Modem Wall CAT5e or CAT6 CAT5e or CAT6 cable to DSL Modem Internet Connecti...

Page 76: ...Smart Media Console Installation Manual 66 Network ...

Page 77: ...nnecting Other Devices and AC Power Introduction This chapter shows how to connect other devices and AC power to a Smart Media Console SMC Other devices include Serial devices such as thermostats security systems lighting controllers etc 12 volt triggered devices ...

Page 78: ...d devices and 12 volt trigger devices such as shades or relays Home Control Network Diagram SMC 50 IR Transmitter for Smart TV Shade Control Projection Screen Motor Serial Control for Smart TV External IR Receiver DSL or Cable Modem IP Cameras IP Ethernet Ethernet Router Switch Distributed Audio Lighting HVAC Serial Life controller IR Transmitter for AV Receiver Serial Control for AV Receiver Seri...

Page 79: ...d audio systems To connect serial controlled devices to the SMC s rear panel Connect one end of a DB 9 serial 1 cable to a serial control port on the SMC s rear panel Connect the other end of the cable to 2 a serial control port on your serial hub or device Add the serial device into the 3 Life ware configuration using an installer worksheet Plug serial cable into serial control port Plug serial c...

Page 80: ...a two conductor cable 1 to one of the supplied Phoenix plugs making sure to observe the polarity indicated on the SMC s rear panel Connect the other ends and of the cable to the port of the device or 2 circuit to be controlled Connect the Phoenix plug into one of the 12 volt Trigger Ports on the SMC s 3 rear panel Life media 12 volt Trigger Port and Plug Life media 12 volt Trigger Port with Instal...

Page 81: ...nected before you turn on the 1 display and the SMC Make sure that either the wireless keyboard has batteries in it and is turned 2 on or the USB keyboard and mouse are connected to the rear panel USB ports Connect all audio and video equipment apply power and turn on all 3 connected system equipment such as TVs set top boxes and A V receivers Make sure that the SMC is connected to the network and...

Page 82: ...s the first screen in the initial setup procedure Windows Account Setup Step Screen Select your Country Region Time and currency and Keyboard layout Click Next When the License screen appears the PC owner can use the scroll bars to read both the Microsoft Software License Terms and the EI License Agreement and select the check box beside I accept the license terms Click Next ...

Page 83: ...ccount with the user name russound and the password password for two reasons 1 In a multiple Media Center environment this makes setting up Media Center much simpler and 2 This facilitates remote diagnosis and maintenance by technical support Click Next Choose a computer name and a desktop background If you do not select a background the setup defaults to the first SMC background in the row of cho...

Page 84: ... 74 Configuration Windows Account Setup Step Screen Select the correct time and date settings Click Next Note The time and date must be accurate for the program guide to download correctly Choose a PC location Home is recommended Click Next ...

Page 85: ...Vista desktop appears and Windows checks online for software updates If any updates are found Vista downloads them and displays a message asking you to restart the SMC to install the updates Select Restart from the message window and the SMC restarts to install the updates Once you have completed the setup follow the instructions in Ch 14 Setting up and Optimizing Media Center to set up Media Cent...

Page 86: ...Smart Media Console Installation Manual 76 Configuration ...

Page 87: ... Internet connection and other required components Speaker Setup Configure stereo or surround for your speaker setup Configure Tuners TV Signal and Guide Scan for tuners and connections and set up TV services Configure CableCARD Tuners Applies to models equipped with CableCARD Tuners Optimize Display Configure your primary video display and adjust display settings Set Up Music Pictures and Video L...

Page 88: ...er button on the remote control or by opening the Start Menu and selecting Media Center Initial Media Center Setup Step Screen Press the green Media Center button on the remote control You can also click Start on the taskbar and select Media Center When this screen appears click Next When the Welcome screen appears select Custom Click Next When the Media Center Setup screen appears click Next ...

Page 89: ...en the Internet Connection screen appears select Yes Click Next When the Internet Connection Test Screen appears select Yes Click Next If your Internet connection is OK this screen appears with a Connection working message Click Next Otherwise troubleshoot and correct the problem before continuing ...

Page 90: ... Statement You can view the privacy statement by clicking View the Privacy Statement Online or click Next to continue Windows gives you the option to join the Customer Experience Improvement Program Select Yes or No and click Next Windows gives you the option to periodically download album DVD art music and movie information Select Yes or No and click Next ...

Page 91: ...c movie libraries configure speakers and configure the TV signal Speaker Setup Note This procedure assumes that the audio system is already connected Before you start this procedure ensure that the speakers are correctly connected to the SMC the A V receiver or other audio device and that the device is turned on with the proper input selected Speaker Setup Step Screen Under Optional Setup select S...

Page 92: ...l 82 Media Center Speaker Setup Step Screen In this screen click Next Select the type of cable that connects your speakers to your SMC Click Next Select the number of speakers that most closely matches your speaker configuration Click Next ...

Page 93: ...setup If the test did not work select I did not hear sound from all of my speakers and click Next for suggestions on how to proceed Otherwise select I heard sound from all of my speakers and click Next to save your configuration When this screen appears you have finished setting up your speakers Click Finish to exit ...

Page 94: ...e assumes that the TV antenna and or cable TV system is already connected Media Center automatically scans for and detects your configuration and downloads the required information TV Setup Step Screen Under Optional Setup select Configure tuners TV signal and Guide Click Next Select the correct region Click Next ...

Page 95: ...etup options Once the download is complete the Next option becomes active Click Next Select Configure my TV signal automatically Click Next Media Center scans your configuration This may take several minutes Media Center scans your TV inputs and records the type of tuners and the TV sources you have connected ...

Page 96: ... re scan the system or configure the signal manually If you are setting up a set top box go to Setting up a Set top Box later in this chapter When you are finished return to this procedure to set up the guide Click Next to set up the Media Center TV Program Guide Windows gives you the option to read the Guide privacy statement If you want to view the privacy statement click View the Guide privacy ...

Page 97: ...nstallation Manual 87 Media Center TV Setup Step Screen The PC owner should agree to the terms of service Click Next Enter your zip code Click Next Media Center begins to download provider information for your program guide ...

Page 98: ...l 88 Media Center TV Setup Step Screen Select your digital cable signal provider from the list Click Next Media Center begins to download your program guide This may take several minutes When the download is complete click Next to continue ...

Page 99: ...his screen displays Click Next to see the signal strength indications for each of your OTA Digital TV channels This screen shows your signal strength for each OTA Digital TV channel You can use the arrows to see the signal strength for all channels in the list and adjust your HDTV antenna for the best overall reception When you are done click Next ...

Page 100: ... available Note If you have two tuners and only one set top box installed you may have to manually configure the signal Setup Step Screen Select your set top box cable or satellite Click Next Note At this point if your IR control cables are not installed you will receive a warning and the installation will not proceed Connect the IR control cables before continuing Select a working TV signal If yo...

Page 101: ... your remote as instructed to identify which set top box you are configuring When ready click Next If you have the remote for the set top box you are configuring select Yes otherwise select No Click Next Select the number of digits for the highest channel you receive Click Next ...

Page 102: ...elect how channels are changed using the remote If you are not sure test the remote on the set top box before you proceed Click Next Select your set top box brand Click Next If you do not have your remote you are asked to select codes and test them until you find the right one ...

Page 103: ...d and select whether or not the set top box changed the channel correctly If you do have your remote click Next Press and hold each button on your remote as instructed Note If your remote is not identified in the first try try again it may take several attempts before the remote is correctly identified ...

Page 104: ...4 Media Center Setup Step Screen Once your remote is identified click Next to test the Windows Media Center remote Test changing the channel with the Media Center remote as instructed Set IR signal speed as instructed Once selected click Next ...

Page 105: ... that CableCARD devices and digital cable TV feeds are already connected If they are not connected make sure that CableCARD devices and digital cable TV feeds are available for the technician to connect before beginning this procedure Important To receive digital cable TV channels including premium programming you must subscribe to a supported digital cable TV package For more information about di...

Page 106: ...o do so During this procedure Media Center automatically scans for and detects your configuration This allows you to download the required information to activate the CableCARD s for use With the assistance of a cable TV technician perform the following steps to activate CableCARD digital TV service CableCARD Setup Step Screen Under Optional Setup select Configure tuners TV signal and Guide Click ...

Page 107: ...Media Center CableCARD Setup Step Screen Select the correct region Click Next Media Center downloads your TV setup options Select Configure my TV signal automatically Click Next Media Center scans your configuration This may take several minutes ...

Page 108: ...Once the scanning is finished Media Center displays the configuration of your television service If you are satisfied with the detected TV signal s select Yes Click Next If not you can re scan the system or configure the signal manually Select Yes to activate your CableCARD Click Next ...

Page 109: ...tion on the next screen Click Next Note The installation and activation of one or more CableCARDs requires an onsite visit by a cable TV technician Use the number on this screen to call your cable company and provide them with the information for your CableCARD Once you have provided the requested information click Next Select Set Up Guide listings to adjust your TV guide listings Click Next ...

Page 110: ...Screen Click Next to set up your TV Program Guide listings Select Yes to use the Guide Click Next You can also view the privacy statement by clicking View the Guide privacy statement Use the scroll arrows and cursor to read the Guide Terms of Service Select I agree and click Next ...

Page 111: ...tallation Manual 101 Media Center CableCARD Setup Step Screen Enter your zip code Click Next Media Center begins to download provider information for your TV program guide Select your digital provider from the list Click Next ...

Page 112: ...Manual 102 Media Center CableCARD Setup Step Screen Media Center downloads your program guide This may take several minutes When the download is complete select Next You have set up your CableCARD and adjusted your TV program listings ...

Page 113: ...ation Steps Screen Under Optional Setup select Optimize how Windows Media Center looks on your display Click Next In this screen Windows offers you a video to watch while you adjust your display s settings If you want to watch this video click Watch Video Otherwise click Next If your preferred display is connected select Yes If you want to use a different display select No Click Next ...

Page 114: ...nter Display Optimization Steps Screen Identify the type of display you are using by selecting from the list Click Next Select the connection type that connects your primary display to your computer Click Next Select the width of your display Click Next ...

Page 115: ...imization Steps Screen Confirm your display resolution by selecting Yes or change it by selecting No Click Next Select Adjust display controls to adjust your display settings contrast color brightness or select Finish this wizard Click Next Click Next to exit the wizard ...

Page 116: ...monitors your music picture and video folders so you can easily access your media Use this procedure to tell Media Center which folders to monitor Music Picture and Video Library Setup Steps Screen Select Set up your Music Pictures and Videos Libraries Click Next On this screen select Add a folder to watch Click Next ...

Page 117: ...you have made your selection click Next Media Center shows you a list of folders available for monitoring If you want to watch folders on a particular drive but not the whole drive itself click the plus sign next to the listed drive to view the folders in that drive Once you have selected the folders you want to watch click Next Check that all folders you want to add are listed If not you can clic...

Page 118: ...allation Manual 108 Media Center Music Picture and Video Library Setup Steps Screen When this screen appears you have finished setting up your library Click Finish to exit Library Setup and to start using Windows Media Center ...

Page 119: ...tings Use this set up procedure when you are having problems with the appearance of video on a TV or display Important You should be familiar with the display connector type and signal format you are using before attempting to make changes to these settings NVIDIA Display Setup Steps Screen From the Windows desktop right click in the background area Select NVIDIA Control Panel from the choice list...

Page 120: ...matically detects the type of video output connector you are using when you click Apply in the right hand window Select the display the connector or auto detect and the signal format you are using Click Apply These new display settings take effect instantly If the display does not look as it should you have 15 seconds to either accept them or revert back to the previous settings If the new setting...

Page 121: ...stance Audio Problem Solution I don t have sound from my speakers Verify sound cable connections and check volume and mute settings If the SMC is connected to a receiver make sure the receiver is on and set to the correct path Reconfigure the software for surround sound See the speaker setup section in Ch 14 Setting Up and Optimizing Media Center The SMC does not produce amplified sound Make sure ...

Page 122: ...ncrease the volume Double click the volume icon on the taskbar Increase the volume and make sure the Mute box is not checked Double click the volume icon on the Windows taskbar The Play Control window opens Make sure none of the Mute boxes are checked Adjust the volume slide bars to increase volume If your speakers have a power button make sure it is turned on and that the power supply is connecte...

Page 123: ...sure the connections are made and then turn off the SMC by pressing and holding down the Power button for four seconds Check your input switches The quality of the picture on my display is poor colors are bad distorted video washed out etc See Ch 15 NVIDIA Display Setup for procedures on how to change video settings for your NVIDIA video card My SMC doesn t recognize my digital video camera Check ...

Page 124: ...ware settings for the cable set top box or satellite receiver Make sure the set top box remote IR sensor is still on the front panel and working My remote control works but the SMC doesn t respond to it Make sure the front of the remote sensor on the SMC front panel is not blocked Restart your SMC Wireless Keyboard Problem Solution My keyboard isn t working correctly Check that the remote s batter...

Page 125: ...lay the Windows Vista desktop If these actions are unsuccessful contact your Life ware dealer or Life support My SMC isn t communicating with the network Make sure the LAN cable plug is inserted all the way into the RJ45 network jack on the SMC unit Make sure the RJ45 LAN cable plug has been terminated correctly Make sure the RJ45 plug on the other end of the LAN cable has been terminated correctl...

Page 126: ... an earlier restore point If a System Restore is unsuccessful you may need to perform a System Recovery to reinstall the operating system software Refer to the instructions and procedures in Ch 17 System Recovery in this manual It s possible that a voltage spike or power outage has occurred Symptoms of voltage spikes include unexpected SMC startups and the SMC not responding to your commands Note ...

Page 127: ...ssful you may need to perform a System Recovery to reinstall the operating system software Refer to the instructions and procedures in Ch 17 System Recovery in this manual It is possible that your system hard drive is failing or has failed Copy important files to a removable media If your hard drive needs to be replaced you will also need to perform a System Recovery see above when your hard drive...

Page 128: ...e pushed in all the way prior to turning on the SMC unit Ensure that the cables to your monitor and your TV connect to the video out connectors on the SMC unit Adjust the brightness and contrast controls on the monitor Make sure the monitor power cord is plugged into a grounded outlet Check to see whether the outlet works by plugging another item into it If the light on the front of the monitor is...

Page 129: ...d write switch is set to Write Enabled before attempting to write data to it Make sure the amount of data you are storing has not exceeded the storage limit of the card Make sure the memory card is one of the supported types CompactFlash I II and Micro drive Memory Stick Memory Stick Pro MultiMedia Secure Digital SmartMedia or xD Make sure the memory card is fully inserted into the correct slot Re...

Page 130: ...hrough the home network s Internet connection whenever a software update release is available from EI Your dealer sets up automatic updates during the initial Life ware installation procedure and updates occur at the time of day specified in the update portion of the procedure Microsoft OS Updates The SMC s Microsoft Windows Vista Operating System software is automatically updated through the Inte...

Page 131: ...ped If you are using Life ware you will also need to reinstall Life ware and activate your Life ware license The procedure on the following page lists the items information you will need to do a full system recovery When to Use System Recovery Use this System Recovery procedure only in the event of a system c drive failure or when you are having the following types of problems with your SMC softwa...

Page 132: ... partition c area of your SMC s hard drive storage and all data and programs on that partition will be lost including your Life ware installation configuration and Media Center settings System Recovery Procedure Before you begin you should have the following items and information available System Recovery DVD included in the SMC shipping package Portable USB Mass Storage device for file backup rec...

Page 133: ...olumes Identify your USB drive by the number in the SIZE column When you have backed up the files you want click the X in the upper corner of the window to exit Click Next in the Welcome Screen to continue When this warning window appears verify that the SMC model shown is the correct model for your SMC Choose one of the following options Click Cancel to exit the Recovery program and use Vista to ...

Page 134: ...s status window appears indicating that the hard drive is being reformatted This may take several minutes Note The Next button at the bottom of the screen will be grayed out disabled After the hard drive is reformatted a second progress status window appears indicating that the system files are being restored This may take several minutes Note The Next button at the bottom of the screen will be gr...

Page 135: ... you will set up the Windows User account see Chapter 13 Initial Configuration After you have set up the Windows User account you will then set up Media Center see Chapter 14 Setting Up and Optimizing Media Center Make sure you have the Media Center settings including CableCARD numbers if equipped before continuing When Media Center setup is completed you will install Life ware if applicable from ...

Page 136: ...126 System Recovery Smart Media Console Installation Manual ...

Page 137: ...nition TV Connection 53 Audio Connections to a Russound Controller 29 Audio 31 Audio Output Connectors 31 Audio Output Direct to TV 33 Audio Output to TV through AV Receiver 34 AV Receiver or Powered Audio Connections 35 5 1 Audio Connections 36 7 1 Audio Connections 38 AV Receiver or Powered Speaker Audio Connections 35 2 1 Audio Connections 35 Connecting Audio 31 ...

Page 138: ...le Accessories Included 5 Cables Cable Accessories Not Included 6 E Exceptional Innovation Website 120 F Federal Communications Commission FCC Notice 3 FM Radio Antenna 43 Front Panel 17 AV Input Connections 18 FireWire USB Connections 18 Additional Front Panel Features 19 28 in 1 Media Card Reader 19 IR Receiver and DVD CD Player Recorder 20 Functions Connections Overview 17 G Guide Configure Gui...

Page 139: ...al Configuration 71 Starting the SMC for the First Time 71 Installation Overview 25 Selecting a Location and Mounting 25 Mounting and Ventilation 26 Additional Equipment 27 Connecting Guidelines 27 Audio Video Signal Routing 27 Audio Video Flow Diagram 28 Audio Connections to a Russound Controller 29 K Keyboard 13 Installing the Wireless Keyboard Receiver 13 Installing the Keyboard Batteries 14 Wi...

Page 140: ...te 120 Mounting and Ventilation 26 Environmental Conditions 26 Rack Mounting in Equipment Rack or Closet 26 Shelf Mounting in Equipment Rack Closet Entertainment Center 26 N Network Connecting to the Network 63 Ethernet Connection to the Network 63 Connecting to the Internet Through a DSL Cable Modem 64 Connecting to the Internet Through a Router and DSL Cable Modem 65 NTSC TV Connection 51 NVIDIA...

Page 141: ...al Devices to Serial Control Ports Connecting 69 Speaker Setup 81 Support 120 T Troubleshooting 111 Audio 111 Video 113 Remote Control 114 Wireless Keyboard 114 System 115 Tuners Configure Tuners 84 TV Signal Configure TV Signal 84 TV Sources Connecting TV Sources 49 Satellite or Cable Box TV Connection 49 NTSC and ATSC TV Connection 51 NTSC TV Connection 51 ATSC High Definition TV Connection 53 D...

Page 142: ...Connection 55 Digital Cable TV Connection for CableCARD 56 Dual Digital Cable Tuner Connection 58 U Updates Life ware 120 Microsoft OS 120 V Video Connecting Video 45 Video Output Connections SMC 30 40 47 Video Output Connections SMC 50 46 W Warranty 120 Windows Account Setup 72 ...

Page 143: ...Smart Media Console Installation Manual 133 Index ...

Page 144: ...30 35 40 45 50 55 Installation Manual 2008 Exceptional Innovation All rights reserved All trademarks are the property of their respective owners EI is not responsible for typographical errors or omissions Version 1 0 28 1298 01 08 08 ...

Reviews: