background image

Roxio Easy VHS to DVD Plus

33

Note:  

VST sound effects are implemented as .dll files, but 

they may be distributed as archives (such as .zip files). Extract 

them from the archive before installing.

The VST effect is added to the list of Sound Effects.

When you delete the effect from your computer, it is removed 

from the list.

Using the Mix Editor

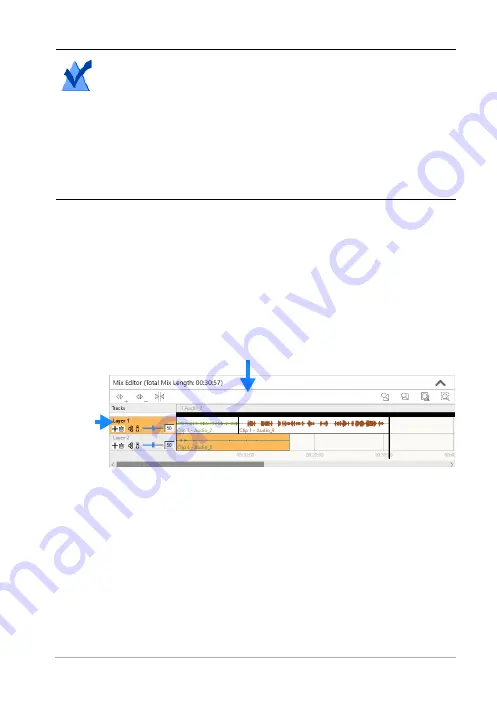
The Mix Editor allows you to arrange your clips in 

layers

. A layer is one 

or more audio clips, arranged sequentially. You can arrange up to eight 

layers simultaneously, overdubbing and blending them to add voice to 

music tracks or to create audio mixes and fun projects. You can play 

back all layers simultaneously, to produce a mix. 

Using the Mix Editor for basic editing

Using the 

Mix Editor

, you can add audio clips in a specific location on 

a specific layer. You can also copy and paste mixes (the combined 

content of all layers).

Layer

Mix Editor toolbar

Summary of Contents for Easy VHS to DVD Plus

Page 1: ...Roxio Easy VHS to DVD Plus User Guide ...

Page 2: ... s products give today s knowledge workers the tools they need to achieve new levels of creativity productivity and success For more information please visit www corel com 2020 Corel Corporation All rights reserved Corel and other Corel marks and logos used herein are trademarks owned by Corel Corporation and or its subsidiaries This product and guide include intellectual property including tradem...

Page 3: ...ome 2 What you get in the box 2 Minimum system requirements 2 Installing the software 3 Connecting a VHS player to your computer 4 Resources 5 Contacting Support 6 2 Converting VHS tapes 7 Converting VHS tapes with Easy VHS to DVD Plus 8 ...

Page 4: ...and applying effects 19 Using the Mix Editor 33 Completing projects 37 5 FAQ Frequently Asked Questions 43 About the FAQ 44 What do I need to start converting 44 How do I install Easy VHS to DVD 44 Do I need a serial key 45 How do I check if my system is 64 bit 45 How do I connect the Roxio Video Capture device to my VCR 45 How do I connect the Roxio Video Capture device to my analog camcorder 47 ...

Page 5: ...apture troubleshooting What do I need to check before I start to capture 48 Can the captured video quality ever be better than the source 48 Why is the Video input not detected 49 Why is the audio distorted 49 Why is there a high pitched sound squeal when the application is running 52 ...

Page 6: ...iv Roxio Easy VHS to DVD Plus ...

Page 7: ...7 Getting started In this chapter Welcome 2 What you get in the box 2 Minimum system requirements 2 Installing the software 3 Connecting a VHS player to your computer 4 Resources 5 Contacting Support 6 ...

Page 8: ...converts the SCART out connection on the VCR to standard RCA audio and composite video Software Easy VHS to DVD Plus comes with two great Roxio applications Easy VHS to DVD Plus Use this application to transfer video from VHS tape directly to a DVD or convert the videos to digital files You can also convert your vinyl LPs to digital music files Enhance recordings and save them in many of the most ...

Page 9: ...VDs One available USB 2 0 port Minimum screen resolution of 1024 by 768 Input formats Video MPEG2 AVC H 264 Audio WAV mp3 ogg Vorbis FLAC WMA AAC m4a Output formats Video DVD ISO MPEG2 AVC H 264 Audio WAV mp3 ogg Vorbis FLAC WMA AAC Disc DVD Mini DVD Supported Languages English French Italian German Spanish Dutch Japanese Installing the software 1 Before you install the software connect the includ...

Page 10: ...our permission at each step to complete the installation 3 Follow the on screen instructions to install your software Connecting a VHS player to your computer Below you will find the basic steps for connecting the Easy VHS to DVD Plus video capture USB device to your computer and your VCR or other playback device Note If you experience connection issues please see FAQ Frequently Asked Questions on...

Page 11: ...sources In addition to this user guide you can consult the following resources In product Help Click the Help icon anywhere in the application to open a related Help topic Knowledgebase www roxio com support click the Knowledgebase icon ...

Page 12: ...S to DVD Plus Contacting Support If you are not able to find the answers you are looking for please contact customer support through www roxio com support email corelhelp corel com calling North America 1 877 582 6735 ...

Page 13: ...7 Converting VHS tapes In this chapter Converting VHS tapes with Easy VHS to DVD Plus 8 ...

Page 14: ... the Easy VHS to DVD Plus icon on your computer desktop 2 Click Video 3 Click Start a new project 4 Insert your first VHS tape Fast forward or rewind the tape to the position where you want to begin recording 5 In the Video Name box give your recording a title 6 Choose any of the following settings Set Recording Duration Mark this check box and set a time value in the boxes if you know the exact d...

Page 15: ...Click the Record button 9 If you set a recording duration Easy VHS to DVD Plus will stop recording automatically If not click the Stop button when you are done recording Your video appears in the Video List Now you are ready to record the next clip 10 If you want to record another video in the Add Video area click the Record Video button 11 Insert the next tape in your VCR or reset the current tap...

Page 16: ... 16 9 by selecting File Preferences In the Select a Destination Drive choose the drive that has the recordable DVD inserted Optional In the Video List click the Link buttons between clips to choose transition options Select the AutoFit or Span option 18 Do one of the following If you want to save to an ISO file click the Export to DVD ISO you do not need an optical drive for this option If you sel...

Page 17: ...7 Converting LPs and audio tapes In this chapter Converting LPs and audio tapes with Easy VHS to DVD Plus 12 ...

Page 18: ... the Audio tile 4 Choose Start a new project 5 In the Add Audio area bottom right corner click the Record Audio button 6 In the Capture From drop down menu select Line Roxio Video Capture USB 7 To optimize the recording volume play a loud portion of your LP or tape and click Auto 8 If this is your first time converting an LP or tape we suggest that you click Options Here you can select a destinati...

Page 19: ...7 Editing audio In this chapter Editing audio 14 About adding audio clips 17 Editing and applying effects 19 Using the Mix Editor 33 Completing projects 37 ...

Page 20: ...s and tapes For more information see About adding audio clips on page 17 Edit your clips and choose from a wide range of effects to apply to either the entire project or a part of the project for example adjust the volume or balance remove crackling sounds from audio files or add dramatic effects to your music For more information see Editing and applying effects on page 19 Export your clips and t...

Page 21: ...1 Clip Editor 2 Zoom controls 3 Project View Task area 4 Mute Unmute 5 Volume 6 Track position 7 Enable Disable Repeat Mode 8 Playback controls 9 Section length 10 Balance controls Audio project file format dmse Audio projects are stored in DMSE format The project file stores ...

Page 22: ...f you share a DMSE file with another user who must also have Easy VHS to DVD Plus you must also share all referenced audio files and the audio files must be in the same folder structure as they are on your computer Getting started with audio projects An audio project is a collection of the following components Audio clip An audio file which contains a song a part of a song or a short repetitive so...

Page 23: ...projects on page 37 Starting projects To start a new project Choose File New Project To open an existing project 1 Choose File Open Project 2 Browse to the file you want to open select it and click Open About adding audio clips A Easy VHS to DVD Plus audio project is a collection of audio clips You can add audio clips from various sources improve their quality and add special effects You can add a...

Page 24: ... Editor click to move the playback cursor to the location at which you want to insert the audio file 2 In the task area under Add Audio click Add Audio File The Media Selector window opens 3 In the Media Selector window browse to and select the desired files Tip For more information about the Media Selector views click Help on the Media Selector window 4 Click OK The selected audio file appears in...

Page 25: ...pears For more information click Help in the dialog box 7 In the Save To box enter the folder in which the tracks will be saved 8 Click Save The tracks appear as audio clips in the Clip Editor Note Tracks cannot be imported from copy protected DVDs Editing and applying effects You can use Easy VHS to DVD Plus to make changes to audio clips Not only does Easy VHS to DVD Plus let you save your recor...

Page 26: ... task area under Project View expand Clips and click a clip To select a part of a waveform use one of these methods In the Clip Editor click and drag your mouse cursor from the beginning of the selection to the end Your selection is highlighted on the waveform If you have inserted markers into the waveform you can select the area between the markers In the Clip Editor right click the section of th...

Page 27: ...m region to edit on page 19 2 On the Clip Editor toolbar click Cut 3 Move the playback cursor to the location to which you want to move the waveform region and choose Edit Paste To undo the last edit step Choose Edit Undo To redo the last edit step that was undone Choose Edit Redo Removing or inserting silences You can easily remove or insert silences to further refine your Easy VHS to DVD Plus au...

Page 28: ...m to select the section that you want to overwrite with the silent area b Right click the selection and choose Insert Silence The selected area of the waveform is replaced with a silence of the same length Adjusting volume or balance With Easy VHS to DVD Plus you can quickly and easily adjust the volume and balance of your audio clip and apply fading effects To adjust volume 1 Select the region on...

Page 29: ...lick Fading Volume and choose Reset Volume Envelope to undo your changes To adjust balance 1 Select the region on the audio clip where you want to adjust the balance For information on how to select the waveform see Selecting the waveform region to edit on page 19 2 On the Clip Editor toolbar click Apply fades and adjust volume and choose Adjust Balance The Balance Fading dialog box appears 3 In t...

Page 30: ...e in and fade out effect For information on how to select the waveform see Selecting the waveform region to edit on page 19 2 On the Clip Editor toolbar click Fading Volume and choose Fade In and Out 3 In the Fade In and Out dialog box specify the length of the fading effect in seconds For example if you set the fade in fade out time to five seconds the volume fades from zero to full volume in the...

Page 31: ...rom your recording For example if you intend to play your recording as a playlist or burn it to disc you will want to easily identify the tracks and navigate them with your player Tip To make editing easier maximize the Easy VHS to DVD Plus window for a higher resolution display of your audio waveform To add track separators 1 Play your recording to determine where you want to place a track separa...

Page 32: ... 1 Select the track separator that you want to remove 2 Click Remove the currently selected track For more information about markers see Adding or deleting markers on page 26 Adding or deleting markers You can use Easy VHS to DVD Plus to add markers to your recording or to delete them A marker identifies a specific time in a track Use markers to denote points of interest to which you may want to j...

Page 33: ...o enhance your audio clip in many ways including adjusting the equalization or bass brightening the sound or applying de clicking effects to clean up audio recorded from scratchy vinyl LPs Note When previewing the effects applied to your audio clip you can select the Bypass option which lets you preview the audio clip without the effects This is helpful if you want to compare how the audio clip so...

Page 34: ...hance sound in one of the following areas Bass Select this option to enhance the bass Excite Select this option to make the sound more bright Equalizer 10 band with Master Volume Lets you boost or cut the amplitude volume for ten bands of sound frequencies The Equalizer effect also includes a master volume control to let you increase or decrease overall sound output level To link the left and righ...

Page 35: ...es dialog box select the Adjust DC Offset check box and click OK Changing the channels of a stereo signal You can modify the channels of a stereo signal flipping channels playing only the right channel or the left channel or playing either the right channel or the left channel on both channels You might want to use this feature if your audio clip only contains one recorded channel but it is not a ...

Page 36: ... or you can simulate the sound of an older analog recording being played from vintage audio equipment Note When previewing the effects applied to your audio clip you can select the Bypass option which lets you preview the audio clip without the effects This is helpful if you want to compare how the audio clip sounds with and without the effect To enhance audio clips with effects 1 Select the porti...

Page 37: ...intage audio equipment Apply settings in any one or more of five areas Noise Hum Crackle Click and AM Radio Mono to Stereo Creates a simulated stereo signal from a mono signal Normalize Sets the volume of clips to a consistent level Before using this effect go to the Mix Editor if available select all the clips in a layer and click Join Clips Parametric Equalizer 4 band with Master Volume Lets you...

Page 38: ... toolbar If the VST sound effect comes with an installation program use that program to install the sound effect If it does not use the following procedure Note Some VST plug ins may not be compatible with all versions of Windows be sure to check with the plug in developer Only install plug ins from a trusted source Corel assumes no responsibility for problems caused by plug in installation We rec...

Page 39: ...ix Editor allows you to arrange your clips in layers A layer is one or more audio clips arranged sequentially You can arrange up to eight layers simultaneously overdubbing and blending them to add voice to music tracks or to create audio mixes and fun projects You can play back all layers simultaneously to produce a mix Using the Mix Editor for basic editing Using the Mix Editor you can add audio ...

Page 40: ...a location that does not already contain a clip 3 Add the audio clip in one of the following ways from the Project View To add an audio clip stored on your computer click Import Audio Add Audio File To import audio tracks from a disc click Import Audio Import from CD DVD To record an audio clip click Record Audio Copying mixes To copy a mix 1 In the Mix Editor click below the layers on the timelin...

Page 41: ...he Mix Editor to arrange them in layers Then you can play your mix to see how the combined layers sound To arrange audio clips 1 In the Mix Editor select the audio clip you want to move 2 Click and drag the audio clip until you have placed it into the desired position 3 To preview your project use the playback controls Play Stop Previous Next 4 Optional Repeat Steps 1 to 3 for each audio clip that...

Page 42: ... clip 1 In the Mix Editor select the audio clip that you want to split into two The audio clip appears in the Clip Editor 2 Use the playback controls to move the playback cursor to the position at which you want to split the clip 3 On the Clip Editor toolbar click the Split Clip button Exporting mix selections Easy VHS to DVD Plus lets you export a selection of your mix To export the full project ...

Page 43: ...rmation see Saving Easy VHS to DVD Plus audio projects on page 37 Flatten your project combine all of the edits and enhancements into a single audio file and save it Export an audio clip to a single file For more information see Exporting audio clips on page 38 Export a set of tracks or audio clips to multiple files Easy VHS to DVD Plus lets you export each track or audio clip from your project to...

Page 44: ...hanges are not applied to the clips but are stored separately This allows you to easily undo the changes if you change your mind If you are happy with the changes you have made to the audio clip you can integrate them into the audio clip by flattening the clip When you flatten an audio clip Easy VHS to DVD Plus does not replace the existing clip with the changed clip but creates a new copy of the ...

Page 45: ...specify the name of the exported file 5 Click Export Exporting sets of tracks or audio clips Using Easy VHS to DVD Plus you can export a set of tracks or audio clips Each track or clip is saved as a separate file To export a set of tracks or audio clips to separate files 1 Click the Export arrow near the top of the window and click the Tracks Clips icon 2 Choose one of the following options Use Tr...

Page 46: ...udio in the mix clear the Maximize volume before exporting check box The total volume of an audio mix is made up of the individual layer volumes Note Unless you manually adjust the layers volume the more layers you have in the mix the lower is the volume of each individual layer Selecting this option renders the entire mix and then maximizes the volume of the resulting audio to ensure the loudest ...

Page 47: ... burn audio clips from your project to disc 4 Select the tracks or audio clips that you want to burn 5 In the Disc Size box select the size of your audio CD 6 Optional To add more information about your disc click Audio CD Settings The Audio CD Project Settings dialog box appears For more information click Help in the dialog box 7 Optional To rename and tag the tracks click Edit Audio Tags The Edi...

Page 48: ...42 Roxio Easy VHS to DVD Plus ...

Page 49: ... Capture device to my VCR 45 How do I connect the Roxio Video Capture device to my analog camcorder 47 How do I connect my audio device to my computer 47 Capture troubleshooting What do I need to check before I start to capture 48 Can the captured video quality ever be better than the source 48 Why is the Video input not detected 49 Why is the audio distorted 49 Why is there a high pitched sound s...

Page 50: ... Video and audio can also be captured from an analog camcorder or most older audio players and devices if they have matching jacks to the Roxio Video Capture device Connecting cables An RCA or S Video cable and audio cables are required to connect your devices to the Roxio Video Capture device These cables should have been supplied with your VCR DVDs If you wish to burn your converted files to dis...

Page 51: ...r capture device to a USB port on your computer and launch the installer The installer can be downloaded from www roxio com download How do I check if my system is 64 bit You can tell if you have a 32 or 64 bit system by right clicking on My Computer then selecting Properties It will be listed in System Type How do I connect the Roxio Video Capture device to my VCR 1 Connect the video output on yo...

Page 52: ...VD Plus 2 Connect the red and white RCA composite audio outputs on your VCR to the red and white inputs on your Roxio Video Capture device using audio cables 3 Plug in the Roxio Video Capture device to a USB port on your PC ...

Page 53: ...g an RCA or S Video cable and audio cables attach your camcorder s video and audio outputs to the matching jacks on the Roxio Video Capture device Launch the software to begin capturing video Note RCA S Video and audio cables are not included with Roxio Easy VHS to DVD How do I connect my audio device to my computer Connect the Roxio Video Capture USB device to a USB 2 0 port on your computer An o...

Page 54: ...our drivers are up to date Ensure the latest software updates are installed Can the captured video quality ever be better than the source VHS tapes are generally recorded at a lower quality than we have come to expect in the age of digital video and degrades over time Roxio Easy VHS to DVD will faithfully transfer your video to DVD Roxio Easy VHS to DVD also includes some tools to sharpen denoise ...

Page 55: ...e device This can also occur when a connected VCR is turned off If the VCR is powered on and you still get this message try playing a VHS tape for 30 seconds to see if Easy VHS to DVD will detect a Video Signal and lock on to a frame If there is no actual recording on the VHS tape there will be no frame to lock on and it will result in No Video Signal On occasion the VCR might lose tracking on the...

Page 56: ...e way into the red zone at the end like this If the audio levels are set correctly the audio will fall into the normal range of yellow to green like this To check your audio input level in the Windows Sound settings 1 On your Windows 10 taskbar right click the Sound icon and choose Open Sound settings from the context menu 2 On the Sound page of the Settings window in the Input area choose Line Ro...

Page 57: ... Easy VHS to DVD Plus 51 3 Click the corresponding Device properties link and on the Devices properties page adjust the Volume level for the device 4 Close the Settings window to exit and apply the settings ...

Page 58: ...adjust the Line volume settings Click OK to apply the changes and close the window Why is there a high pitched sound squeal when the application is running This can be caused by your default recording device being set to your microphone and not the VHS to DVD USB device To set the USB capture device as your default recording device 1 In the Windows Control Panel open the Devices and Printers page ...

Reviews: