background image

Setting Up XS-80H Remote

5

Setting the Wireless ID

Here you set the device name and SSID for the Wi-Fi-connected 

XS-80H series unit displayed in XS-80H Remote.
When multiple XS-80H series devices of the same model are on the 

network, you can change the device names and SSIDs by setting 

wireless IDs within a range of 1 to 99.
The XS-84H is used in the following example.

Wireless ID = 0: “XS-84H” (default)
Wireless ID = 1: “XS-84H-1”
 :
Wireless ID = 99: “XS-84H-99”


* The wireless ID is a setting shared by the wired LAN and the 

wireless LAN.

1. 

Use the [MENU] button on the XS-80H series device to 

select “WIRELESS LAN,” then use “WIRELESS ID” to set the 

wireless ID.

The device name and SSID change automatically when you make 

the “WIRELESS ID” setting.

2. 

Press the [MENU] button to quit the menu.

Checking the Wi-Fi Information

Here you check the Wi-Fi information for the XS-80H series device.

1. 

Use the [MENU] button on the XS-80H series device to 

select “WIRELESS LAN” 

g

 “INFORMATION,” then press the 

[VALUE] dial

The “WLAN INFORMATION” popup appears.

You can check and verify the following information.

Indication

Description

STATUS

This displays the connection status.

CONNECTED:

Connected to the Wi-Fi router.

NOT CONNECTED:

A wireless USB adaptor is attached, but no 

connection to the Wi-Fi router is in effect.

NOT AVAILABLE:

No wireless USB adaptor is attached.

AD-HOC:

In ad-hoc mode.

SSID

This displays the SSID.

IP ADDRESS

This displays the IP address.

SUBNET MASK

This displays the subnet mask.

MAC ADDRESS

This displays the MAC address.

AD-HOC KEY

This displays the ad-hoc key.

2. 

Press the [MENU] button to quit the menu.

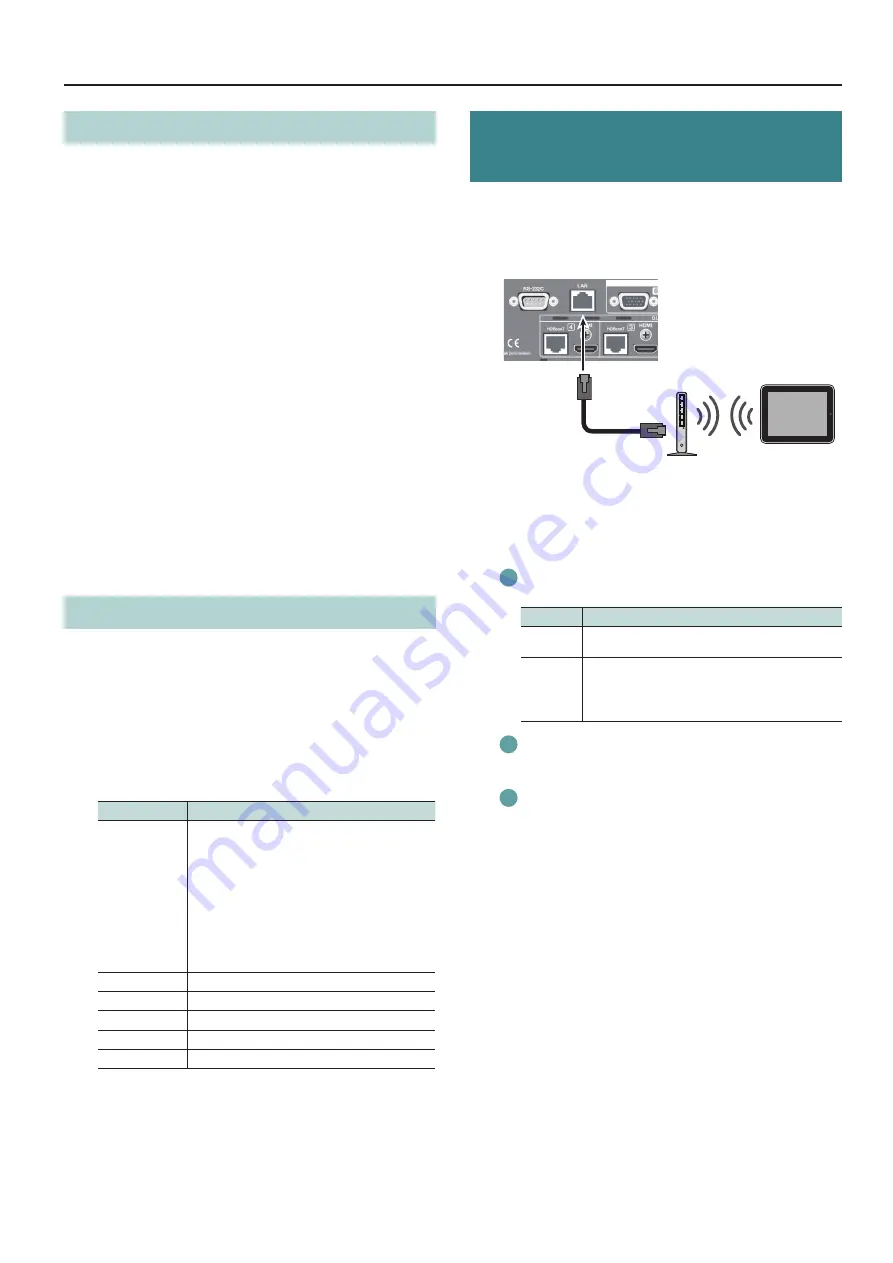
Making a Wired Connection to the 

Wi-Fi Router

Here you connect the XS-80H series device to the Wi-Fi router using 

a network cable and make a wireless connection to the iPad via the 

router.


* For information on how to operate the Wi-Fi router, refer to the 

router’s documentation.

XS-84H

1. 

Use a network cable to connect the LAN port on the 

XS-80H series unit to the Wi-Fi router.

2. 

Connect the XS-80H series device to the Wi-Fi router.

Use the [MENU] button on the XS-80H series device to select 

“LAN,” and then make the following settings.

Menu item Description

CONFIGURE This sets whether the IP address is obtained automatically 

(USING DHCP) or set manually (MANUALLY).

IP ADDRESS

This sets the IP address when “CONFIGURE” is set to 

“MANUALLY.”


* The subnet mask is fixed at “255.255.255.0” and cannot 

be changed.

Press the [MENU] button to quit the menu.

3. 

Connect the iPad and the Wi-Fi router.

On the iPad, tap “Settings” 

g

 “Wi-Fi,” make sure Wi-Fi is turned 

on, then at “Choose a Network,” select the Wi-Fi router to 

which the XS-80H series device is connected.

Summary of Contents for XS-80H Remote

Page 1: ... and or other countries Company names and product names appearing in this document are registered trademarks or trademarks of their respective owners Copyright 2015 ROLAND CORPORATION XS 80H Remote is a dedicated iPad application for the Roland XS 82H XS 83H XS 84H the XS 80H series Connecting an XS 80H series unit with an iPad via Wi Fi lets you operate the XS 80H series unit using XS 80H Remote ...

Page 2: ...e and a Wi Fi router and make a wireless connection to the iPad via the router g Connecting to a Wi Fi Router by WPS p 3 g Selecting and Connecting to a Wi Fi Router p 4 Preparations To make the connections over Wi Fi have the following equipment on hand 5 5 Wireless USB adaptor ONKYO UWF 1 or Roland WNA1100 RL sold separately 5 5 iPad 5 5 Wi Fi router wireless LAN router etc 1 2 1 Connection with...

Page 3: ...hannel of the ad hoc mode on the XS 80H series device might help Use the MENU button to select WIRELESS LAN g AD HOC CH and change the ad hoc mode channel 1 through 11 5 5 When you re not making a connection in ad hoc mode return the iPad s Settings g Wi Fi settings to their original values 4 Press the MENU button on the XS 80H series device to exit the menu Connecting to aWi Fi Router byWPS This ...

Page 4: ...2 3 5 5 When the Wi Fi router is one that you ve connected to in the past The connection is made as soon as you select the Wi Fi router When a successful connection is made the unit returns to the WIRELESS LAN menu Go on to step 3 Entering Security Data This procedure is necessary only when the Wi Fi router is one you re connecting to for the first time 3 Enter the security data passphrase for the...

Page 5: ... is attached but no connection to the Wi Fi router is in effect NOT AVAILABLE No wireless USB adaptor is attached AD HOC In ad hoc mode SSID This displays the SSID IP ADDRESS This displays the IP address SUBNET MASK This displays the subnet mask MAC ADDRESS This displays the MAC address AD HOC KEY This displays the ad hoc key 2 Press the MENU button to quit the menu Making aWired Connection to the...

Page 6: ...up appears 4 Tap Update or Load in the popup Communication between the iPad and the XS 80H series device starts Update This sends the XS 80H Remote settings to the XS 80H series device overwriting the settings on the unit Even when Update is selected the following settings are loaded into XS 80H Remote from the XS 80H series device 5 5 The Video Input setting Type 5 5 The Audio Control setting Sou...

Page 7: ...n also use Tab Name at the Settings screen to change the name displayed for each tab p 10 4 Display area This displays a Video Output Audio or Preset screen Video Output Screens 1 2 No Name Description 1 Cross point selection buttons These switch the cross points for the video or audio channels You can use Video Input on the Settings screen p 9 to change button icons and names The operation mode i...

Page 8: ... input or output audio for which this is turned on is muted out When turned on the Mute button lights up in white and OFF is displayed for the volume level You can use Audio Control on the Settings screen p 9 to change audio channel icons and names Preset Screens 1 Presetnumber assignments 1 4 5 8 9 12 13 16 No Name Description 1 Preset access buttons These buttons access preset settings that have...

Page 9: ... 2 Still 3 Still 4 SHARE 2 This sets the type of video signal to input Icon This selects the icons displayed for cross point selection buttons Name PC 1 PC 2 Tablet Document Camera 1 Camera 2 BD Player Video Game This sets the names for cross point selection buttons You can enter up to 64 characters 64 bytes Tap the Name field and edit the name Audio Control FADER 1 FADER 8 Source HDMI INPUT 1 HDM...

Page 10: ... Passcode Off On Off This switches passcode use on and off Tap Turn Passcode On and enter the passcode in the Set passcode popup The passcode is set when you have entered it twice When passcode use is turned on the passcode must be entered to display the Settings screen in XS 80H Remote To turn off passcode use tap Turn Passcode Off and enter the passcode in the Turn off passcode popup Change Pass...

Reviews: