Roland XS-80H Remote Owner'S Manual Download Page 4

Setting Up XS-80H Remote

4

Selecting and Connecting to a Wi-Fi Router

This lets you select from a list of Wi-Fi access points the Wi-Fi router where you want to connect the XS-80H series device, then make the connection.


* The 802.11g/n (2.4-GHz) wireless protocols and WPS and WPS2 authentication methods are supported.


* For information on how to operate the Wi-Fi router, refer to the router’s documentation.

1. 

Insert the optional wireless USB adaptor into the USB 

WLAN ADAPTOR port on the XS-80H series unit.

For the wireless USB adaptor, use the ONKYO UWF-1 or Roland 

WNA1100-RL.

2. 

Connect the XS-80H series device to the Wi-Fi router.

Use the [MENU] button on the XS-80H series device to select 

“WIRELESS LAN” 

g

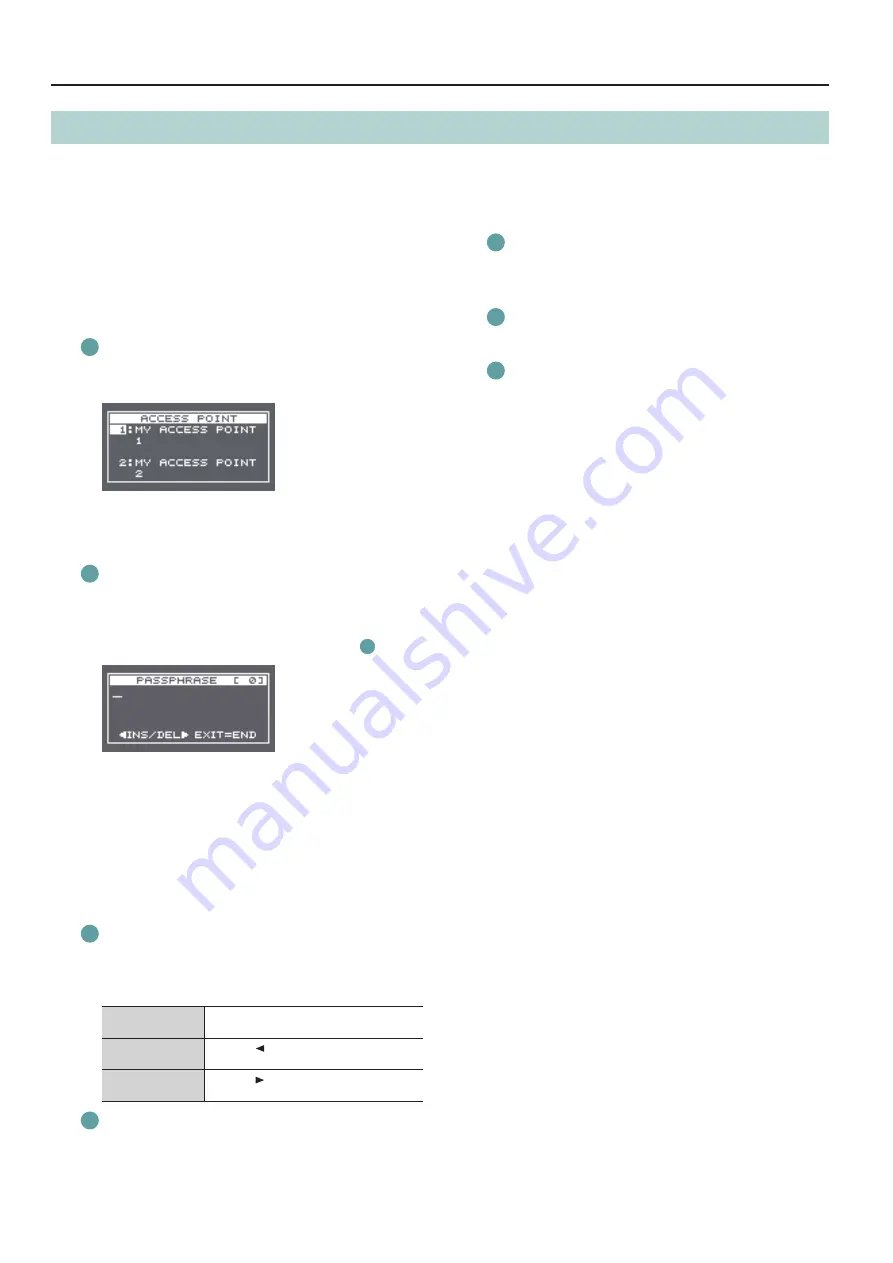
 “ACCESS POINT,” then press the [VALUE] dial.

The “ACCESS POINT” popup appears.


5

The number of the currently selected Wi-Fi router is highlighted.


5

Names that use other than single-byte alphanumeric characters 

are not displayed correctly.

Select the Wi-Fi router you want to connect to and press the 

[VALUE] dial.


5

When the Wi-Fi router is one you’re connecting to for the 

first time

The “PASSPHRASE” popup appears. Go on to step 2- 

3


5

When the Wi-Fi router is one that you’ve connected to in the 

past

The connection is made as soon as you select the Wi-Fi router. 

When a successful connection is made, the unit returns to the 

WIRELESS LAN menu. Go on to step 3

Entering Security Data


* This procedure is necessary only when the Wi-Fi router is one 

you’re connecting to for the first time

Enter the security data (passphrase) for the Wi-Fi router.

Pressing the [VALUE] dial lets you change the character at the 

cursor location. Turn the [VALUE] dial to change the character, 

then press the [VALUE] dial to apply the change.

Moving the cursor

Turn the [VALUE] dial. The cursor moves forward 

or backward.

Inserting a character

Press the [   ] button. The same character as the 

one just before the cursor location is inserted.

Deleting a character

Press the [   ] button. The character at the 

cursor location is deleted.

When you’ve finished entering the text, press the [EXIT] 

button.

Check the message and press the [VALUE] dial. 

(If you want to quit, press the [EXIT] button.)

When a successful connection is made, the unit returns to the 

WIRELESS LAN menu.

Press the [MENU] button to quit the menu.

3. 

Connect the iPad and the Wi-Fi router.

On the iPad, tap “Settings” 

g

 “Wi-Fi,” make sure Wi-Fi is turned 

on, then at “Choose a Network,” select the Wi-Fi router to 

which the XS-80H series device is connected.

Summary of Contents for XS-80H Remote

Page 1: ... and or other countries Company names and product names appearing in this document are registered trademarks or trademarks of their respective owners Copyright 2015 ROLAND CORPORATION XS 80H Remote is a dedicated iPad application for the Roland XS 82H XS 83H XS 84H the XS 80H series Connecting an XS 80H series unit with an iPad via Wi Fi lets you operate the XS 80H series unit using XS 80H Remote ...

Page 2: ...e and a Wi Fi router and make a wireless connection to the iPad via the router g Connecting to a Wi Fi Router by WPS p 3 g Selecting and Connecting to a Wi Fi Router p 4 Preparations To make the connections over Wi Fi have the following equipment on hand 5 5 Wireless USB adaptor ONKYO UWF 1 or Roland WNA1100 RL sold separately 5 5 iPad 5 5 Wi Fi router wireless LAN router etc 1 2 1 Connection with...

Page 3: ...hannel of the ad hoc mode on the XS 80H series device might help Use the MENU button to select WIRELESS LAN g AD HOC CH and change the ad hoc mode channel 1 through 11 5 5 When you re not making a connection in ad hoc mode return the iPad s Settings g Wi Fi settings to their original values 4 Press the MENU button on the XS 80H series device to exit the menu Connecting to aWi Fi Router byWPS This ...

Page 4: ...2 3 5 5 When the Wi Fi router is one that you ve connected to in the past The connection is made as soon as you select the Wi Fi router When a successful connection is made the unit returns to the WIRELESS LAN menu Go on to step 3 Entering Security Data This procedure is necessary only when the Wi Fi router is one you re connecting to for the first time 3 Enter the security data passphrase for the...

Page 5: ... is attached but no connection to the Wi Fi router is in effect NOT AVAILABLE No wireless USB adaptor is attached AD HOC In ad hoc mode SSID This displays the SSID IP ADDRESS This displays the IP address SUBNET MASK This displays the subnet mask MAC ADDRESS This displays the MAC address AD HOC KEY This displays the ad hoc key 2 Press the MENU button to quit the menu Making aWired Connection to the...

Page 6: ...up appears 4 Tap Update or Load in the popup Communication between the iPad and the XS 80H series device starts Update This sends the XS 80H Remote settings to the XS 80H series device overwriting the settings on the unit Even when Update is selected the following settings are loaded into XS 80H Remote from the XS 80H series device 5 5 The Video Input setting Type 5 5 The Audio Control setting Sou...

Page 7: ...n also use Tab Name at the Settings screen to change the name displayed for each tab p 10 4 Display area This displays a Video Output Audio or Preset screen Video Output Screens 1 2 No Name Description 1 Cross point selection buttons These switch the cross points for the video or audio channels You can use Video Input on the Settings screen p 9 to change button icons and names The operation mode i...

Page 8: ... input or output audio for which this is turned on is muted out When turned on the Mute button lights up in white and OFF is displayed for the volume level You can use Audio Control on the Settings screen p 9 to change audio channel icons and names Preset Screens 1 Presetnumber assignments 1 4 5 8 9 12 13 16 No Name Description 1 Preset access buttons These buttons access preset settings that have...

Page 9: ... 2 Still 3 Still 4 SHARE 2 This sets the type of video signal to input Icon This selects the icons displayed for cross point selection buttons Name PC 1 PC 2 Tablet Document Camera 1 Camera 2 BD Player Video Game This sets the names for cross point selection buttons You can enter up to 64 characters 64 bytes Tap the Name field and edit the name Audio Control FADER 1 FADER 8 Source HDMI INPUT 1 HDM...

Page 10: ... Passcode Off On Off This switches passcode use on and off Tap Turn Passcode On and enter the passcode in the Set passcode popup The passcode is set when you have entered it twice When passcode use is turned on the passcode must be entered to display the Settings screen in XS 80H Remote To turn off passcode use tap Turn Passcode Off and enter the passcode in the Turn off passcode popup Change Pass...

Reviews: