background image


97


Metering

Metering


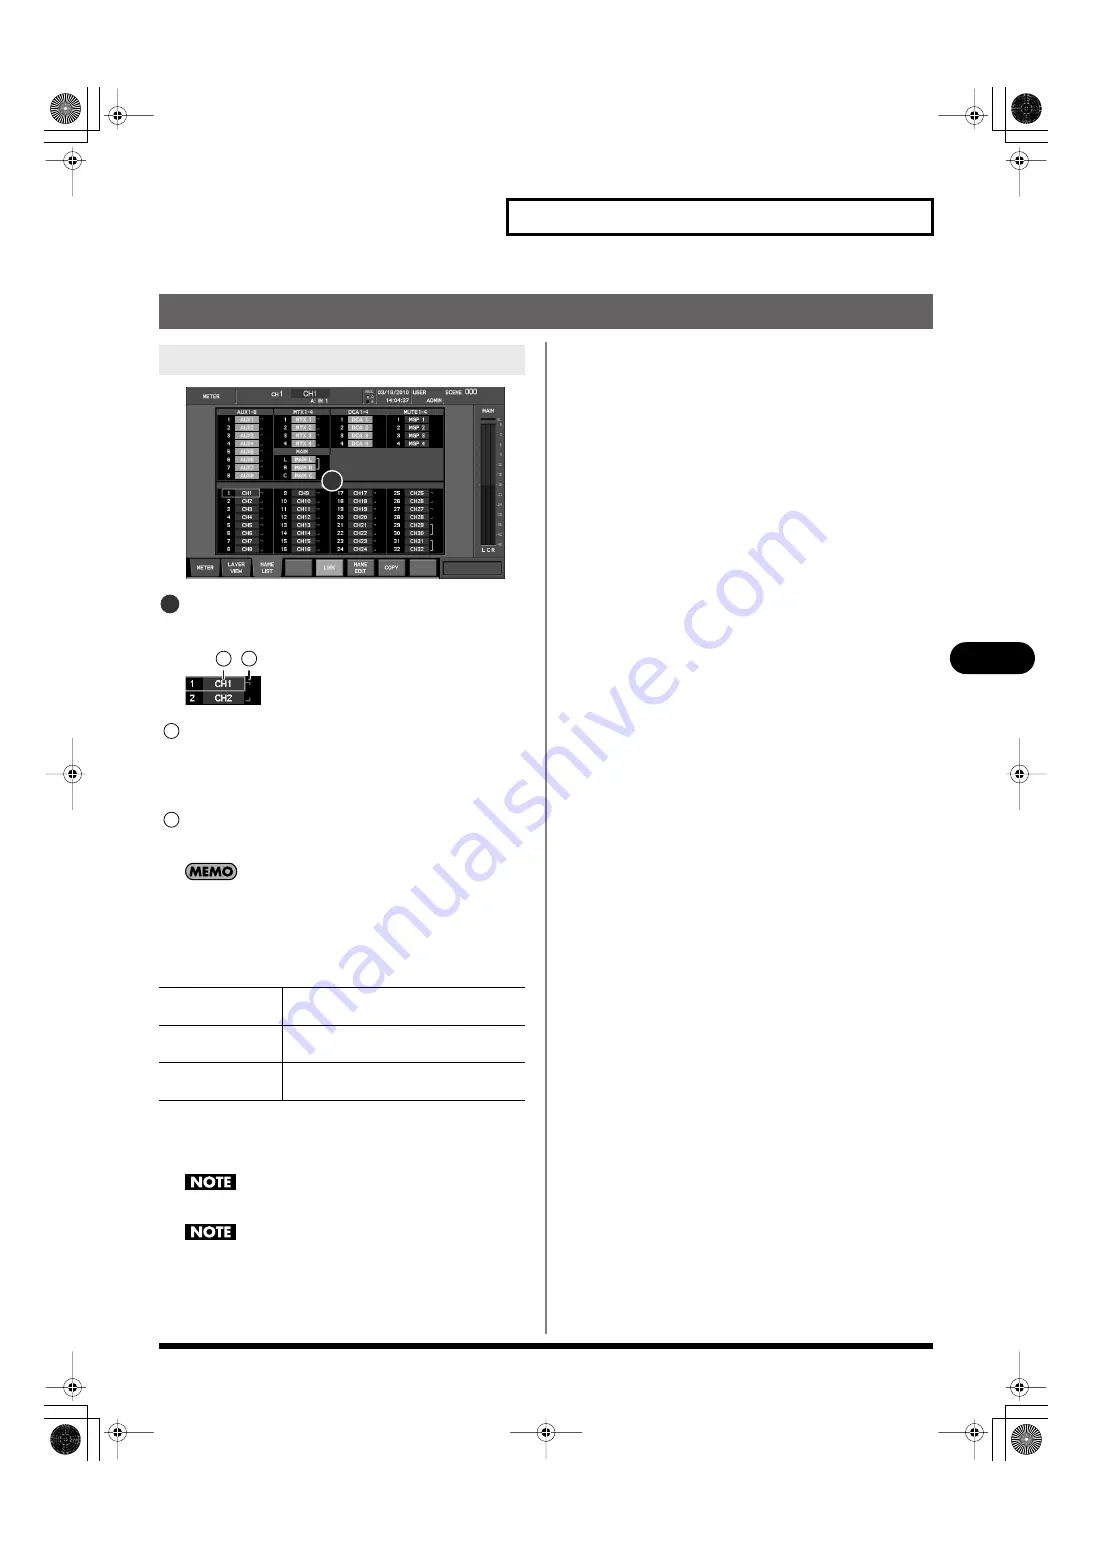
Listing the channel names and group names


fig.ScrMeterList_Guide.eps


Name list


This lists the names of each channel and group.


fig.List_Compo_Guide.eps


Name


This is the name of the channel or group. If you move the 
cursor to the name of a channel, that channel will become 
the selected channel.


Link indication


This indicates the link status of the channel.


To change the link status of a channel, move the cursor to the 
name of the desired channel, and press [F5 (LINK)] to turn link 
on/off.

The function buttons specific to the NAME LIST tab have the 
following operations:


*1 This is unavailable if the cursor is at MAIN L, MAIN R, DCA1–4, or 

MUTE1–4.

*2 This is unavailable if the cursor is at DCA1–4 or MUTE1–4.


NAME EDIT popup (p. 50).


CHANNEL COPY popup (p. 51).
AUX/MTX/MAIN COPY popup (p. 64).


NAME LIST tab


[F5 (LINK)]


*1


Turns link on/off for the channel at the cursor 
location.

[F6 (NAME EDIT)]

Accesses the NAME EDIT popup, where you can 
edit the name at the cursor location.

[F7 (COPY)]


 *2


Accesses the COPY popup, with the channel at 
the cursor location as the copy-source.

1

1

2

1

1

2

M-300_e.book 97 ページ 2010年6月24日 木曜日 午後2時26分

Summary of Contents for RSS M-300

Page 1: ...arefully read the sections entitled IMPORTANT SAFETY INSTRUCTIONS p 2 USING THE UNIT SAFELY p 3 5 and IMPORTANT NOTES p 6 8 These sections provide important information concerning the proper operation...

Page 2: ...OWN LIVE For the U K CAUTION Danger of explosion if battery is incorrectly replaced Replace only with same or equivalent type WARNING To reduce the risk of fire or electric shock do not expose this ap...

Page 3: ...either alone or in combination with an amplifier and headphones or speakers may be capable of producing sound levels that could cause permanent hearing loss Do not operate for a long period of time a...

Page 4: ...it Also avoid the use of insecticides perfumes alcohol nail polish spray cans etc near the unit Swiftly wipe away any liquid that spills on the unit using a dry soft cloth 027 Never expose lithium bat...

Page 5: ...nce of them being swallowed accidentally 120 Always turn the phantom power off when connecting any device other than condenser micro phones that require phantom power You risk causing damage if you mi...

Page 6: ...experience such problems you should relocate such wireless devices so they are at a greater distance from this unit or switch them off 354a Do not expose the unit to direct sunlight place it near devi...

Page 7: ...o not use cables that incorporate resistors for connecting to this unit The use of such cables can cause the sound level to be extremely low or impossible to hear For information on cable specificatio...

Page 8: ...s forbidden by law 852a This product can be used to record or duplicate audio or visual material without being limited by certain technological copy protection measures This is due to the fact that th...

Page 9: ...tions in the CHANNEL DISPLAY screen 44 Stereo linking channels 49 Specifying a channel name and color label 50 Copying channel settings to another channel 51 Using the channel library 52 Assigning cha...

Page 10: ...About inserting an external effects device 106 Inserting an external effects device into a channel 107 DCA groups 108 About DCA groups 108 DCA group settings 108 Assigning a channel to a DCA group 10...

Page 11: ...ng loading mixer settings 155 Date time settings 158 Managing USB memory 159 Console Lock 162 Help function 163 Other settings 164 Management of the M 48 live personal mixer 166 What is the M 48 live...

Page 12: ...12 Pitch shift 212 GEQ 213 Roland vintage effects 214 Index 216 Screen index 220 M 300_e book 12...

Page 13: ...ng down SHIFT In the case of function buttons the function is given in parentheses such as F1 LINK The REAC Roland Ethernet Audio Communication interface is the core of this system It uses a proprieta...

Page 14: ...detailed description of connections refer to REAC applications p 138 Cat5e Ethernet cables up to 100 meters long are supported If you need a longer connection we recommend that you use the optional S...

Page 15: ...300 s REAC port When the M 300 is shipped from the factory REAC caps are attached to the REAC ports In order to use REAC port you ll need to remove the REAC cap Take care not to lose the REAC caps you...

Page 16: ...ternal power supply Use only the supplied power cords to prevent damage to the units 1 As shown in the illustration fit the power cord hook over the power cord fig cord hook1 eps When installing in a...

Page 17: ...er of S 0808 on refer to the owner s manual of the S 0808 6 Turn on the power of the equipment connected to the audio outputs of the M 300 and your input output units 942 This unit is equipped with a...

Page 18: ...SB memory to which you backed up the data in step 1 p 156 Le M 300 est quip d une pile au lithium qui fait fonctionner l horloge et pr serve les r glages du m langeur Si la pile est faible l horloge e...

Page 19: ...and recover internal mixer data Carefully insert the USB memory all the way in until it is firmly in place USB memory used with the USB Memory Recorder must support USB 2 0 Hi speed The USB memory con...

Page 20: ...Function button section p 25 Screen controller section p 25 METER button p 25 EFFECTS Section p 25 GROUP section p 26 SETUP Section p 26 SCENE MEMORY section p 26 USB MEMORY RECORDER section p 26 TALK...

Page 21: ...f for each channel The button will be lit if mute is active Faders These adjust the signal level of each channel fig LayerSectGuide eps This section lets you select the channel layer that will be assi...

Page 22: ...MAIN R or MAIN C channels SOLO button This button turns solo on off for the MAIN L R C channels It will light if solo is on Fader This adjusts the signal level of the MAIN L R C channels fig ChEditSe...

Page 23: ...he EQ on off It will light if the EQ is on Band selection button LO LO MID HI MID HI These buttons select the band controlled by knobs on the EQUALIZER area The button of the currently selected band w...

Page 24: ...area you can adjust the send level from CH1 32 to the AUX MTX buses or adjust the send level from AUX1 8 MAIN L R C to the MTX buses AUX1 AUX8 MTX1 MTX4 buttons These buttons select the AUX MTX bus th...

Page 25: ...l allowing you to adjust the setting in finer detail You can use the user preference SHIFT LOCK p 137 to change the behavior of the SHIFT button ENTER button Use this button to turn an on screen butto...

Page 26: ...f the preceding or following song During playback button takes you back to the beginning of the currently playing song Rewinding or fast forwarding during playback By pressing and holding these button...

Page 27: ...olo settings of all channels in a single operation fig UserSectGuide eps DISP button This button accesses the USER screen where you can change or edit the user settings It will light red while the scr...

Page 28: ...30 USB connector p 30 MIDI connectors p 30 RS 232C MIDI select switch p 30 RS 232C connector p 30 DIGITAL OUT jack p 31 Security slot p 31 BATTERY slot p 31 Grounding terminal p 31 Power cord hook p 3...

Page 29: ...are used the volume level of equipment connected to the inputs CONSOLE INPUT may be low If this happens use connection cables that do not contain resistors fig ConsOutJackGuide eps CONSOLE OUTPUT 1 4...

Page 30: ...r for reception and an OUT THRU connector for transmission and thru are provided You can use the REMOTE popup to switch between the OUT and THRU functions For details refer to MIDI settings p 149 fig...

Page 31: ...nitesimal electrical charge which is absolutely harmless However if you are concerned about this connect the ground terminal see figure with an external ground When the unit is grounded a slight hum m...

Page 32: ...values fig ScrChDisp eps You can make adjustments in finer increments by holding down SHIFT while you operate the CHANNEL EDIT section s knobs or the value dial If you want to edit channel parameters...

Page 33: ...creen press the button that turned red when you pressed it to access a screen Buttons that access a popup are excepted A user setting lets you choose either the CHANNEL DISPLAY screen or the METER scr...

Page 34: ...time User setting indication This shows the current user settings Scene indication This shows the number and name of the currently selected scene Main display area fig ScrMainArea eps Most screen oper...

Page 35: ...They provide a cursor and function buttons for performing operations in the screen fig Popups eps While a popup is displayed cursor and function button operations are valid only for the popup fig Func...

Page 36: ...LR buttons fig BtnAllClr eps These buttons assist you in operating check buttons Pressing the ALL button will select all applicable check buttons Pressing the CLR button will clear all applicable chec...

Page 37: ...at the cursor location between uppercase and lowercase If the character is not an English letter it will be changed to the letter A F3 NUM Converts the character at the cursor location to the numeral...

Page 38: ...nfirmation message will not appear in step 7 1 Access the desired LIBRARY popup fig ScrChLib eps 2 Make sure that the applicable channel effect indication shows the object that you want to recall 3 Se...

Page 39: ...rom the library data list select the desired library data You cannot clear library data in which PRESET or LOCK is shown 3 Press F6 CLEAR fig ScrM48LibDel_Conf eps A message will ask you to confirm th...

Page 40: ...usts the input level in the digital domain HPF High pass filter This is a 12 dB octave filter that passes the region higher than the specified frequency GATE EXPANDER This is a dynamics processor that...

Page 41: ...e input channel that you want to edit fig SELBtn eps 2 The selected channel is shown in the channel indication at the upper center of the screen fig ScrTBChDisp eps 1 In the CHANNEL EDIT section press...

Page 42: ...pad on off If pad is on the PAD button will light Since noise will be produced when you switch the pad setting the output of the channel whose setting you change will be briefly muted Turn the pad on...

Page 43: ...operate the knob Use the AUX MTX SENDS area of the CHANNEL EDIT section to perform these operations fig ChEdtAux eps You can adjust the send level in either of two ways using the SEND LEVEL knob of t...

Page 44: ...will be produced when you switch the phantom power setting the output of the channel whose setting you change will be briefly muted PAD button This turns the pad on off Turning this on will lower the...

Page 45: ...nge of 80 0 dB 0 0 dB For details refer to Gate expander operations p 68 Compressor fig ScrChComp eps COMP button This turns the compressor on off IN meter This shows the input level of the compressor...

Page 46: ...hEQ eps EQ button This turns the 4 band EQ on off 4 band EQ graph This shows the approximate response of the 4 band EQ OL Overload indicator This will light red when the output of the 4 band EQ exceed...

Page 47: ...cifies the proportion of the signal that is sent to MAIN C when PAN is at C center as a value in a range of 0 100 This is valid when the LCR button is on fig Pan_LCR eps PAN When LCR button is off Thi...

Page 48: ...ton is on MAIN button This turns the send to the MAIN L R C on off This is shown only when the LCR button is off The function buttons have the following operations The F7 ATT Ctrl setting is common to...

Page 49: ...at you want to stereo link 2 Press F1 LINK A confirmation message will appear asking you to confirm the stereo link operation The function buttons have the following operations 3 Press F7 LINK L R or...

Page 50: ...ield and edit the channel name Use the cursor left right buttons to move the cursor location Use the value dial to change the character at the cursor location 3 Press F8 CLOSE to close the popup 1 Acc...

Page 51: ...PY to access the CHANNEL COPY popup fig ScrChCopyGuide eps Copy source channel This indicates the copy source channel Copy parameter select buttons Here you can select the parameters that will be copi...

Page 52: ...nnel that is the target of the CHANNEL LIBRARY popup Library data list This is a list of the library data Recall parameter select buttons Use these to select the parameters that will be recalled You c...

Page 53: ...up to which the channel will be assigned 1 Access the GROUP ASSIGN popup for the desired channel fig ScrChGroupAssign eps 2 Verify that the target channel is correct 3 Move the cursor to the desired D...

Page 54: ...SEL TO MONO MIX MTX SEND 1 4 TO MTX 1 3 TO MTX 2 4 ON SEND MTX LINK PAN ON SEND MTX SEND 1 4 TO MTX 1 3 TO MTX 2 4 ON SEND MTX LINK PAN ON SEND TO MAIN L TO MAIN R TO MAIN C MAIN SEND PAN PAN LCR LR...

Page 55: ...t fig SELBtn eps Each time you press the MAIN SEL button it will select the MAIN L MAIN R or MAIN C one after another 3 The selected channel is shown in the channel indication at the upper center of t...

Page 56: ...ustments by holding down SHIFT while you operate the knob Use the EQUALIZER area of the CHANNEL EDIT section to operate the EQ fig ChEdtEQ eps 1 In the CHANNEL EDIT section press CH DISP fig ScrChAux...

Page 57: ...you operate the knob You can t use SENDS ON FADER to adjust the send amount to an MTX bus By pressing DISP you can access the MTX SENDS popup where you can make detailed MTX send settings p 86 Operat...

Page 58: ...teps Limiter fig ScrChLim eps LIM button This turns the limiter on off IN meter This indicates the input level of the limiter For stereo linked channels two meters L and R are shown GR meter This indi...

Page 59: ...cess the EXTERNAL INSERT screen Inserting an external effects processor into a channel is done in the EXTERNAL INSERT screen For details refer to Inserting an EXT FX into a channel p 107 8 band EQ fig...

Page 60: ...urned on MAIN button This turns the send to MAIN L R C This is shown only when the LCR button is on LR button C button These individually turn the send to the MAIN L R and MAIN C on off These are show...

Page 61: ...Balance fig ScrChBal eps This adjusts the left right output balance sent from MAIN L R or stereo linked AUX MTX in a range of L63 R63 Group fig ScrChGroup eps By moving the cursor to DCA GROUP or MUTE...

Page 62: ...F Frame 24 25 29 97 30fps F2 NAME EDIT Accesses the NAME EDIT popup where you can specify the channel name p 50 F3 COPY Accesses the AUX MTX MAIN COPY popup where you can copy channel settings p 64 F4...

Page 63: ...CHANNEL DISPLAY screen for the AUX MTX that you want to stereo link fig ScrChAux eps 2 Press F1 LINK fig ScrAuxLinkConf eps A confirmation message will appear asking you to confirm the stereo link op...

Page 64: ...e of eight colors as the color label Channel name entry and color label selection are done in the NAME EDIT popup For details on NAME EDIT popup refer to Specifying a channel name and color label p 50...

Page 65: ...om the library or store the settings of the current channel in the library AUX MTX MAIN library operations are performed in the AUX MTX MAIN LIBRARY popup 1 Access the CHANNEL DISPLAY screen for the d...

Page 66: ...the MAIN mix ig ScrChAux eps 2 Press F7 COPY MAIN MIX A confirmation message will ask you to confirm the operation 3 Press F8 OK to copy the send amount from each input channel to MAIN If you press F7...

Page 67: ...copy source MTX Copy destination channel select button This indicates the copy destination MTX The function buttons perform the following operations 3 Use the copy destination select button to select...

Page 68: ...ucking applies a user adjustable level of attenuation RANGE to input signals that are higher than the threshold level fig GateDuck eps Gate expander operations are performed in the GATE EXPANDER popup...

Page 69: ...in a range of 80 0 dB 0 0 dB RANGE knob This adjusts the RANGE in a range of Inf dB 0 0 dB ATTACK knob This adjusts the ATTACK time in a range of 0 0 ms 800 0 ms This is the time from when the input s...

Page 70: ...ig PopDuckGuide eps THRESH knob This adjusts the threshold level in a range of 80 0 dB 0 0 dB RANGE knob This adjusts the RANGE in a range of Inf dB 0 0 dB ATTACK knob This adjusts the ATTACK time in...

Page 71: ...have the following operations 1 In the fader module section press a SEL button to select the desired channel 2 In the GATE area of the CHANNEL EDIT section press DISP fig PopGate eps The GATE EXPANDER...

Page 72: ...6 SELECT SELF 1 Access the GATE EXPANDER popup fig PopGate eps 2 Use the filter type select buttons to select the filter type 3 Use the FREQ Q knobs in the KEY IN FILTER section to adjust the filter 4...

Page 73: ...ettings in the library The GATE EXP LIBRARY popup is used to perform gate expander library operations 1 Access the GATE EXPANDER popup 2 Press F4 LIBRARY to access the GATE EXP LIBRARY popup ffig PopG...

Page 74: ...mpressor OUT meter This indicates the output level of the compressor For stereo linked channels two meters L and R are shown Parameters In this field you can edit the compressor parameters fig PopComp...

Page 75: ...ile maintaining 6 dB of headroom 1 In the fader module section press a SEL button to select the desired channel 2 In the COMP area of the CHANNEL EDIT section press DISP fig PopComp eps The COMPRESSOR...

Page 76: ...ss F6 SELCT SELF 1 Access the COMPRESSOR popup fig PopComp eps 2 Use the filter type select buttons to select the filter type 3 Use the FREQ Q knobs in the KEY IN FILTER section to adjust the filter 4...

Page 77: ...LIBRARY popup is used to perform compressor library operations 1 Access the COMPRESSOR popup 2 Press F4 LIBRARY to access the COMP LIBRARY popup fig PopCompLibGuide eps Channel indication This indicat...

Page 78: ...ect the desired channel 2 In the COMP area of the CHANNEL EDIT section press DISP fig PopLmt eps The LIMITER popup will appear fig PopLmtGuide eps IN meter This indicates the input level of the limite...

Page 79: ...an recall limiter settings from the library or store the current limiter settings in the library The LIMITER LIBRARY popup is used to perform limiter library operations 1 Access the LIMITER popup 2 Pr...

Page 80: ...ou can adjust the frequency in a range of 20 Hz 20 0 kHz fig FilterCurve eps IN meter This indicates the input level of the 4 band EQ For stereo linked channels two meters L and R are shown 4 band EQ...

Page 81: ...s the channel to which the 4 BAND EQ LIBRARY popup applies Library data list This is a list of the library data Recall parameter select buttons These select the section that will be recalled The funct...

Page 82: ...he Q of the peaking type filters in a range of 0 36 16 00 Higher values produce a sharper curve The Q knob is not shown in bands 1 8 when LSV HSV is selected as a filter type FREQ knobs This adjusts t...

Page 83: ...fig Pop_8BandEQLibGuide eps Channel indication This indicates the channel to which the 8 BAND EQ LIBRARY popup applies Library data list This is a list of the library data The function buttons have th...

Page 84: ...nds 1 4 These adjust the sends from the CH to AUX MTX The AUX MTX send area is structured as follows fig PopAuxSendFieldGuide eps Number Name This indicates the AUX MTX number and name Send level bar...

Page 85: ...ttons These buttons select the send point for AUX1 8 or MTX1 4 from the following choices 4 Use the send point select buttons to select the desired send point 5 Press F8 OK the AUX MTX send points you...

Page 86: ...AIN L R C 2 In the AUX MTX SENDS area of the CHANNEL EDIT section press DISP fig ScrMatrixSends eps The MTX SENDS popup will appear MTX sends 1 4 These adjust the sends from the AUX or MAIN to MTX The...

Page 87: ...s the left right panning of the signal send to the stereo linked MTX in a range of L63 R63 The function buttons have the following operations F3 ALL ON Turns on all send switches for each send field F...

Page 88: ...pecifying the output destination for the USB memory recorder p 126 When the M 300 is in its default state the output patchbay is set as follows Default setting of the input output patchbay Default set...

Page 89: ...ymbol A patch symbol is shown where the currently patched channel and jack intersect To change the patching move the cursor to the location where the desired channel and jack intersect and press ENTER...

Page 90: ...the current input patchbay settings for later recall The INPUT PATCHBAY LIBRARY popup is used to perform input patchbay library operations 1 Access the PATCHBAY screen 2 Press F1 INPUT to access the...

Page 91: ...ent that does not require 48V phantom power Mistakenly supplying phantom power to a dynamic microphone audio playback device or any other device that does not require phantom power will cause malfunct...

Page 92: ...User Preference p 137 is unselected no confirmation message will appear in step 4 The output patchbay library lets you store the current output patchbay settings for later recall The OUTPUT PATCHBAY...

Page 93: ...ations refer to Library operations p 37 F3 NAME EDIT Accesses the NAME EDIT popup F4 RECALL Recalls the selected library data F5 STORE Stores the current settings into the selected library data F6 CLE...

Page 94: ...cursor in the screen will move When you move the cursor in the screen the SEL indication of the top panel will likewise move If the CHANNEL DISPLAY follows CH SELECT button item in the CHANNEL SELECT...

Page 95: ...s inverts the phase of the audio signal The phase will be inverted if this is on and will be normal if this is off Preamp gain knob CH1 32 This adjusts the preamp gain for the input jack patched to th...

Page 96: ...knob This adjusts the level at which the OVER indication of the meter will light in a range of 18 dB 0 dB PEAK HOLD button This turns the meter s peak hold function on off HOLD TIME knob This sets th...

Page 97: ...of the desired channel and press F5 LINK to turn link on off The function buttons specific to the NAME LIST tab have the following operations 1 This is unavailable if the cursor is at MAIN L MAIN R D...

Page 98: ...indication This indicates the effect number FX INSERT SOURCE SELECT popup button This selects the input source for the effect The current input source is shown on the button When you move the cursor...

Page 99: ...or off from a USER button p 136 FX DESTINATION SELECT popup button These select the output destination for the effect The current output destination is shown on the button When you move the cursor to...

Page 100: ...s have the following operations 1 Access the EFFECTS screen fig ScrFXOutSelBtn eps 2 Move the cursor to the FX DESTINATION SELECT popup button L or R of the desired effect and press ENTER The FX DESTI...

Page 101: ...ide of FX3 Specifying the effect return channel 1 Access the EFFECTS screen 2 Move the cursor to the FX DESTINATION SELECT popup button L for FX3 and press ENTER fig ScrFXOutSel2 eps The FX DESTINATIO...

Page 102: ...ou want to edit 3 Move the cursor to the desired parameter and use the value dial to change the value 4 Press F8 CLOSE to close the popup The effect library is used to select the effect type You can r...

Page 103: ...ss F6 TEMPO fig ScrTempoGuide eps The TEMPO popup will appear TEMPO knob Sets the tempo BPM in a range of 5 0 300 0 SLAVE TO MIDI CLOCK select button If this is selected the tempo will synchronize to...

Page 104: ...ar 3 Press F2 BUS INSERT to access the BUS INSERT tab fig ScrFxInsSelBus eps 4 Move the cursor to the MAIN L button and press ENTER to select it 5 Press F8 CLOSE to close the popup Insert into MAIN R...

Page 105: ...and use the value dial to change the value Turning on F5 20 630 ON FADER F7 630 20k ON FADER will allow you to use the top panel faders to operate the corresponding bands While using the top panel fad...

Page 106: ...g ScrExtRackGuide2 eps This area indicates the status of EXT FX1 4 It is organized as follows External effect number This indicates the number of the external effect ENABLE button This enables or disa...

Page 107: ...ce to CONSOLE IN5 and CONSOLE OUT5 and insert it into CH1 1 Access the EXTERNAL INSERT screen 2 Move the cursor to the ENABLE button for EXT FX1 and press ENTER to select it 3 Connect your external ef...

Page 108: ...r to Assigning a channel to a DCA group p 53 1 In the GROUP section press DCA to access the DCA GROUP screen 2 Move the cursor to the DCA group fader of the desired DCA group and press F8 ASSIGN The D...

Page 109: ...group and press F7 NAME EDIT fig ScrChNameEdit eps The NAME EDIT popup will appear For details on name editing refer to Editing the channel name p 50 You can use the AUX MTX DCA layer of the fader mod...

Page 110: ...PLAY screen to assign a channel to a mute group For details refer to Assigning a channel to a MUTE group p 53 1 In the GROUP section press MUTE to access the MUTE GROUP screen fig ScrMUTEGroup eps 2 M...

Page 111: ...tching MUTE groups on or off from a USER button p 136 You can specify a name and color label for each mute group A name of up to six characters can be specified and you can choose one of eight colors...

Page 112: ...OSC MIC SELECT CONSOLE INPUT 1 CONSOLE INPUT 2 CONSOLE INPUT 3 CONSOLE INPUT 4 TALKBACK OSC OUT Either talkback or oscillator can be outputted If you turn both talkback and oscillator on oscillator w...

Page 113: ...will be sent The function buttons have the following operations 1 Access the TALKBACK OSCILLATOR screen 2 Use the MIC SELECT buttons to select the CONSOLE IN that is used for talkback 3 Connect a mic...

Page 114: ...X 1 OUT MTX 4 OUT MAIN OUT LR MAIN OUT C MAIN OUT LCR MONO OUT REC OUT LR MONITOR MONITOR SELECT DELAY DELAY Normally the monitor signal will be output to MONITOR OUT L R and PHONES Solo is enabled wh...

Page 115: ...he desired solo mode 3 On the top panel press SOLO for the desired channel The signal of that channel will be sent to solo buses and output from the output jacks to which MONITOR OUT L R are patched a...

Page 116: ...he setting of the monitor The statuses of the SOLO buttons The recorder status e g playing or recording of the USB memory recorder The playback mode of the USB memory recorder The song selection of th...

Page 117: ...te the Store operation The operation will be cancelled if you press F7 CANCEL If the SCENE LIB STORE button located in the CONFIRMATION area of User Preferences p 137 is not selected no confirmation m...

Page 118: ...ned on this area will indicate LOCK or FILT respectively RECALL PARAMETERS A check mark is shown for parameters that will be recalled as specified by the Recall Filter settings M 48 Indicates the memo...

Page 119: ...Preamp settings gain 48V phantom power pad CH1 32 Input channel settings BUS AUX MTX and MAIN settings EFFECTS Effect and external effect insertion settings DCA MUTE GROUP DCA group and MUTE group se...

Page 120: ...ration The scene you selected in step 2 will be overwritten onto the number you selected in step 3 INSERT If you press F5 INSERT a message will ask you to confirm the Insert operation Press F8 INSERT...

Page 121: ...don t want to be recalled The parameter recall scope buttons correspond to the following parameters For CH1 32 For AUX MTX MAIN Channel recall scope buttons These buttons specify the channels that wil...

Page 122: ...e buttons of F3 OTHER to specify the other parameters that will be recalled If desired M 48 memories can be stored simultaneously when a scene memory is stored on the M 300 The current memory of each...

Page 123: ...bject of the M 48 MEMORY LIST popup Memory list This indicates the memory number and name The memory of the current memory number is shown in green The function buttons have the following operations F...

Page 124: ...USB memory Doing so may damage the data saved on USB memory fig RecorderSectGuide eps button Here you can select the song to play and rewind or fast forward the playback button Use this button to star...

Page 125: ...or recording WAV file name This indicates the name of the WAV file currently being recorded or currently selected for playback Playback mode This indicates the playback mode The following playback mod...

Page 126: ...emory recorder are specified as follows The RECORDER DESTINATION SELECT popup is used to specify the output 1 Access the RECORDER screen g ScrRecorderPlay eps 2 Move the cursor to the L channel of the...

Page 127: ...select a WAV file The selected WAV file is shown in the sub display area 2 Press The selected WAV file will play The sub display area shows the playback time fig SubDispRcdr eps Pressing and holding...

Page 128: ...cannot be given ADMIN privileges USER These are user settings that an ADMIN user creates on USB memory A name of up to eight characters can be assigned The user level is specified by an ADMIN user A...

Page 129: ...he Accessing the USER screen FILE NAME Indicates the name of the user settings TIME Indicates the date and time at which the settings were last changed STATUS If a password has been specified the indi...

Page 130: ...USB memory are copied to internal memory Operation will switch to the user settings that were copied to internal memory This means that the current user settings will become the user settings in inte...

Page 131: ...emory You can delete user settings if the current user setting has ADMIN privileges 1 Access the USER screen 2 From the USB memory user list select the user that you want to delete 3 Press F4 DELETE U...

Page 132: ...confirm the entry in the PASSWORD field Enter the same password as you did in the PASSWORD field If the contents entered in the PASSWORD field and the CONFIRM field do not match the following error me...

Page 133: ...able to operate for the channels selected by the channel access permission buttons The parameters that are selected here will be operable Channel access permission buttons These buttons select the cha...

Page 134: ...diting the user level If a user who does not have ADMIN privileges attempts to access the USER LEVEL popup an ENTER PASSWORD popup will appear requesting that the ADMIN password be entered Enter the A...

Page 135: ...the cursor to the desired channel and press ENTER to select it 8 Press F8 CLOSE to finalize the changes and close the USER FADER ASSIGN popup 9 Press F8 OK to finalize the changes and close the USER P...

Page 136: ...functions that are assigned to user buttons 1 8 or user buttons 9 16 5 Move the cursor to the desired user button assignment and press ENTER fig ScrUserBtnAsgn eps The USER BUTTON EDIT popup will app...

Page 137: ...essing SEL performs when DCA1 through 8 has been called up to the top panel s fader module section p 21 The selection items are as indicated below 5 Move the cursor to the desired item and press ENTER...

Page 138: ...ansmission time between REAC devices is approximately 375 microseconds but if the signal passes through a REAC splitter S 4000 SP S 4000D or an Ethernet switching hub approximately 200 microseconds of...

Page 139: ...soles To split the FOH inputs as analog audio signals or AES EBU format an S 4000S in which output modules SO DA4 or SO AES4 have been installed can be used This allows up to 40 channels of analog aud...

Page 140: ...e REAC CONFIG popup will appear 3 Press F1 SETUP fig ScrSysReacConf1Guide eps The SETUP tab will appear REAC SETUP select buttons These buttons select REAC settings appropriate for the desired applica...

Page 141: ...This area shows the name the number of inputs and outputs and the following information of the selected device This area also shows following information S 4000S You can view the modules that are ins...

Page 142: ...up from the connected S 4000M You can save load the S 4000M input and output setups to a USB memory as a S 4000M Input Output Setup file p 147 S 4000M s input output setups cannot be saved as part of...

Page 143: ...opup will appear You can reset and optimize the merge output patchbays according to the devices physically connected to REAC ports 1 4 This has the same function as AUTO MAP SLAVE UNITS button on S 40...

Page 144: ...tes the signal level as follows Patch symbol A patch symbol is shown where the currently patched REAC channel and input intersect To change the patching move the cursor to the location where the desir...

Page 145: ...signal level as follows Output indication This indicates the output numbers of the REAC slave device Patch symbol A patch symbol is shown where the currently patched REAC channel and output intersect...

Page 146: ...sible to manage setup the M 48 from the M 300 Using the S 4000M s split function makes it unnecessary to use the M 300 s output to REAC for stage input splitting or recording 1 Access the S 4000M CONF...

Page 147: ...ll cancel the operation Do not disconnect the USB memory or switch off the M 300 s power while data is being saved to USB memory Doing so may destroy the data saved in USB memory 1 Access the S 4000M...

Page 148: ...r on the PC that s to be connected to the M 300 using USB Download the USB MIDI driver from the Roland website below http www rolandsystemsgroup net The M 300 can be remotely controlled from M 300RCS...

Page 149: ...ll transmit MIDI OUT THRU select buttons These select the function of the rear panel MIDI OUT THRU connectors If you select THRU the settings of the SEND buttons will have no effect 4 In the MIDI RS 2...

Page 150: ...y the device ID 5 Move the cursor to the V LINK SOURCE CHANNEL SELECT popup button for the desired source and press ENTER fig ScrSysVlnkSrcSel eps The V LINK SOURCE CHANNEL SELECT popup will appear Cu...

Page 151: ...s the SYSTEM screen 2 Press F4 REMOTE to access the REMOTE popup 3 Press F4 RS 232C fig ScrSysRS232CGuide eps The RS 232C tab will appear MIDI RS 232C selection indicator This shows the status of the...

Page 152: ...f the following delay units CH MUTE OPTION select buttons These buttons make the settings for the channel mute options Mutes AUX MTX SENDS If this is checked muting input channel also mutes AUX MTX se...

Page 153: ...e delay units shown in the CHANNEL DISPLAY screens AUX MTX MAIN and the MONITOR screen If you select Frame as the delay units move cursor to the fps field and use dial to select the frame rate 5 Use t...

Page 154: ...the section you selected in step 3 will be initialized If you press F7 CANCEL the operation will be cancelled Initializing the mixer settings MIXER PARAMETER The mixer parameters will be initialized S...

Page 155: ...The function buttons have the following operations 1 Access the SYSTEM screen fig ScrSystem eps 2 Press F3 LOAD SAVE fig ScrSysLoadSave eps The LOAD SAVE popup will appear LOAD SAVE popup MIXER PARAM...

Page 156: ...USB memory 1 Access the LOAD SAVE popup fig ScrSysLoadSave eps 2 Move the cursor to the project file list and select the file that you want to load 3 Move the cursor to the LOAD SECTION select buttons...

Page 157: ...ails on name editing refer to Editing a name p 37 5 Press F8 OK to finalize the name you edited and close the popup If you press F7 CANCEL the name edit will be cancelled and the popup will close 1 Ac...

Page 158: ...select the format of the date You can choose one of the following formats YEAR knob This specifies the year in a range of 2000 to 2099 MONTH knob This specifies the month in a range of 1 12 DATE knob...

Page 159: ...ps A message will ask you to confirm the operation 3 Press F8 FORMAT to carry out the Format operation If you press F7 CANCEL the operation will be cancelled A progress message will indicate the state...

Page 160: ...on and close the popup 1 Access the USB MEMORY popup 2 In the file list move the cursor to the desired file or folder 3 Press F3 NAME EDIT fig ScrNameEdit eps The NAME EDIT popup will appear 4 Use the...

Page 161: ...will ask you to confirm the operation Press F8 DELETE to carry out the Delete operation If you press F7 CANCEL the operation will be cancelled Here s how to test your USB memory s reading and writing...

Page 162: ...LOCK CONSOLE fig ScrUserPasswd eps If a password has been specified for the current user settings the ENTER PASSWORD popup will appear Enter the user password and press F8 OK If you press F7 CANCEL t...

Page 163: ...down cursor buttons or the value dial to scroll the display Press F8 CLOSE to close the HELP popup By holding down HELP and pressing a top panel button you can access the Help content related to that...

Page 164: ...tialization will begin Do not turn off the power until the initialization is completed 4 Turn off the power If you ve forgotten the ADMIN password you can use the following procedure to clear the ADMI...

Page 165: ...f the above four points for each fader that has drifted out of calibration 5 Press the function button that corresponds to the location at which you set the fader fig FaderCalibrationConfirm eps A mes...

Page 166: ...on the M 48 unit Group mix VOLUME PAN REVERB SEND and 3 BAND EQ can be adjusted for each group created by the source assignment settings The group mix can also be viewed and edited from the M 300 or P...

Page 167: ...nits The output from the M 300 s REAC B port is distributed via the S 4000D You can connect up to four S 4000D units serially and support up to twenty four M 48 units The mixing engineer can make sett...

Page 168: ...agement functionality for the M 48 are also provided Viewing the connected M 48 units Editing screen M 48 MANAGER popup p 170 Checking and adjusting the musician s mix Group Mix Editing screen M 48 GR...

Page 169: ...the level determined by the M 300 s channel fader In this case the actual LEVEL setting of the M 48 source is controlled by the M 300 fader In addition to input channel direct outs you can use a vari...

Page 170: ...up Item Explanation Function of ENTER NO Indicates the order in the list Accesses the ARRANGE UNIT popup UNIT NAME Indicates the unit name Accesses the NAME EDIT popup MEMORY NO Indicates the current...

Page 171: ...1 Access the M 48 MANAGER popup 2 In the M 48 list move the cursor to the NO field of the desired M 48 and press ENTER fig ScrM48Arrange eps The ARRANGE UNIT popup will appear 3 Use the value dial to...

Page 172: ...p to six characters Volume knob This adjusts the group s volume in a range of Inf dB 20 0 dB If no index markings are shown for a knob this means that no source has been assigned to that group The fun...

Page 173: ...Note that the level of the output from Line Out will change significantly if you switch the LPF from a setting of 80Hz or 120Hz to OFF Be sure to exercise due caution so that the signal sent to the e...

Page 174: ...cess the desired M 48 SETUP popup fig ScrM48Setup eps 2 In the GROUP MIX VOLUME area move the cursor to the desired group name and press ENTER fig ScrM48GrpName eps The NAME EDIT popup will appear 3 U...

Page 175: ...This shows the unit name of the M 48 that is the target of the M 48 SOURCE LEV PAN Source LEVEL PAN fig ScrM48SrcLevEmnt_Guide eps Source number name indication In the SOURCE LAYOUT tab this indicates...

Page 176: ...e faders and pan knobs of sources 1 40 and use the value dial to edit the values 3 If you want to use the M 300 s top panel faders to control the levels turn F5 SOURCE ON FADER on The display in the M...

Page 177: ...ls from AUX or MAIN to MTX will also included Copy PAN All center on MONO MIX button If this is on the send pan will also be copied If you use the mix level select buttons to select a mono mix the pan...

Page 178: ...ersect and press ENTER A source can be assigned only to one group You cannot assign the same source to multiple groups Sources that are not assigned to a group cannot be controlled from the M 48 s pan...

Page 179: ...gnment symbol appear A source can be assigned only to one group You cannot assign the same source to multiple groups 1 Access the M 48 SOURCE ASSIGN popup fig ScrM48SrcAssign eps 2 Press F7 CLEAR ALL...

Page 180: ...ts the group s reverb send in a range of Inf dB 10 0 dB PAN knob This adjusts the group s pan in a range of L63 C R63 This pan setting is a relative adjustment to the pan specified by the source level...

Page 181: ...GrpMixClr_Conf eps A message will ask you to confirm the operation 3 Press F8 RESET the group mix will be reset to the default settings Pressing F7 CANCEL will cancel the operation This operation will...

Page 182: ...ssign or clear a check mark You can use F1 MARK ALL or F2 CLEAR MARKS to assign or clear check marks for all DEST fields in the copy destination list 5 Use the copy parameter select buttons to select...

Page 183: ...memory operations Memory list This lists the memories of the target M 48 unit The current memory number is shown in green The list shows the following items This is not shown in the ALL UNITS tab The...

Page 184: ...d by this operation except for units whose MEMORY SAFE function is turned on 3 Press F4 RECALL fig ScrM48MemRecall_Conf eps A message will ask you to confirm the recall operation In this example memor...

Page 185: ...library Parameters with a check mark will be recalled The function buttons have the following operations Cannot be used if the selected library item is locked Accessing the M 48 LIBRARY popup Item Ex...

Page 186: ...hat you want to recall 3 Use the recall parameter select buttons to select the parameters that you want to recall 4 Press F4 RECALL fig ScrM48LibRecall_Conf eps A message will ask you to confirm the r...

Page 187: ...ks in all MARK fields of the target unit list 3 In the project file list move to the location in the folder hierarchy in which you want to save the data By selecting a folder and pressing ENTER you ca...

Page 188: ...ved on USB memory 1 Access the M 48 LOAD SAVE popup fig ScrM48LoadSave eps 2 In the project file list select the project file that you want to load By selecting a folder and pressing ENTER you can mov...

Page 189: ...want to delete This operation cannot delete files or folders other than M 48 project files or folders A folder must be empty before it can be deleted 3 Press F7 DELETE fig ScrDelete_Conf eps A messag...

Page 190: ...IT popup p 102 TAP TEMPO Blinks in time with the tempo Setting the tempo p 103 MUTE GROUP 1 4 ON lit OFF unlit Turns the specified mute group on off METER PEAK CLEAR Lit while held Clears the meter pe...

Page 191: ...ory has not been formatted MIDI RS 232C Rx Error Framing An inappropriate signal is being input to MIDI RS 232C MIDI RS 232C Rx Error Buffer Full Too much data is being received via MIDI RS 232C Passw...

Page 192: ...a section that s overloading adjust the parameters for it Can t input successfully from REAC noise is heard If REAC devices are connected incorrectly or if the REAC mode setting is incorrect it will...

Page 193: ...k the following points Make sure that all REAC devices are powered on Check the Cat5e cable connections Make sure that the Cat5e cables are not damaged Verify that you re using the appropriate type of...

Page 194: ...al communication must be supported Caution when using a switching hub The network propagation time between REAC devices is approximately 375 microseconds but if the signal passes through a switching h...

Page 195: ...nnector CONSOLE INPUT 5 to 12 Input sens 4 dBu 20 Hz to 20 kHz Dynamic Range CONSOLE OUTPUT jacks 1 to 8 105 dB typ Sample Rate 48 0 kHz or 44 1 kHz Input Connector CONSOLE INPUT 1 to 4 Pad ON Input s...

Page 196: ...Hz Effects No insert effects 1 When a REAC Splitter S 4000D or a switching hub is used in line with REAC cables the network latency will increase by the amount of processing delay introduced by the sp...

Page 197: ...ature 5 to 40 degrees Celsius 41 to 104 degrees Fahrenheit Accessories Power Cord REAC Connector Cover x 2 Ferrite Core x 2 Channel number sticker Owner s Manual Options Rackmount angle RA 10U 0dBu 0...

Page 198: ...198 Appendix Appendix Dimensions 475 7 470 430 Dimensions are shown in millimeters 20 20 194 9 48 2 7 M 300_e book 198...

Page 199: ...reverb time is the duration until the reverb disappears Tonal character of reverb The tonal character of reverb is affected by the material of the walls and other reflective surfaces This is because t...

Page 200: ...requency at which the low frequency region of the reverb sound begins to be attenuated Value 20 Hz 2 00 kHz HI FREQ DAMP GAIN High frequency attenuation of the reverb sound Value 36 0 0 0 dB HI FREQ D...

Page 201: ...ain combinations for which the Freq Gain and Q values will have no effect as listed below PEAK Peaking Creates a hill or valley in the region of FREQ Freq Valid Gain Valid Q Valid LSV Low Shelving Boo...

Page 202: ...Q Frequency at which the high frequency region of the reverb sound begins to be attenuated Value 200 Hz 20 00 kHz HI CUT FREQ Frequency at which the high frequency region of the reverb sound will be c...

Page 203: ...the frequency region above FREQ Freq Valid Gain Q LPF2 Low Pass Filter 2 A sharper response curve than LPF1 Freq Valid Gain Q Valid HPF2 High Pass Filter 2 A sharper response curve than HPF1 Freq Vali...

Page 204: ...64T 1 64 1 32T 1 64D 1 32 1 16T 1 32D 1 16 1 8T 1 16D 1 8 1 4T 1 8D 1 4 1 2T 1 4D 1 2 1 1T 1 2D 1 1 T signifies Triplet and D signifies Dotted For example 1 4 means quarter note 1 4T means quarter not...

Page 205: ...lue 0 0 2700 ms R TIME Time from the original sound until the right channel delay is heard Value 0 0 2700 ms FEEDBACK TIME Feedback time Time until the delayed sound is returned to the input of the de...

Page 206: ...evel specifies the amount of sound that is returned Increasing this setting will increase the number of delay repetitions Value 0 100 LO FREQ DAMP GAIN Low frequency attenuation of the delay sound Val...

Page 207: ...AIN Low frequency attenuation of the delay sound Value 36 0 0 0 dB LO FREQ DAMP FREQ Frequency at which the low frequency region of the delay sound begins to be attenuated Value 20 Hz 2 00 kHz HI FREQ...

Page 208: ...osition of the sound image that s been set for the stereo input by panning or other means Flanger RATE Flanger rate Value 0 01 10 Hz DEPTH Flanger depth Value 0 100 MANUAL Center frequency at which th...

Page 209: ...mount of phaser sound that is returned to the opposite side input of the phaser Value 100 100 LEVEL Phaser level Value 0 100 MODE Type of phaser Value 4STAGE 8STAGE DIR SW Direct switch Turns the unpr...

Page 210: ...for the de esser Value 36 0 0 0 dB EQ A B EQ SW EQ switch Turns the EQ on off Value OFF ON EQ ATT EQ attenuator Attenuator for the EQ Value 42 0 6 0 dB LOW TYPE Filter type for the Lo band 1 Value PE...

Page 211: ...ve than HPF1 Freq Valid Gain Q Valid BPF Band Pass Filter Passes the frequency region around FREQ Freq Valid Gain Q Valid BEF Band Eliminate Filter Removes the frequency region around FREQ Freq Valid...

Page 212: ...gth of time delay it takes before the pitch shifted sound is produced Poly Fast offers a shorter time until the pitch shifted sound is heard but the pitch shifted sound will be less stable Poly Slow t...

Page 213: ...eps This is a single mono 31 band GEQ GEQ ATT Attenuator Attenuator for the GEQ Value 42 0 15 0 dB 20 Hz Gain 20 kHz Gain Gain of each band Value 15 0 15 0 dB GEQ GEQx1 Input A Output A THRU 31 Band...

Page 214: ...el Value 0 100 fig ScrSPH323 eps This is a phase shifter that models the Roland SPH 323 Phase Shifter The original was mono in mono out but this modeling is a dual mono design with two units in parall...

Page 215: ...in 1979 and became standard equipment in many recording studios DIMENSION MODE Specifies how the chorus changes Value OFF 1 2 3 4 1 4 2 4 3 4 1 4 2 4 and 3 4 can be selected by pressing F1 1 4 F2 2 4...

Page 216: ...l Selecting the channel 55 Viewing the values 55 ATT adjustments 56 Limiter operations 56 Adjusting the balance 56 8 band EQ operations 56 Sending to the MTX buses 57 Check buttons 36 Compressor Auto...

Page 217: ...alize 154 164 Input channel Operations using the CHANNEL EDIT section 41 Operations in the CHANNEL DISPLAY screen 44 Stereo linking 49 Specifying a channel name 50 Copying 51 Channel Library 52 Groupi...

Page 218: ...FOH console setup 139 Indications 34 Monitor Broadcast console setup 140 REAC A port 30 138 REAC B port 30 138 REAC connections 14 REAC Version 141 Splitting 138 REAC caps 15 REAC Connector covers 13...

Page 219: ...on 26 User settings About user settings 128 ADMIN 128 Changing the password 132 Creating user settings 130 Editing other user preferences 137 Editing user button 136 Editing user fader layers 134 GUES...

Page 220: ...TE EXPANDER popup 68 GLOBAL SCOPE popup 121 GROUP ASSIGN popup 53 H HELP CONTENTS popup 163 HELP popup 163 I INITIALIZE popup 154 INPUT PATCHBAY LIBRARY popup 90 K KEY IN SELECT popup 72 76 L LIBRARY...

Page 221: ...opup 144 S 4000M OUTPUT PATCHBAY popup 145 S 4000M SAVE popup 147 SAVE CURRENT USER popup 131 SCENE LIST EDIT popup 119 SCENE screen 118 SCENE STORE popup 117 SYSTEM CONFIG screen 164 SYSTEM screen 15...

Page 222: ...RATION OF CONFORMITY Compliance Information Statement Model Name Type of Equipment Responsible Party Address Telephone M 300 Digital Mixer Roland Systems Group U S 801 West Orchard Drive Suite 3 Belli...

Page 223: ...OWN LIVE For the U K CAUTION Danger of explosion if battery is incorrectly replaced Replace only with same or equivalent type WARNING To reduce the risk of fire or electric shock do not expose this ap...

Page 224: ...O KEY IN SOLO PRE EQ PRE FADER POST FADER AFL R PFL R AFL L PFL L ON SEND DIRECT OUT POINT AFL ON TALKBACK OSC LEVEL OSC ON OSC ON TALKBACK ON KEY IN SOLO CH 1 32 TALKBACK OSCILLATOR GATE EXP KEY IN F...

Page 225: ...arefully read the sections entitled IMPORTANT SAFETY INSTRUCTIONS p 2 USING THE UNIT SAFELY p 3 5 and IMPORTANT NOTES p 6 8 These sections provide important information concerning the proper operation...

Reviews: