background image


- 26 - 

1. 

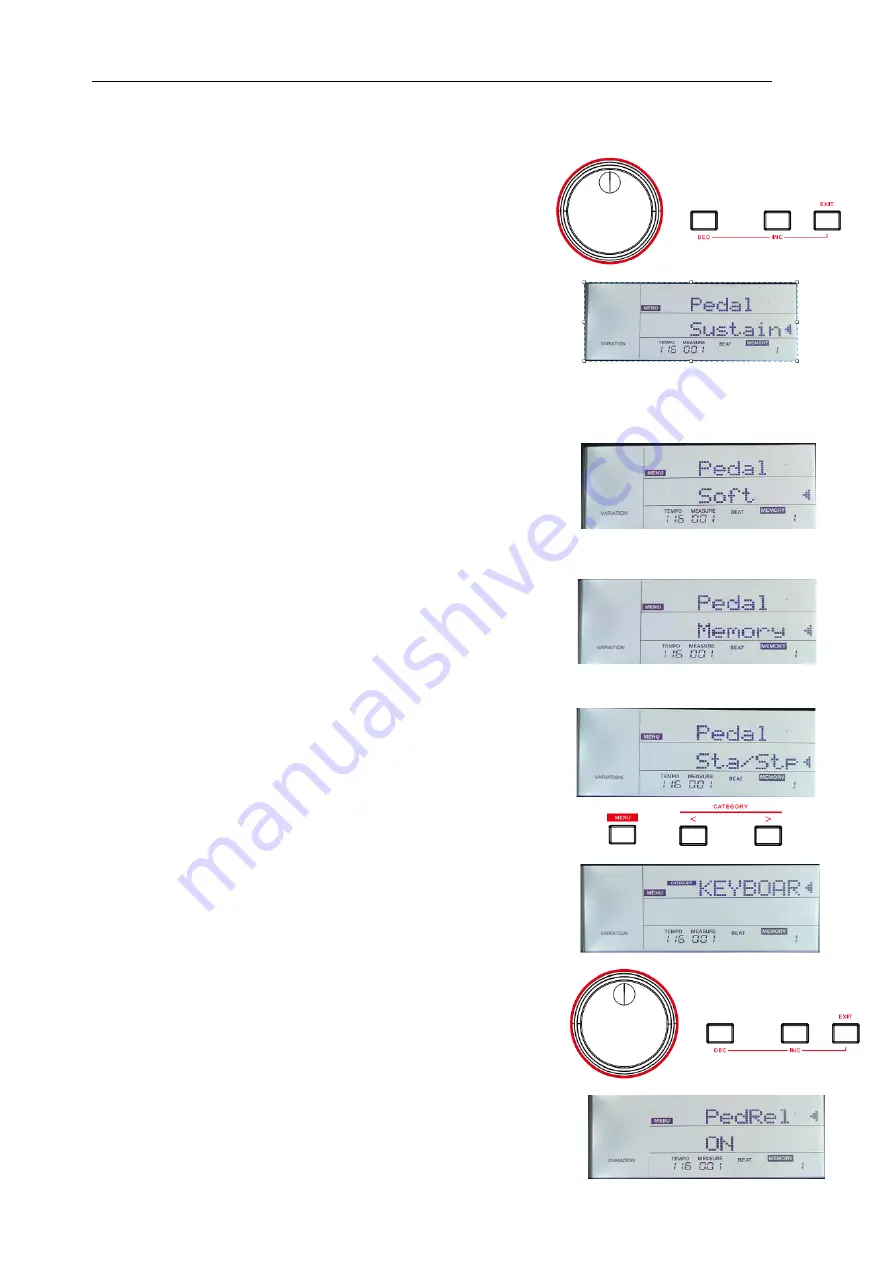
Press the [MENU] button to enter the function menu.   

2. 

Use the [<] / [>] button to select the “KEYBOARD” menu. Then use the 

data dial to select the “Pedal” parameter.   

3. 

Press the [ENTER] button to move the cursor to the lower menu. Now 

use the data dial or the [EXIT] + [<] / [>] buttons to change the pedal 

function. 


Sustain Pedal 

This pedal function performs the same function as the damper pedal on an 

acoustic piano, letting you sustain the sound even after releasing the keys. 

Step and press on the pedal to turn the sustain effect on. Release the 

pedal to turn the sustain effect off


Soft Pedal 

When the soft pedal is selected, pressing this pedal will make the notes you 

play sound softer. 


Memory Pedal 

When the memory pedal is selected, press this pedal at the first time to call up 

the registration memory “1-1”, and then you can call up each memory one by 

one. The memory number on LCD will be updated in sync. 

Note: 

If the current memory recalled contains pedal settings, these pedal settings will be neglected. 


Style Start/Stop Pedal 

When the style start/stop pedal is selected, press this pedal to start/stop 

accompaniment.


Sustain Type 

You can set the sustain pedal so that it will produce a different sustain effect. 

When setting to ON, when you press the pedal, it will produce the same 

sustain effect as holding the keys. When setting to OFF, when you press the 

pedal, it will produce natural decay of the sound. 


1. 

Press the [MENU] button to enter the Function menu.   

2. 

Use the [<] / [>] button to select the “KEYBOARD” menu. Then use the 

data dial to select the “PedRel” parameter.   

Summary of Contents for E-X50

Page 1: ...1 E X50 Arranger Keyboard Owner s Manual Version V06...

Page 2: ...ing measures Reorient or relocate the receiving antenna Increase the separation between the equipment and receiver Connect the equipment into an outlet on a circuit different from that to which the re...

Page 3: ...laying Demo Song 13 Playing Tones 13 Selecting a Tone 13 Playing Two Tones Simultaneously 14 Playing Different Tones with Both Hands 14 Pitch Bend 15 Transpose 15 Auto Accompaniment 15 Selecting Chord...

Page 4: ...Style to USB Flash Drive 30 Loading User Style from USB Flash Drive 31 Saving User Setting to USB Flash Drive 31 Loading User Setting from USB Flash Drive 32 Formatting the USB Flash Drive 32 Functio...

Page 5: ...the master volume 4 AUDIO PAD SCALE TUNE button Switch between Scale Tune mode and Audio Pad mode In Scale Tune mode 3 SCALE TUNE buttons Set the Scale parameters 5 SCALE RESET RECALL button Reset th...

Page 6: ...ction on or off 14 FILL 1 3 button Click to play Fill 1 Double click to play Fill 3 15 FILL 2 4 button Click to play Fill 2 Double click to play Fill 4 16 MENU button Enter the Function menu 17 STYLE...

Page 7: ...and hold it to enter Song mode and play back the song When in Song mode press to play or pause the song REC Enter the Record mode REW Rewind song playback FWD Fast forward song playback 34 METRONOME b...

Page 8: ...k for connecting a USB flash drive 40 USB COMPUTER jack for connecting to a computer 41 PEDAL jack for connecting a sustain pedal 42 OUTPUT jacks for connecting external audio equipment 43 MIC INPUT j...

Page 9: ...turn off the instrument press and hold the POWER switch again Notes 1 The power to this unit will be turned off automatically after a predetermined amount of time has passed since it was last used for...

Page 10: ...ote To avoid errors or damaging the USB flash drive do not remove it when reading or writing is in progress Connecting a Computer The instrument receives and transmits MIDI messages via the USB comput...

Page 11: ...udio equipment Use the R and L MONO jacks for stereo output or just the L MONO jack for mono output Note To avoid damaging the speakers please set the volume level to minimum before connecting to powe...

Page 12: ...d Function Menu Tone Mode Press the TONE button to enter Tone mode In Tone mode you can select a desired tone and use it for performance For the operation details please see the chapter Playing Tones...

Page 13: ...mo song is playing all buttons and keys are unavailable except EXIT START STOP TEMPO TAP VOLUME METRONOME USB and the POWER switch Playing Tones The instrument features a variety of built in tones Ple...

Page 14: ...on Playing Different Tones with Both Hands The split function splits the keyboard into the left and the right hand areas each with a different tone The left hand tone is the split tone The default spl...

Page 15: ...ANSPOSE and buttons simultaneously to restore the default transpose setting 3 Press and hold the TRANSPOSE or button then press a specific key to fast set the transpose value Key Transpose value C 0 C...

Page 16: ...ights up You can play normal chords over the entire keyboard Press the CHORD button again to turn off chord mode The chord button LED and the WHOLE icon on LCD turn off Playing Auto Accompaniment Rhyt...

Page 17: ...adjust the parameter Please refer to the function menu When setting it to OFF it will only produce major chords when using one finger key For example when you press the key G it will play G major chor...

Page 18: ...style is playing you can press FILL 1 3 or FILL 2 4 button to play Fill 1 or Fill 2 Or you can fast double press FILL 1 3 or FILL 2 4 button to play Fill 3 or Fill 4 4 When style is playing if you hol...

Page 19: ...animent volume and the tone volume 1 Press the ACCOMP VOLUME button The LCD displays the current accompaniment volume level 2 Use the ACCOMP VOLUME button the EXIT buttons or the data dial to adjust t...

Page 20: ...start the style at the tapping speed When style is playing press the TAP button twice the tempo will be reset to the tapping speed Notes 1 When style stops if you change the style the tempo will be re...

Page 21: ...he metronome in record mode the metronome sound will not be recorded Registration Memory This function allows you to save virtually all panel settings to a registration memory and you can instantly re...

Page 22: ...One Touch Setting When one touch setting function is in use you can instantly recall the related tone settings to match the current style with a single touch of a button 1 Press the O T S button The...

Page 23: ...con on LCD blink Now you can set the desired tone style etc for recording 4 In recording standby mode if you press the EXIT button it will go back to the user song menu Note You can record up to 10 us...

Page 24: ...le if the current song is blank 2 Use the data dial or the EXIT buttons to select a song 3 Press the PLAY STOP button to start the song During song playback you can use the PLAY STOP button to pause o...

Page 25: ...or EXIT buttons to turn the Bluetooth on or off When Bluetooth function is turned off the instrument s Bluetooth name cannot be found by a mobile device Adjusting Bluetooth Volume 1 Press the button...

Page 26: ...mory Pedal When the memory pedal is selected press this pedal at the first time to call up the registration memory 1 1 and then you can call up each memory one by one The memory number on LCD will be...

Page 27: ...LED will turn on The related pitch will decrease by 1 2 semitone When switched off the corresponding button LED will turn off The related pitch will return to normal 2 Reset the scale Press the SCALE...

Page 28: ...me 4 C PAD_C wav PAD_1 wav PAD_C mp3 PAD_1 mp3 C PAD_C wav PAD_2 wav PAD_C mp3 PAD_2 mp3 D PAD_D wav PAD_3 wav PAD_D mp3 PAD_3 mp3 D PAD_D wav PAD_4 wav PAD_D m03 PAD_4 mp3 E PAD_E wav PAD_5 wav PAD_E...

Page 29: ...in to stop the playback When in USB Style menu you can use these buttons to control the style TEMPO TAP CHORD SYNC INTRO ENDING FADE IN OUT FILL 1 3 and FILL 2 4 2 When in song mode press the USB butt...

Page 30: ...the USB flash drive 3 Press the ENTER button The LCD will display the user songs maximum 10 songs on the instrument Use the data dial to select a user song If the selected user song has data the LCD w...

Page 31: ...ton to enter the USB menu Use the data dial to select LoadSTY 2 Press the ENTER button to move the cursor to the style file name sty in the lower menu Use the data dial to select a style file from the...

Page 32: ...SB menu Loading User Setting from USB Flash Drive 1 Press the MENU button to enter the function menu then press the USB button to enter the USB menu Use the data dial to select LoadUSet 2 Press the EN...

Page 33: ...taneously to restore the default setting of the current parameter 5 Press the EXIT button to go back 6 Press the STYLE or TONE button to exit the function menu Detailed parameters and their ranges Par...

Page 34: ...ferent sustain effect ACCOMP Accomp volume AcmpVol 0 32 default 26 Adjust the accompaniment volume One finger key OneFKey OFF C C D D E F F G G A A B default OFF Set the root note of one finger key fu...

Page 35: ...Gain 10 10 default 0 Set the low mid high gain for the microphone Mic EQ mid gain MidGain 10 10 default 0 Mic EQ high gain HighGain 10 10 default 0 Mic reverb type MRvType MRevHal1 MRevHal2 MRevHal3 M...

Page 36: ...oneLck ON OFF default OFF Style lock Stl Lck ON OFF default OFF Transpose lock TrnsLck ON OFF default OFF Mic effect lock Mregist ON OFF default ON Bluetooth Bluetooth function Bluetooth ON OFF defaul...

Page 37: ...to delete all user styles or press the EXIT button to cancel Note The deleted user styles cannot be recovered 8 The reset procedure may take several minutes to complete Note Do not turn off the power...

Page 38: ...u can edit the records on the computer such as changing the channels or tones adding DSP effects Then play back the records with the instrument or other sound source such as a sound card You can play...

Page 39: ...When connecting to computer the instrument cannot be recognized Check if the USB cable is firmly connected Try connecting another USB port on the computer This instrument is plug and play and should...

Page 40: ...llers 1 pedal Pitch Bend Yes Pitch adjustment Transpose octave tune Metronome Yes Tempo 30 280 Other control Touch response Scale tune Audio Pad Interaction expansion Bluetooth audio External drive US...

Page 41: ...41 information refer to the Roland website All specifications are subject to change without notice...

Page 42: ...iano 3 E Piano3 33 Electric Piano 4 E Piano4 34 Electric Piano 1 velocity mix E PnoV1 35 Electric Piano 2 velocity mix E PnoV2 36 60 s Electric Piano 60 sEP 37 EP Legend EPLegend 38 Phase EP PhaseEP 3...

Page 43: ...PedalGtr 121 Electric Guitar clean 1 CleanGt1 122 Electric Guitar clean 2 CleanGt2 123 Electric Guitar detuned clean DetClnGt 124 Mid Tone Guitar MidTonGt 125 Electric Guitar muted 1 MutedGt1 126 Elec...

Page 44: ...208 6th Hit 6thHit 209 Euro Hit EuroHit BRASS Brass 210 Trumpet 1 Trumpet1 211 Trumpet 2 Trumpet2 212 Dark Trumpet DarkTrp 213 Trombone 1 Trmbone1 214 Trombone 2 Trmbone2 215 Trombone 3 Trmbone3 216 B...

Page 45: ...302 Lead 2b saw pulse SawPlsLd 303 Lead 2c double sawtooth DubSawLd 304 Lead 2d sequenced analog 1 SqAnaLd1 305 Lead 2d sequenced analog 2 SqAnaLd2 306 Wavy Sawtooth 1 WavySaw1 307 Bauble Lead Bauble...

Page 46: ...are 390 New Year Pad NewYear 391 Space Voice SpcVoice 392 Rising Rising 393 Congregate Congrega SYNTH SFX SynthSFX 394 FX 1 rain 1 FXRain1 395 FX 1 rain 2 FXRain2 396 FX 2 soundtrack 1 Sondtrk1 397 FX...

Page 47: ...78 TR Keman TR Keman 479 UD UD 480 Ney Ney 481 Zurna E Zurna E 482 Zurna TR ZurnaTR 483 Vib Zurna A VibZrnA 484 Vib Zurna D VibZrnD 485 Vib Zurna E VibZrnE BRAZIL Brazil 486 Acc Master AcMaster 487 Ac...

Page 48: ...ngo LoBongo 570 Mute Hi Conga MuHiCnga 571 Open Hi Conga OpHiCnga 572 Low Conga LowConga 573 Analog Hi Conga AnHiCnga 574 Analog Mid Conga AnMiCnga 575 Analog Low Conga AnLoCnga 576 High Timbale HiTim...

Page 49: ...Music Box Stereo Strings MBox Str 662 Vibraphone Stereo Strings Vib Str 663 Vibraphone Octave VibraOct 664 Vibraphone Marimba Kalimba Vib M K 665 Marimba Kalimba Mar Kal 666 Marimba Delay MarDelay 667...

Page 50: ...50 706 LD Std Kit LD Std 707 IndoMix4 IndoMix4...

Page 51: ...oftDisc 40 Funk Funk 41 Classic Funk ClasFunk BALLAD 6 8 BALL 6 8 42 Pop Ballad 1 PopBald1 43 Fusion Fusion 44 Soft Beat SoftBeat 45 Natural Ballad NatulBld 46 Love Ballad LoveBald 47 Blues Ballad 2 B...

Page 52: ...Cha Cha 1 ChaCha1 128 Cha Cha 2 ChaCha2 129 Beguine 2 Beguine2 130 Beguine 3 Beguine3 131 Rumba 3 Rumba1 132 Samba 2 Samba2 133 Samba 3 Samba3 134 Jive Jive 135 Fox Trot FoxTrot 136 Waltz Waltz 137 Ol...

Page 53: ...d DiscoBnd 215 DJ DJ 216 Rumba POP RumbaPop 217 Slow Rock 2 SlowRk 2 218 Slow Surf SlowSurf 219 Habanera Habanera 220 Tango Cha TangoCha ORIENTAL 221 Baladi Live BaladiLv 222 RAYE2 RAYE2 223 Maksoum S...

Page 54: ...R B 280 Zeybek Zeybek PIANIST 281 Pianist 1 Pianist1 282 Pianist 2 Pianist2 283 Pianist 3 Pianist3 284 Jazz 1 Jazz1 285 Jazz 2 Jazz2 286 Jazz Pub JazzPub 287 Piano Rock PianoRk 288 Pop Bossa PopBossa...

Page 55: ...55 MIDI Implementation Chart same as E X30...

Reviews: