25
E10037-180424
PROBEX
4.4
REPLACEMENT OF THE MEMBRANE
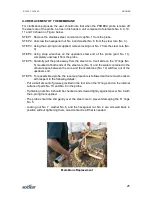
For clarification purposes, the user should note that when the PROBEX probe is taken off
the steel core of the probe, he has in his hands a unit composed of elements No. 8, 9, 10,
11 and 14 shown on Figure below.
STEP 1. Remove the stainless steel, conical end cap No. 1 from the probe.
STEP 2. Unscrew the hexagonal nut No. 4 and washer No. 6 from the steel core (No. 3).
STEP 3. Using the 4-prong tool supplied, remove locking nut No. 7 from the steel core (No.
3).
STEP 4. Using strap wrenches on the upstream steel end of the probe (part No. 11),
completely unscrew it from the probe.
STEP 5. Carefully pull the probe away from the steel core. It will slide on the 'O' rings (No.
5) mounted at both ends of the steel core (No. 3) and the water contained in the
annular space between the core and the membrane (No. 14) will flow out of the
upstream end.
STEP 6. To reassemble a probe, the reverse procedure is followed and care must be taken
with respect to the following details:
- Put a small amount of grease provided in the tool kit on the 'O' rings and on the internal
surface of parts No. 10 and No. 9 in the probe.
- Tightening nuts No. 9 should be checked and screwed tightly against spacer No. 8 with
the 4-prong tool supplied.
- The probe should be slid gently over the steel core to prevent damaging the 'O' rings
No. 5.
- Locking nut No. 7, washer No.6, and the hexagonal nut No. 4 are screwed back in
position without tightening them. Good contact is all that is needed.
Membrane Replacement


