background image


89


INFORMATION ABOUT THE USE 


ENG


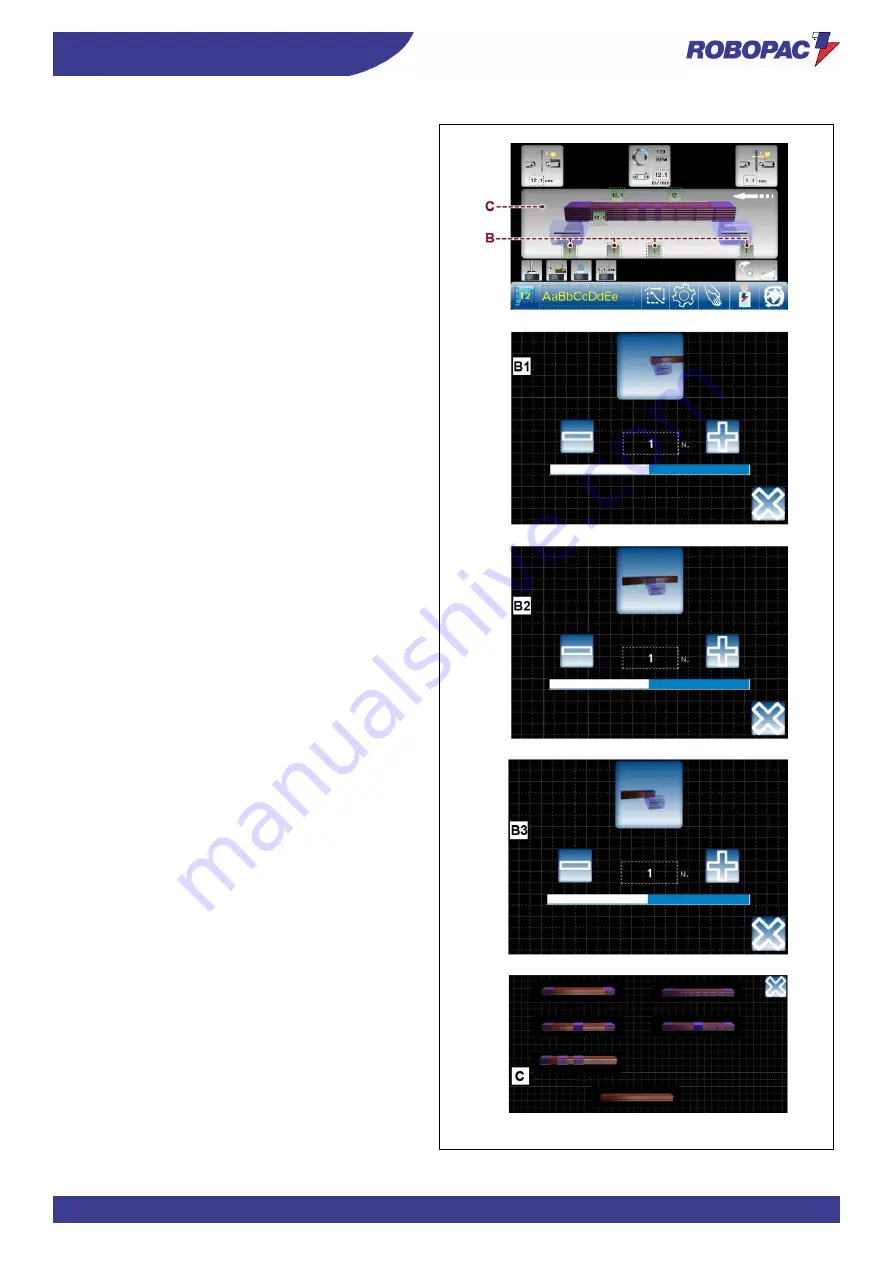
The parameters of the wrapping cycle are the following: 

B1)  Number of wrappings (varying from 1 to 9). 

It allows you to set the number of additional wraps 

to  be  carried  out  at  the  beginning  of  the  wrapping 

cycle (product head). 

B2)  Number of wrappings (varying from 1 to 9). 

It allows you to set the number of additional wraps 

that must be carried out at the centre of the product. 

B3)  Number of wrappings (varying from 1 to 9). 

It allows you to set the number of additional wraps 

that must be carried out at the end of the wrapping 

(product tail). 

C)  Product wrapping cycles. 

“TOTAL” wrapping.


The  product  is  completely  spiral  wrapped  with 

additional wraps on head and tail. 


“Head 

tail” wrapping.


The product is only wrapped at the head and tail. 


“Total”

 and 

“central bands” wrapping.


The product is completely wrapped in a spiral, with 

additional wraps on head and tail, and with a series 

of  reinforcing  wrappings  spaced  using  a  settable 

time. 


“Head

-

tail”

 and 

“central bands” wrapping.


The product head and tail are wrapped with a series 

of  reinforcing  wrappings  spaced  using  a  settable 

time. 


“Head 

and


additional bands” wrapping (Optional).


The  product  is  wrapped  at  the  head  and  with  a 

series  of  additional  reinforcing  wrappings  in 

quantities and distances that can be set through the 

corresponding parameters. 


“Bypass” cycle.


The  product  passes  through  the  machine  without 

being wrapped. 


Summary of Contents for ORBIT 12

Page 1: ...ORBIT 4 6 9 12 USE AND MAINTENANCE MANUAL ENG ...

Page 2: ...ENG 2 Page left intentionally blank ...

Page 3: ...ENERAL DESCRIPTION 20 3 1 1 MACHINE MODELS DESCRIPTION 22 3 2 DESCRIPTION OF THE OPERATION CYCLE 22 3 3 SAFETY DEVICE DESCRIPTION 34 3 4 DESCRIPTION OF ELECTRICAL DEVICES 36 3 5 DESCRIPTION OF PNEUMATIC DEVICES 37 3 6 DESCRIPTION OF ACCESSORIES ON REQUEST 38 3 7 TECHNICAL SPECIFICATIONS 38 3 7 1 PRODUCT DIMENSIONS 39 3 7 2 MACHINE DIMENSIONS 40 3 7 3 MACHINE DIMENSIONS WITH CONVEYORS 41 3 7 4 FILM...

Page 4: ... COPY RECIPES FUNCTION 86 6 5 CYCLE PARAMETER SETTING RECIPE COMPOSITION 87 6 6 CYCLE RESET 91 6 7 MACHINE STATUSES 92 6 8 PREPARATION OF THE MACHINE FOR OPERATION 92 6 9 MACHINE START UP 92 6 10 CYCLE START 99 6 11 STOP AND RESTART TYPES 99 7 MAINTENANCE INFORMATION 101 7 1 RECOMMENDATIONS FOR MAINTENANCE 101 7 2 PERIODICAL MAINTENANCE INTERVALS 102 7 3 CONDENSATE DRAINAGE 103 7 4 AIR FILTER CLEA...

Page 5: ... the message Translation of the original instructions Refer to the table of contents in order to easily identify the subjects of interest Some information may not correspond completely to the actual configuration of the machine delivered Any additional information does not affect the readability of the text and the safety level The Manufacturer reserves the right to modify the contents of the manu...

Page 6: ...It contains references and indispensable operating safety indications 1 Machine model 2 Machine serial number 3 Year of manufacture 4 Power supply voltage 5 Power supply frequency 6 Power supply phases 7 Absorbed electric current 8 Installed power 9 Air consumption 10 Air supply max pressure 11 Machine weight 12 Manufacturer s identification ...

Page 7: ...he requirements to perform routine and extraordinary maintenance on the machine Therefore the technician must have accurate information and competences with particular skills in the field of intervention Format changeover Set of operations to carry out on the machine before starting to work with characteristics other than the previous ones Training Training process aimed at transferring to the new...

Page 8: ...a risk of electric shock ATTENTION DANGER DUE TO FLAMMABLE MATERIAL ATTENTION DANGER DUE TO MOVING PARTS ATTENTION DANGER DUE TO HIGH TEMPERATURES ATTENTION DANGER DUE TO SUSPENDED LOADS ATTENTION DANGER DUE TO CONTACT WITH OVERHEAD OBSTACLES ATTENTION TRIPPING OR FALLING DANGER ATTENTION TANGLING DANGER It signals to the concerned personnel that the device bearing this pictogram features parts wh...

Page 9: ...FLAMES This symbol prohibits the use of naked flames near the machine or parts of it to prevent a fire hazard NO PEDESTRIANS Pedestrians are not allowed to pass through the area where this signal is located DO NOT EXTINGUISH WITH WATER Any fire that may occur near the machine or parts of it must NOT be extinguished with jets of water DO NOT INSERT YOUR HANDS DO NOT PUSH DO NOT SEAT DOWN DO NOT CLI...

Page 10: ...ATION TO WEAR PROTECTIVE GOGGLES The presence of the symbol next to the description requires the use of safety goggles by the operator since the risk of injury is implicit OBLIGATION TO WEAR A PROTECTIVE HELMET The presence of the symbol next to the description requires the use of a protective helmet by the operator since the risk of injury is implicit OBLIGATION TO WEAR A PROTECTIVE MASK The pres...

Page 11: ...lled commercial devices if necessary for machine use Unpacking and installation instructions Quick guide for quick start USB pendrive containing the information listed below Use and maintenance manual translated into various languages Spare parts catalogue Machine programming software Wiring Diagrams 1 6 HOW TO READ THE INSTRUCTIONS FOR USE The manual is divided into chapters each of which describ...

Page 12: ...tions given may cause risks to the safety and health of people as well as economic damages 2 2 SAFETY WARNINGS FOR HANDLING AND INSTALLATION The personnel authorised to handle the machine load and unload must possess the necessary technical and professional knowledge and skills Handle load and unload the machine according to the instructions affixed directly to the machine to the package and in th...

Page 13: ...nual and identify the control functions and simulate some operations especially machine start and stop The machine has been designed and manufactured to meet all the operating conditions indicated by the Manufacturer Caution warning Use the machine only with the original safety devices installed by the Manufacturer Do not tamper with disable remove or bypass the safety devices installed on the mac...

Page 14: ...r Do not use or let the machine be used with defective deactivated and or incorrectly installed safety devices Do not continue to use the machine if malfunctions have been detected Stop the machine immediately and restart it only after the normal conditions of use have been restored Never carry out an intervention with the machine in operation but only after stopping it properly under safety condi...

Page 15: ...is able to support products up to a certain length approximately 700 mm Longer products or improperly balanced once placed on the conveyor may fall onto the operator When these types of products require wrapping arranging a support that can sustain the protruding part of the product being processed is recommended Danger on the outfeed conveyor The conveyor is able to support products up to a certa...

Page 16: ...ccordance with the applicable laws All the extraordinary maintenance interventions shall be carried out only by authorised personnel with experience and expertise in the field of intervention Important Non compliance with the instructions given may cause risks to the safety and health of people as well as economic damages 2 7 SAFETY WARNING FOR THE ELECTRICAL EQUIPMENT The electrical equipment has...

Page 17: ...ion sign Do not act on the component with your hands 4 Danger sign Cutting danger 5 Information sign Ring rotation direction 6 Information sign Electrical disconnector 7 Danger sign Hand crushing danger 8 Information sign Film winding diagram 9 Information sign Vernier position reference 10 Information sign Film passage plate 11 Obligation sign Obligation to read instructions 12 Prohibition sign I...

Page 18: ...ENG SAFETY INFORMATION 18 Orbit 12 Orbit 9 Orbit 4 6 ...

Page 19: ...illustration shows the perimeter working areas of the machine A Operator workstation loading and cycle start area B Perimeter area C Product outfeed area D Lateral guide adjustment area These areas must be suitably sized to the product being processed ...

Page 20: ...the product The operator must place the product on the machine and start the cycle using the foot pedal control subsequent wrapping length wrapping film fastening and cutting operations are automatic The machine is equipped with a series of safety devices designed to avoid any injuries to the operator or other persons using the machine Danger warning This machine is normally installed in workshops...

Page 21: ...ick load spool carriage spindle and an idler roller that controls wrapping tension The unit can be accessed through door 12 6 Clamping and cutting unit it allows clamping and cutting the film at the end of the wrapping operation 7 Pressers unit they hold the product against the conveyors The positioning is automatic 8 Driving axle Optional for short product support 9 Guides Optional adjust the wid...

Page 22: ...ral wrapped with additional wraps on head and tail 2 Head tail wrapping The product is only wrapped at the head and tail 3 Total and central bands wrapping The product is completely wrapped in a spiral with additional wraps on head and tail and with a series of reinforcing wrappings spaced using a settable time 4 Head tail and central bands wrapping The product head and tail are wrapped with a ser...

Page 23: ...ot pedal control to start the work cycle Phase 1 The conveyor starts and moves the product towards the rotary ring The product engages photocell B1 the infeed presser lowers and blocks the product the head positioning timer starts When the timer count is over the roller conveyor stops the rotary rings starts and activates the head and tail wraps count the head of the product is wrapped ...

Page 24: ...rap the product Important The overlapping of film wraps is defined by the conveyor speed the slewing ring speed as well as by the film width Phase 3 The product moves forward disengaging photocell B1 the infeed presser rises the tail positioning timer starts When the timer count is over the outfeed conveyor stops the head and tail wraps count starts the tail part of the product is wrapped while th...

Page 25: ...When timer count is over the conveyor stops and the totally wrapped product can be removed from the machine Head tail wrapping After the product has been placed on the infeed conveyor press the button Start on the control panel to enable the automatism and press the foot pedal control to start the work cycle Phase 1 The conveyor starts and moves the product towards the rotary ring The product enga...

Page 26: ...tail wraps count the head of the product is wrapped At the last wrap of the rotary ring the clamp comes out to hook the film the rotary ring stops while the clamp blocks and cuts the film as it recedes Phase 2 Infeed and outfeed conveyors start The product moves forward and engages photocell B2 The outfeed presser lowers on the product ...

Page 27: ... tail wraps count starts the tail part of the product is wrapped while the clamp advances to hook the film at the last wrap of the rotary ring Phase 4 When the head and tail wraps count is completed the rotary ring stops while the clamp blocks and cuts the film as it recedes The outfeed conveyor restarts The product disengages the photocell B2 the conveyor unloading timer starts When timer count i...

Page 28: ... and press the foot pedal control to start the work cycle Phase 1 The conveyor starts and moves the product towards the rotary ring The product engages photocell B1 the infeed presser lowers and blocks the product the head positioning timer starts After the timer count is over the conveyor stops the rotary ring starts counting the reinforcing wrappings the head of the product is wrapped ...

Page 29: ...to wrap the product Important The overlapping of film wraps is defined by the conveyor speed the slewing ring speed as well as by the film width Phase 3 The central bands timer starts at count completed the conveyor stops the rotary ring starts and counts the reinforcing wrappings set the product is wrapped for the number of reinforcing wraps set Important The number of central bands is determined...

Page 30: ...uct is wrapped while the clamp advances to hook the film at the last wrap of the rotary ring Phase 5 When the reinforcing wraps count is completed the rotary ring stops while the clamp locks and cuts the film while it retracts The outfeed conveyor restarts The product disengages the photocell B2 the outfeed presser rises and the conveyor unloading timer starts When timer count is over the conveyor...

Page 31: ...arts and moves the product towards the rotary ring The product engages photocell B1 the infeed presser lowers and blocks the product the head positioning timer starts When the timer count is over the roller conveyor stops the rotary rings starts and activates the head and tail wraps count the head of the product is wrapped At the last wrap of the rotary ring the clamp comes out to hook the film th...

Page 32: ...owers on the product Phase 3 The central bands timer starts at count completed the conveyor stops the rotary ring starts and counts the reinforcing wrappings set the product is wrapped for the number of reinforcing wraps set Important The number of central bands is determined by the central bands timer the conveyor speed and the product length ...

Page 33: ... tail wraps count starts the tail part of the product is wrapped while the clamp advances to hook the film at the last wrap of the rotary ring Phase 5 When the head and tail wraps count is completed the rotary ring stops while the clamp blocks and cuts the film as it recedes The outfeed conveyor restarts The product disengages the photocell B2 the conveyor unloading timer starts When timer count i...

Page 34: ...hen pressed they immediately stop the machine in emergency conditions To reset rotate the button in the direction indicated by the arrow 3 Microswitch on the door It disables any function of the machine when the door is opened 4 Fixed guards They avoid access to the inner parts of the machine 5 Alarm warnings The operator panel display indicates any anomalies that may occur on the machine 6 Mobile...

Page 35: ...alve It stops all pneumatically driven movements when electricity is disconnected both in case of a blackout and when the emergency button is pressed 3 Padlockable air inlet tap If closed and padlocked machine cannot be started by unauthorised personnel 4 Pressure switch It sets the machine to emergency mode when line pressure is lower than the set value ...

Page 36: ...sence on the outfeed conveyor 3 Timing sensor SQ3 It detects the rotary ring in the start cycle position machine set up 4 Microswitch SQ1 The machine stops when the guard is opened 5 Electric motor It activates the rotary ring 6 Electric motor It activates the infeed conveyor 7 Electric motor It activates the outfeed conveyor 8 Sensor It detects the clamp in the back position Important For further...

Page 37: ...pressure inside the machine 2 Pressure regulator with filter and pressure gauge To adjust the general pressure of the pneumatic system Turn the knob to change the pressure values indicated on the pressure gauge 3 Pressure regulator with pressure gauge To adjust the pressure of the infeed outfeed pressers Important For further details see the pneumatic diagram ...

Page 38: ...nit with dancer roller Orbit 6 and 9 Driving axle Gas spring Orbit 4 6 9 Infeed and outfeed conveyor unit Upon request the conveyors are equipped with idle rollers 1000 or 2000 mm long to be connected to the roller conveyors The conveyors have a double function product accumulation and extra support 3 7 TECHNICAL SPECIFICATIONS Machine Spool Power Absorption Air consumption Max pressure kW A Nl cy...

Page 39: ...ection is uniform for the whole length of the product For best quality results the product cross section should be as close as possible to the machine diameter For products that intersect the hatched areas contact the Manufacturer Machine Spool Minimum size of product that can be processed mm Orbit 4 125 50 x 50 x 450 Orbit 6 125 70 x 70 x 450 Orbit 9 125 90 x 90 x 450 Orbit 9 250 90 x 90 x 600 Or...

Page 40: ...E DIMENSIONS standard L 600 mm for Orbit 4 6 9 L 850 mm for Orbit 12 Orbit 4 Orbit 6 Orbit 9 Orbit 12 L mm 1985 1983 2162 2243 N mm 1258 1462 1920 2348 H mm 1350 1755 2182 2699 H min mm 800 800 800 800 max mm 920 950 1100 W mm 220 305 500 815 ...

Page 41: ... 3 MACHINE DIMENSIONS WITH CONVEYORS optionals 1500 mm long Orbit 4 Orbit 6 Orbit 9 Orbit 12 L mm 3187 3187 3316 3348 N mm 1258 1489 1920 2348 H mm 1350 1755 2182 2699 H min mm 800 800 800 800 max mm 920 950 1100 W mm 220 305 500 815 ...

Page 42: ...ENG TECHNICAL INFORMATION 42 3 7 4 FILM TECHNICAL FEATURES Orbit 4 Orbit 6 Orbit 9 Orbit 12 D mm 200 250 d mm 76 D optional mm 50 L mm 50 125 125 250 250 opt Thickness μm 17 50 ...

Page 43: ...ES Solenoid valve Y0 it closes compressed air supply when power is disconnected Solenoid valve Y1 it controls clamp opening and closing Solenoid valve Y2 it controls infeed presser up and down movement Solenoid valve Y3 it controls outfeed presser up and down movement ...

Page 44: ... ISO cd 11202 1997 Caution warning Prolonged exposure above 80 dB A can be harmful Obligation The use of appropriate protection systems is recommended earmuffs ear plugs etc Description Average level of pressure on the measurement surface Lpm Acoustic power output level Lw Level at operator position Lop No load operation 47 0 dB A 63 0 dBw A 0 00 mW A 52 7 dB A Operation in working conditions 67 9...

Page 45: ...l value in order to create a pleasant and relaxing environment for those using the machine A perimeter area that must be left around the immediate working area also for safety reasons as shown in the figure A flat surface steady and without vibrations with adequate load bearing capacity The area must be equipped with a power supply socket and a compressed air supply socket 1 Operator workstation 2...

Page 46: ... machine and assess the possible residual risks 4 2 PACKING AND UNPACKING The packing is realised keeping the overall dimensions limited also in consideration of the transport chosen To facilitate transport shipping can be performed with some components disassembled and appropriately protected and packaged Some parts especially electrical equipment are protected with anti moisture nylon covers The...

Page 47: ...47 INFORMATION ON HANDLING AND INSTALLATION ENG Package in crate Standard L 600 mm L 850 Orbit 12 Optional L 1500 mm ...

Page 48: ...he destination can be performed with different vehicles The diagram represents the most used solutions During transport in order to avoid sudden movements adequately anchor the machine to the vehicle Important For further transportations recreate the initial packaging conditions for transport and handling ...

Page 49: ...MATION ON HANDLING AND INSTALLATION ENG 4 4 HANDLING AND LIFTING The machine can be moved with a forklift truck with suitable load capacity by inserting the forks in the points indicated directly on the machine ...

Page 50: ...anger warning Authorised technical service personnel must perform installation and assembly operations 1 Remove the screws that retain the machine to the wooden pallet 2 Insert the forklift truck forks in the specially designed spaces provided in the base 3 Lift the machine from the pallet 4 Insert support feet in the place of the fastening screws 5 Place the machine in the area assigned for assem...

Page 51: ... drilling holes in the walls prepared on the support feet 4 5 1 CONVEYORS ASSEMBLY length 1500 mm 850 mm 1 Unpack the conveyors 2 Remove the screws that fasten the conveyor 3 Connect the conveyor and support it to avoid damaging the conveyor belt 4 Lift the conveyor and screw the adjustable feet to the frame 5 Fasten the conveyor to the machine base ...

Page 52: ...onnect the pneumatic tubes M to the cylinder of the clamp unit after conveyor assembly see following pages Important Remember that the tube that controls the exit of the clamp is marked with a 6 while the one that controls its return is marked with a 5 ...

Page 53: ...NG 7 Connect the infeed conveyor to the base and tighten screws C Important Remember that the adhesive arrows on the conveyors indicate the normal operating direction Caution warning During the operation pay attention not to damage the clamp unit ...

Page 54: ...ENG INFORMATION ON HANDLING AND INSTALLATION 54 8 Use the support feet to level the machine ...

Page 55: ...HANDLING AND INSTALLATION ENG 9 Connect the photocell L cable H 10 Insert plug A into socket B 11 Fasten the electrical cable to the machine using self locking ties 12 Repeat the same operations for the outfeed conveyor ...

Page 56: ... pay attention not to damage the presser unit 4 6 RECOMMENDATIONS FOR CONNECTIONS Important The connections must be made in accordance with the specifications supplied by the Manufacturer in the enclosed diagrams The person authorised to carry out said operation must have the skills and experience acquired and acknowledged in the specific sector must perform the connection in accordance with the b...

Page 57: ...the hose barb fitting and fasten it with a metallic screw clamp A 2 Check that the valve B is in the OPEN position 3 Activate the supply line pressure 4 Check that the pressure gauge indicates at least 6 bar and use the knob C to compensate any pressure difference Repeat this operation when the machine is running ...

Page 58: ...oltage V and frequency Hz correspond to those of the machine see identification plate and wiring diagram 2 Turn main switch to pos 0 OFF 3 Connect the power cable as shown in the figure 4 Power the machine using the main switch 5 Press the START pedal Important The earth wire yellow green must be connected to its earth terminal PE Refer to the wiring diagram in the machine power supply page to che...

Page 59: ...USTMENTS Adjustments of conveyor height Orbit 4 6 9 According to the product to be wrapped adjust the infeed and outfeed conveyor height 1 Loosen knobs A 2 Position the conveyors checking the height on the graduated scale B 3 Tighten knobs A Important Use a spirit level to adjust conveyor horizontality and coplanarity Important If the optional gas spring is installed under each conveyor keep in mi...

Page 60: ...cale B 3 Tighten knobs A Important Use a spirit level to adjust conveyor horizontality and coplanarity Important Conveyors must be coplanar to each other however only in particular cases the outfeed conveyor can be few millimetres below the infeed one Important When processing very wide products you must lift the conveyors up to their maximum height from the ground within the product height limits...

Page 61: ...ons 1 2 Fix the guides with 2 M8 screws 3 According to the product to be wrapped adjust the guides by regulating knobs A 4 Adjust guide position so as to keep the product as much as possible in the middle of the belt Caution warning To prevent the guides from squeezing the product leave 1 3 cm between the product and the guides on each side ...

Page 62: ...STMENTS 62 When wrapping very wide products guide supports must be moved after loosening the handles B Important Remember that in case of products wider than the conveyors the position of the photocells must also be adjusted ...

Page 63: ...o the product to be wrapped after loosening the screws A 2 Check that the guides do not engage the photocells Caution warning Keep the guides on the infeed and outfeed conveyors as close to the rotary ring as possible for extremely short products prevent the pressers from lowering onto the guides ...

Page 64: ...ct be greater than the conveyors it is necessary to move the position of photocells A and of the reflectors B by acting on screws C without removing them Important The photocells and reflectors can be moved along the conveyors However to avoid malfunctions it is important that they are aligned ...

Page 65: ...osition When processing round and very high products move the pressers in top position 2 Disassemble the supports by removing screws B 3 Reinstall them to the desired position Caution warning Between pressers in top position and the product there must always be space ...

Page 66: ...osition operate the corresponding solenoid valve Y2 Y3 manually with a screwdriver to lower the presser Important When processing very heigh products the roller C of both pressers could interfere with the rotary ring In this case you must disassemble the supports D and mount them back into the farthest holes from the rotary ring Adjust the presser height ...

Page 67: ...STMENTS ENG 5 6 PRESSER PRESSURE ADJUSTMENT 1 Based on the type of product adjust the pressure using the knob A so that the pressers securely hold the product without deforming it Pressure can be read on the pressure gauge B ...

Page 68: ...2 Touch the key A to access the manual movements see paragraph 6 3 Description of control panel Description of control panel manual controls 3 Touch the slewing ring B key to enable it and then the spool key C The spool carriage unit automatically moves in front of the door D 4 Open the door D to access to the spool clutch adjustment 5 Adjust the clutch on the spool carriage roller using the knob ...

Page 69: ... automatically moves in front of the door D 4 Open the door D to access to the clutch roller adjustment 5 Use knob E on the roller with clutch to adjust film wrapping tension the roller is equipped with mechanical clutch turn clockwise to increase the braking effect and the film stretch 6 Close the door and press the reset push button 7 Press the Home F key to return to the main page and to set up...

Page 70: ...m machine use depends on many factors that cannot always be foreseen and controlled Some accidents may be caused by unpredictable environmental factors others are mainly due to users behaviours On first use and if required in addition to being authorised and appropriately informed the personnel must simulate some manoeuvres to identify the main controls and functions Only carry out the operations ...

Page 71: ...in emergency situations stopping the machine Important After the emergency button activation you must press the reset button to enable the automatic cycle 3 Stop button Press the button to interrupt the automatic wrapping cycle 4 Start button Press the button to enable the automatic work cycle 5 Reset button Press the button to set up the machine Press to reset the machine before restarting it aft...

Page 72: ...s a display 1 that allows you to activate the various functions by simply touching the images and texts that appear on it The keys to move from one page to the other are shown on each displayed page If necessary there are also keys that allow setting the parameters perform some commands etc The light blue keys are keys that can be pressed function keys while the grey keys are inactive or read only...

Page 73: ... START button to enable the automatism and accept the recipe displayed or touch the A key to display the recipe list Choose the recipe the type of processing desired by touching one of the keys and confirm it by touching the B key to compose the recipe see Cycle parameters setting The machine is ready to run in automatic mode all the cycle parameters displayed on the main screen Press the START bu...

Page 74: ...he conveyors See Cycle parameters setting L Key to access the setting of the product wrapping interval time See Cycle parameters setting M Key to access the setting of the product wrapping end time See Cycle parameters setting N On off key enables disables film breakage control Optional O On off key enables disables the advance of the outfeed presser downstroke Optional P On off key enables disabl...

Page 75: ... page 2 Touch the A1 key to access the general parameters page 3 Touch the B key to change the reference operator 4 Enter the password 1111 assigned to machine manager B1 B1 Machine manager head of department B2 Assistance Service dealer B3 Software administrator Robopac Once the operator is changed and confirmed the H icon on the main page will become that of the confirmed operator At this point ...

Page 76: ... password in case you have forgotten the set password or for other reasons proceed as indicated 1 Upon starting the software when page A is displayed touch the 4 corners of the display in the sequence indicated Important Carry out the operation quickly the page will remain displayed for 5 seconds The operation has been completed successfully if the page B containing the password is displayed ...

Page 77: ...E USE ENG 6 3 5 GENERAL PARAMETER SETTINGS From the main page touch key C to access the General parameters page Touch key 1 to access Production counters Touch key 2 to access H M I Enabling See Software settings and displays ...

Page 78: ...NFORMATION ABOUT THE USE 78 Touch key 3 to access Password login See Operator change Touch key 4 to access the password change See Password change Touch key 5 to access the Product loading and unloading page ...

Page 79: ...79 INFORMATION ABOUT THE USE ENG 6 3 6 SOFTWARE SETTINGS AND DISPLAYS From the main page touch key C to access the General parameters page Touch key 2 to access the H M I Enabling page ...

Page 80: ...ENG INFORMATION ABOUT THE USE 80 2 1 Set the display light brightness 2 2 Display information about the software version 2 3 Set the date and time ...

Page 81: ... 5 Display a summary of the last alarms tripped on the machine 2 6 Enable disable the key sound Change the various parameters and confirm with ESC A These keys are only displayed if the machine manager accesses the software using passwords see Description of control panel Operator and password change ...

Page 82: ...eneral parameters page 3 Touch key 3 and access with the password as machine manager see Description of control panel Operator and password change 4 Touch key 2 to access the H M I Enabling page 5 Touch key 2 3 to display the date and time setting page 6 Once the time and date have been set confirm with button D Confirm with key E to return to the main page ...

Page 83: ...cycle start up By touching the key A from the main page you can access the manual movements By touching the image of the object you want to move you will enable the keys corresponding to the possible movement For example by touching the image of the slewing ring B key C will be displayed light blue therefore enabled Key C if present moves the slewing ring Key C impulse key moves the slewing ring f...

Page 84: ...g product presser upstroke downstroke 4 Product infeed outfeed conveyor forward backward 5 Rotary cutting unit exit return 6 Clamp exit return 7 Sealer block on the striker plate upstroke downstroke 8 Exit return of the cutting blade 9 Opening closing of the guides at product infeed 10 Opening closing of the guides at product outfeed ...

Page 85: ...nfirm and save the text or value entered 2 Esc button to disable the editing mode and to close the page 3 Display showing the values and texts edited 4 Button to delete the text or value selected 5 Button to delete one character at a time starting from right 6 4 2 PROGRESSIVE ADJUSTMENT OF VALUES The page is displayed each time the editable or programmable functions are enabled A Display showing t...

Page 86: ...ey A to display the recipe list 3 Press key B to access the Copy Recipes page 4 Press key C to copy recipes from the control panel to the SD card supported by a PC 5 Press key D to copy recipes from the SD card from a PC to the control panel 6 Press the optional key E to change recipes using external devices ...

Page 87: ...ral parameters page 3 Touch key 3 and access with the password as machine manager see Description of control panel Operator and password change 4 Touch the home key to return to the main page 5 Touch one of the keys B C H I L M N O P Q T to display the page containing the required parameter Important Key T appears only if the Head and additional bands wrapping cycle is selected ...

Page 88: ...THE USE 88 6 Press keys and to increase or decrease the parameter value The graphic bar represents the value set for admitted values see Setting modification mode 7 Touch the key Z to return to the previously displayed page ...

Page 89: ...es TOTAL wrapping The product is completely spiral wrapped with additional wraps on head and tail Head tail wrapping The product is only wrapped at the head and tail Total and central bands wrapping The product is completely wrapped in a spiral with additional wraps on head and tail and with a series of reinforcing wrappings spaced using a settable time Head tail and central bands wrapping The pro...

Page 90: ...ed up or slow down the process and to respectively decrease or increase film overlapping Conveyor speed function To increase or decrease the speed of the infeed and outfeed conveyors this allows to speed up or slow down the process and to respectively decrease or increase film overlapping L Product wrapping time central bands It is the time that determines the position and quantity of central band...

Page 91: ...ser at outfeed Press to enable this function when processing short products Press again to disable A Key to enable disable the heat sealing Press to enable the function press again to disable In the Q area the closing time of the sealer is visible and can be set Important The Q area is only present if sealing is enabled through the key P 6 6 CYCLE RESET If the machine is stopped or turned off whil...

Page 92: ...ion Information on adjustments Pressers height optional Information on adjustments Position of infeed presser Information on adjustments Wrapping tension Information on adjustments Spool carriage roller clutch Information on adjustments Cycle parameters setting recipe composition or change from where you can set for example number of wraps for each operating cycle the rotary ring speed etc 6 9 MAC...

Page 93: ...ring instead of starting the operations Then processing can be started Spool replacement 1 Display the main page 2 Touch the key A to access the manual movements see 6 3 Description of control panel Description of control panel manual controls 3 Touch the slewing ring B key to enable it and then the spool key C The spool carriage unit automatically moves in front of the door D 4 Open the door D to...

Page 94: ... spool on the roller following the diagram in the figure The hatching shows the adhesive side internal or external of the film Unwind the film out of the protection ring A Spool carriage roller B Roller with clutch C Idler rollers D Dancer roller ...

Page 95: ... 6 Adjust the clutch on the spool carriage roller using the knob E turn clockwise to increase the braking effect 7 Close the door D and press the Reset button 8 Press the Home F key to return to the main page and to set up the machine ...

Page 96: ...THE USE 96 Film insertion in the clamp 1 Display the main page 2 Check that the rotary ring is synchronised 3 Touch button B to let the clamp C come out completely Danger warning Do not expose your hands to the cutting area ...

Page 97: ...ATION ABOUT THE USE ENG 4 Open the guard B 5 Manually unwind the film and let it pass well stretched under and against the clamp bar C and engage it onto the disc D 6 Close the guard B 7 Press the Reset button E ...

Page 98: ...ENG INFORMATION ABOUT THE USE 98 8 Press button F to retract the clamp cutting and blocking the film 9 By pressing the Cycle start button Q the machine completes the cycle and stops automatically ...

Page 99: ...ackout Production end stop Emergency stop Temporary stop voluntary It may occur for a short work break a few minutes Press the STOP button Danger warning The machine is still in operation just press the START button to restart it Stop due to blackout In case of sudden blackout the machine stops immediately The electric motors stop and the pneumatically operated components remain still in their pos...

Page 100: ...utton Machine functions stop immediately After setting the working conditions back to normal release the emergency stop button to allow machine operation If you wish to continue the interrupted wrapping operation press the START button If you wish to start a new processing proceed as follow 1 Remove product from the machine 2 Press the key A to set up the machine or press the Reset button 3 Block ...

Page 101: ...ronment but dispose of them according to the standards in force Danger warning Before performing any maintenance operation activate all safety devices provided and evaluate whether it is necessary to inform the personnel operating on the machine and the personnel nearby In particular demarcate the neighbouring areas to prevent access to the devices that could if activated cause unexpected hazardou...

Page 102: ...an with a cloth or air jet Every 2000 hours Rotary ring belt General check Check for wear and replace if necessary Contact the assistance service Tension adjustment See Rotary ring belt Adjustment Conveyors General check Check belt for wear and replace if necessary Contact the assistance service Tension adjustment see Infeed conveyor outfeed conveyor Belt adjustment Safety devices Efficiency check...

Page 103: ...he valve C to drain the condensation 3 Push the valve C upwards until all condensation is let out 4 Tighten the valve C again 7 4 AIR FILTER CLEANING 1 Unscrew the container B with the specific wrench 2 Remove the filter clean it with compressed air and wash it if necessary with petrol or trichloroethylene 3 Refit the filter and tighten the container B ...

Page 104: ...ool carriage unit rotation is necessary proceed as follows 1 Switch the machine off 2 Release the motor brake by tightening the screw A completely the spool carriage unit is now free to rotate 3 Completely loosen the screw to block motor brake again screw removal is recommended when not in use Orbit 9 spool 250 Orbit 12 ...

Page 105: ...the fastening screws A of the reduction unit 2 Act on screw B to achieve correct belt tension 3 Tighten the reduction unit fastening screws A when adjustment is completed Important To avoid transmission overload do not excessively tighten the belt Orbit 4 6 Orbit 9 Orbit 12 ...

Page 106: ...ED AND OUTFEED CONVEYOR BELT ADJUSTMENT 1 Loosen the fastening nuts 2 Tighten the screws A 3 Tighten the nuts Important Tensioning must be performed equally on both sides of the conveyor so as to maintain the belt centred during its movement ...

Page 107: ...rt and foreign bodies The chrome plated shafts must be cleaned with a cloth and slightly lubricated with a cloth soaked in Vaseline oil The parts in plastic material 1 must be cleaned with a slightly damp cloth do not use alcohol petrol or solvents Use only a dry cloth to dust the control panel 2 For the cleaning of the parts inside the machine consult our technical assistance service ...

Page 108: ...LARM MESSAGES In the event of a breakdown during operation the machine stops automatically and alarm messages appear on the display The table lists the displayed messages the type of problem the causes and possible solutions Important For these operations a precise technical expertise or ability is required therefore these operations must be exclusively performed by qualified personnel with certif...

Page 109: ...on or that the reflector is not properly aligned Remove the product or align the photocell with the reflector E62 Clamp forward alarm Clamp cylinder magnetic sensors not properly working Check and replace the sensor if necessary E64 Film breakage alarm The film has broken or spool is finished Insert the film or replace spool E69 Glued remote switch contacts Use the counter Contact the assistance s...

Page 110: ...particular demarcate the neighbouring areas to prevent access to the devices that could if activated cause unexpected hazardous conditions posing a risk for people s safety and health When replacing worn parts use only original spare parts The Manufacturer is not responsible for any damage to property or injuries to people caused by the use of non genuine spare parts or which may result from repai...

Page 111: ...operators in accordance with the standards in force on workplace safety Do not dispose of non biodegradable products lubricant oil and non ferrous components rubber PVC resins etc into the environment Dispose of them in compliance with current regulations Useful information for the disposal of machines and machine parts Scrapping must be performed by qualified personnel Construction materials low ...

Page 112: ...k of production or injuries to persons or damage to things caused by malfunctions or forced downtime of the machine covered by the warranty THE WARRANTY DOES NOT COVER Transport failures Damage due to incorrect installation Improper use of the machine or negligence Tampering with or repairs by unauthorised personnel Lack of maintenance Parts subject to normal wear and tear For purchased components...

Page 113: ...113 ANNEXES ENG 10 2 STANDARD MACHINE PNEUMATIC DIAGRAM Legend A Air treatment unit B Pressure regulator C Input output pressure cylinder D Clamp cylinder F Pressure gauge G Flow regulator ...

Page 114: ... EUROPEAN PARLIAMENT AND OF THE COUNCIL of 26 February 2014 on the harmonisation of the laws of the Member States relating to electromagnetic compatibility Reference to harmonised standards and their annexes at the applicable points EN ISO 12100 2010 EN 60204 1 2006 A1 2009 EN 415 5 2010 EN 415 6 2013 EN 415 10 2014 THE PERSON AUTHORISED TO DRAFT THE TECHNICAL BOOKLET IS Engineer Pierangelo Laghi ...

Reviews: