background image

20

• 

If setting the alarm to once only, continue with step 10 below. Otherwise 
skip to step 11.

10. Press 

Tuning

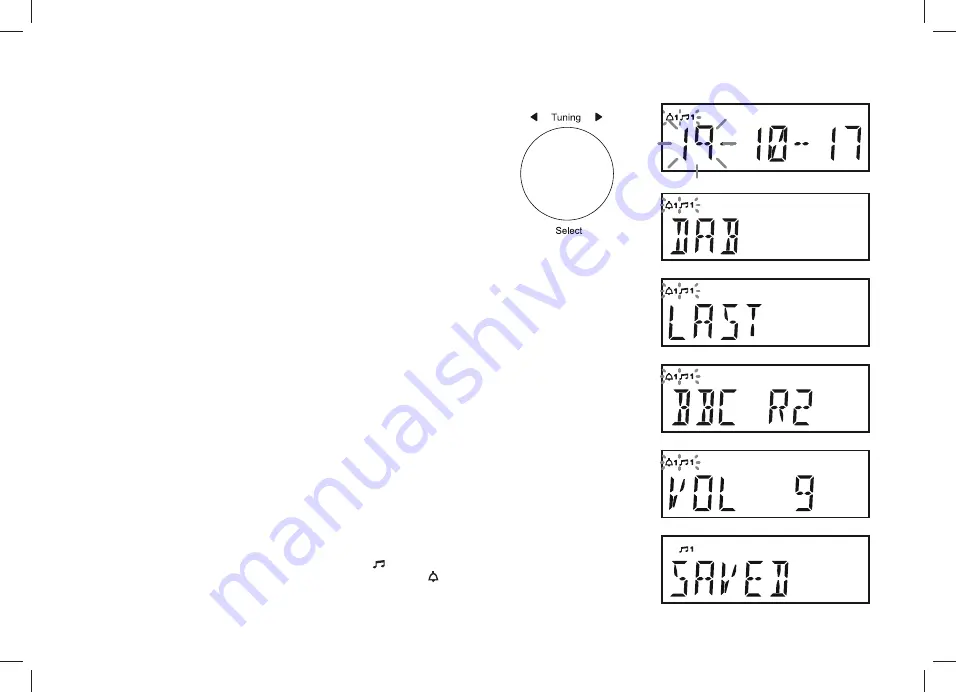
 to enter the setting. You will need need to set the day, 

month and year.

11. Press 

Tuning

 to enter the setting. The alarm source option will show on 

the display.

12. Rotate 

Tuning

WRFKRRVHWKHGHVLUHGDODUPVRXUFH'$%)0%8==(5


If setting the alarms to the radio option, the radio alarm may be set to  
the last listened radio station or any of the stations which have been 
stored as presets.

 Press 

Tuning

 and then rotate the control to choose either 

'LAST'

  to 

wake up to the last listened radio station or from a preset on the display.


Note:

 That you can only set the alarm to use a preset which has already 

been stored. Please see 'Presetting stations' pages 13 and 14.

13. Press 

Tuning

. The volume setting will show on the display.

14. Rotate 

Tuning

 to choose the desired alarm volume. The radio uses the 

saved volume settings for each alarm when it sounds.

15. Press 

Tuning

WRFRQ¿UPWKHDODUPVHWWLQJV

'SAVED'

 will show on the 

display before exiting the alarm setup.

Radio alarms are indicated in the display by the   symbol and the 
corresponding alarm number. Buzzer alarms are indicated by the   symbol 
and the corresponding alarm number.

Summary of Contents for Blutune 5

Page 1: ...Please read this manual before use DAB DAB FM RDS Bluetooth digital radio with clock and alarms Blutune 5 Blutune 6 ...

Page 2: ... Connecting Bluetooth devices 15 3OD LQJ DXGLR OHV LQ OXHWRRWK PRGH 16 Connecting and reconnecting a Bluetooth device 16 17 OXHWRRWK LQIRUPDWLRQ 18 Contents 6HWWLQJ DODUP WLPHV 19 20 DQFHOOLQJ DODUPV 21 7R VHW WKH DODUP GXUDWLRQ 21 Snooze function 22 QDEOH RU LVDEOH DODUPV 23 Sleep function 24 XWRPDWLFDOO XSGDWLQJ WKH FORFN 24 6HWWLQJ WKH FORFN PDQXDOO 25 Software version 25 LVSOD EDFNOLJKW GLPPHU...

Page 3: ...on 10 Preset 2 Previous button 11 Preset 3 Play Pause button 12 Preset 4 Next button 14 1 15 16 2 3 4 5 6 7 9 10 11 12 13 8 8 13 Preset 5 button 14 Volume control 15 LCD display 16 Tuning Select Snooze control Note This instruction manual covers two models the Blutune 5 and Blutune 6 The illustrations shownthroughoutthemanualare fortheBlutune5 Thefunctionsfor both models are the same ...

Page 4: ...revious button 9 Preset 1 button 10 Preset button 11 Alarm 2 button 12 Alarm 1 button 15 2 16 3 4 5 6 7 8 14 14 13 Volume control 14 Loudspeakers x 2 15 On Standby Sleep button 16 LCD display 3 9 10 11 12 1 13 Note This instruction manual covers two models the Blutune 5 and Blutune 6 The illustrations shownthroughoutthemanualare fortheBlutune5 Thefunctionsfor both models are the same ...

Page 5: ...escopic aerial 18 Battery compartment 19 DC input socket 20 Headphone socket Blutune 5 6 controls Rear view Aux In DC IN 9V 1A OPEN 17 18 19 20 21 22 21 Auxiliary input socket 22 USB socket for service use only ...

Page 6: ...o they will power the radio for only a few hours before needing recharging 1HYHU PL EDWWHULHV RI GLIIHUHQW W SHV FDSDFLWLHV or brands in the radio H ZRXOG UHFRPPHQG IRU HFRQRP WKDW WKH UDGLR LV XVHG YLD WKH DGDSWRU whenever possible with battery operation for occasional use only IMPORTANT The batteries should not be exposed to excessive heat such as VXQVKLQH UH RU WKH OLNH IWHU XVH GLVSRVDEOH EDWW...

Page 7: ...e display 6 If no signal is found 0 00 will continue to be displayed It may be necessary to relocate your radio to a position giving better reception You should then FDUU RXW D VFDQ WR QG VWDWLRQV VHH LQGLQJ QHZ VWDWLRQV RQ SDJH 7KH DGDSWRU VKRXOG EH GLVFRQQHFWHG IURP WKH PDLQV VXSSO DQG IURP WKH radio when not in use IMPORTANT The mains adaptor is used as the means of connecting the product to th...

Page 8: ... number on the right of the display is the number of stations that have been found KHQ WKH VFDQ LV FRPSOHWHG WKH UVW VWDWLRQ LQ QXPHULF DOSKD RUGHU ZLOO EH VHOHFWHG 7KH UVW VWDWLRQ LQ WKH OLVW RI VWDWLRQV found during scanning will be played The display will show the station name 5 If no signals are found then it may be necessary to relocate your radio to a position giving better reception You sho...

Page 9: ...ght hand side of the display will increase and the radio stations will be added to the list stored in the radio DAB Selecting a station DAB 1 Press On Standby to switch on the radio 2 Press Mode until the DAB mode is selected 3 Rotate Tuning to step through the list of available stations 4 Press Tuning to select and tune to the desired station 5 Adjust the Volume Note If after selecting a station ...

Page 10: ...od DAB reception 5 When a DAB signal is found as shown by the signal indicator chevrons any new radio stations found with this signal will be added to the list stored in the radio 6 Press Tuning and then Menu to exit Dynamic Range Control DRC settings DAB The DRC facillity can make quieter sounds easier to hear when your radio is used in a noisy environment 1 When in DAB mode press Menu 2 Rotate T...

Page 11: ...V SOHDVH VHH WKH VHFWLRQ LQGLQJ QHZ stations on page 8 DAB Operating your radio FM 1 Carefully extend the telescopic aerial fully Press On Standby to switch on the radio 2 Press Mode until the FM mode is selected 3 Rotate Tuning clockwise and then apply a long press on Tuning Your radio will scan in an upwards direction low frequency to high frequency and stop DXWRPDWLFDOO ZKHQ LW QGV D VWDWLRQ RI...

Page 12: ...DOO VFDQ IRU 0 EURDGFDVWV ZKLFK DUH VWURQJ HQRXJK WR give good reception However you may wish the Auto scan function to also EH DEOH WR QG ZHDNHU VLJQDOV SRVVLEO IURP PRUH GLVWDQW UDGLR WUDQVPLWWHUV Your radio includes a local distant option for the Auto scan function KHQ LQ 0 PRGH SUHVV Menu 2 Rotate Tuning until SETTING is displayed Press Tuning 3 Rotate Tuning to choose either the LOCAL or DIST...

Page 13: ...chevrons increase or decrease showing the changing signal strength as you adjust the telescopic aerial or your radio position FM display options Q 0 PRGH RXU UDGLR FDQ XVH WKH 5DGLR DWD 6 VWHP 5 6 WR GLVSOD WKH radio station name and additional text when provided by the broadcaster DQG ZKHUH WKH UDGLR VLJQDO LV VXI FLHQWO FOHDU RXU UDGLR FDQ GLVSOD WKH IROORZLQJ LQ 0 PRGH UHTXHQF VFUROOLQJ WH W SU...

Page 14: ...ess on the required Preset button 1 5 until the display shows for example P2 SAVED The station will be stored using the chosen preset button Repeat this procedure as needed for the remaining presets 4 Stations that are already stored in the presets may be over written by following the procedure described above Note The radio station presets are retained in memory when the radio is switched off and...

Page 15: ...for example P7 SAVED The station will be stored under the chosen preset 7 Repeat this procedure as needed for the remaining presets Stations which are already stored in the presets may be overwritten by following the above procedure Recalling a preset using the menu presets 1 10 1 Press On Standby to switch on the radio 6HOHFW HLWKHU WKH RU 0 PRGH XVLQJ WKH Mode button 3 Press and release the Pres...

Page 16: ...ator will ÀDVK I WKH LQGLFDWRU LV QRW ÀDVKLQJ WKHQ WKH UDGLR LV DOUHDG FRQQHFWHG WR another device To cause the radio to become discoverable press the Menu button Rotate Tuning until PAIRING is displayed and then press Tuning Your radio will be discoverable 4 Using the Bluetooth settings on your phone tablet or PC direct it to search for discoverable devices After a few seconds you should see a de...

Page 17: ...y respond to all of these buttons Connecting and reconnecting a Bluetooth device You can only have one Bluetooth device connected to the radio at any one time Once you have a Bluetooth enabled device connected to your radio it cannot be interruptedbyanotherBluetoothdeviceunlessyouchoosetobreaktheconnection 1 To connect to a different device press the Menu button on the radio Rotate Tuning until PA...

Page 18: ... previously connected devices 3 Rotate Tuning to step through a list of previously connected devices If you do not have any previously connected devices listed the display will show EMPTY 4 Choose the desired device name and press Tuning to reconnect 5 Ifautomaticreconnectionfailsthenyouwillgenerallybeabletoconnect simply by selecting Blutune 5 or Blutune 6 pairing in your device s Bluetooth setti...

Page 19: ...nyourBluetooth GHYLFHV FORVHU WR HDFK RWKHU LI RX REVHUYH FRPPXQLFDWLRQ GLI FXOWLHV L L QHWZRUNV DQG FRUGOHVV SKRQHV JHQHUDOO XVH VLPLODU UDGLR IUHTXHQFLHV to Bluetooth and may interfere with one another If any interference is noticed then try relocating the radio or one of the other devices TheBluetoothcapabilitiesofyourradioenableittoreceiveaudiofrommany Bluetooth capable devices including mobil...

Page 20: ...ekends Will sound only on weekends Daily Will sound everyday Once Will sound at one time only Setting alarm times RXU UDGLR KDV WZR DODUPV ZKLFK FDQ EH VHW WR ZDNH RX WR 0 UDGLR RU EX HU DODUP DFK DODUP FDQ EH VHW WR VRXQG RQFH GDLO RQ ZHHNGD V or at weekends In the event of a power interruption your radio has a built in memory that will retain your alarm settings Ensure that the time is set corre...

Page 21: ...rotate the control to choose either LAST to wake up to the last listened radio station or from a preset on the display Note That you can only set the alarm to use a preset which has already been stored Please see Presetting stations pages 13 and 14 13 Press Tuning The volume setting will show on the display 14 Rotate Tuning to choose the desired alarm volume The radio uses the saved volume setting...

Page 22: ... because of a radio alarm you can control basic functions such as the volume control KHQ WKH DODUP DFWLYDWHV LW ZLOO VWDUW VRIWO DQG JUDGXDOO LQFUHDVH LQ OHYHO 7KH DODUP LFRQ ZLOO ÀDVK RQ WKH VFUHHQ DQG WKH UDGLR ZLOO DXWRPDWLFDOO VZLWFK back to standby mode when the alarm duration has elapsed To set the alarm duration The alarm duration is adjustable and can only be set while the radio is playing...

Page 23: ... be activated using other buttons on the radio 2 To cancel the Snooze function press On Standby 3 It is possible to disable the snooze function see below When this is done you may use any button except the volume control to switch the alarm off To set the snooze time The snooze duration can only be set while the radio is playing 1 When your radio is playing press Menu 2 Rotate Tuning until SYSTEM ...

Page 24: ...page 19 you may quickly enable or disable that alarm by means of a short press on the appropriate alarm button as follows 1 Press and release the Alarm 1 or Alarm 2 button The display will show 21 RU 2 DFFRUGLQJ WR WKH FXUUHQW VWDWH RI WKH DODUP DQG WKH DODUP LQGLFDWRU ZLOO ÀDVK RQ WKH GLVSOD 2 Rotate Tuning WR FKRRVH 2 RU 21 DV QHHGHG 3 PressTuningWR VDYH WKH QHZ VHOHFWLRQ 7KH GLVSOD ZLOO EULHÀ V...

Page 25: ...display 5 To cancel the sleep timer and switch off your radio before the chosen sleep time has elapsed press On Standby To cancel the sleep timer without VZLWFKLQJ RII RXU UDGLR VHW WKH VOHHS WLPHU WR WKH 2 VHWWLQJ Automatically updating the clock Your radio will usually set the clock time using the DAB signal You may specify WKDW WKH UDGLR VHWV LWV FORFN IURP WKH RU 0 ZDYHEDQG HLWKHU ZDYHEDQG RU ...

Page 26: ...enu as needed to exit DAB DAB Setting the clock manually Normally your radio will set its clock automatically using the DAB radio signal If no DAB signal is available and you need to set the time manually please follow the procedure shown below 1 Press On Standby to switch on the radio 2 To set the clock press Menu 3 Rotate and press the Tuning control to select 6 67 0 TIME SET TIME hour minute da...

Page 27: ... is in Standby select STANDBY Press Tuning to enter the selected brightness adjustment mode 5 Choose the High Mid Low or Off dimmer setting Note that the backlight is almost completely off at the Off setting 6 Press Tuning to set the level Press Menu as needed to exit When the radio is in standby and powered from the mains pressing any button except the Dimmer or Alarm buttons or the rotary contro...

Page 28: ... exit To cancel the effect of the USER SUR OH FKRRVH WKH 1RUPDO option from the equaliser menu Note The bass and treble settings will be remembered for the next time you wish to use the USER setting DAB DAB DAB Equaliser function The sound on your radio can be adjusted to suit your personal taste for WKH PDWHULDO WKDW RX DUH OLVWHQLQJ WR 7KH UDGLR KDV YH SUHVHW HTXDOLVHU options Alternatively you ...

Page 29: ...for long periods Auxiliary input socket 1 Connect a stereo or mono audio source i e CD player MP3 player etc to the Auxiliary input socket 2 Press On Standby to switch on the radio 3 Press Mode until the display shows AUX IN 4 AdjusttheVolumecontrolonyourplayerandontheradioforcomfortable listening 5 Remove the cable from the Auxiliary input socket or press Mode to cancel Auxiliary Input mode Note ...

Page 30: ... mains power supply transients or short interruptions reset the product as above to resume normal operation If you are not able to perform the reset operation as above removal and reconnection of the power supply and batteries may be required If the product is used in an environment with any ESD Immunity Radiated Immunity ConductedImmunitydisturbance theproductmaymalfunction It will automatically ...

Page 31: ... its ventilation openings with items such as newspapers tablecloths curtains etc 1R QDNHG ÀDPH VRXUFHV VXFK DV OLJKWHG FDQGOHV VKRXOG EH SODFHG RQ the product It is recommended to avoid using or storing the product at extremes of temperature Avoid leaving the unit in cars on window sills in direct sunlight etc There are no user serviceable parts inside this product Do not attempt to disassemble an...

Page 32: ...ough the dealer from whom the product was purchased It is likely that your Roberts dealer will be DEOH WR DWWHQG WR DQ GHIHFW TXLFNO DQG HI FLHQWO EXW VKRXOG LW EH QHFHVVDU WKH GHDOHU ZLOO UHWXUQ WKH SURGXFW WR WKH FRPSDQ V VHUYLFH GHSDUWPHQW for attention In the event that it is not possible to return the product to the Roberts dealer from whom it was purchased please contact Roberts Radio using ...

Reviews: