background image

CONTROL PANEL OPERATIONS

9

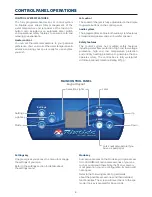
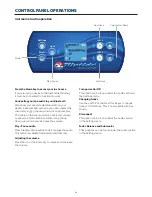
Keypad funCtIOns

power

Press any button to turn the keypad on. 
After 30 minutes without activity it will 
shut off. 


Main screen

The main screen gives you access to 
your accessories and water temperature. 
At the bottom of the screen you will see 
any error or maintenance messages
that are present. 

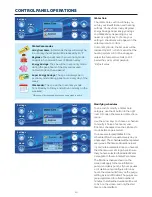
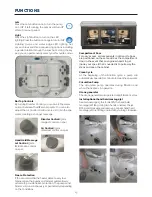
start or stop accessories

To start or stop an accessory, press the 
associated button. icons will become 
animated when their accessory is turned 
on, and inanimate when turned off. icons 
on the screen will reflect the speed or 
state of the devices running on your spa.
When an accessory has more than two 
states, press the button until it reaches 
the desired state.

water temperature

The temperature shown at the top of the 
screen is the current water temperature. 
Use the Up and Down
buttons to set the desired temperature.
The set point will appear in blue at the 
bottom. After 3 seconds without any 
change to the set temperature
value, the keypad will resume the normal 
display of messages.
When the set value is lower than the 
current temperature Cooling to xx.x will 
appear. When the set value is higher than 
the current temperature, Heating to xx.x 
will be indicated. Normally there is a short 
delay before the heating starts, during 
which Heating Suspended is indicated.

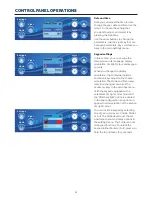
Light

Settings

Mode

Jets 1 

Jets 2

Light

Settings

Mode

Jets 1 

Jets 2

Light

Settings

Mode

Jets 1 

Jets 2

Light

Settings

Mode

Jets 1 

Jets 2

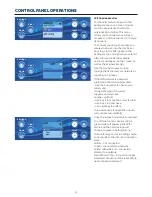
settings

From the home page you can access 
the Settings, where you will find:

• Water care 
• Audio
• in.clear-200 
  linked version
• Standby 
• Maintenance

• Date & time 
• Keypad
• Wi-Fi
• Config
• Restore
• About

Use the arrow keys to move up and down in the list. To select an 
option, press the lit button beside it (Light button). At any point you 
can press the Settings button to return to the home screen.

Summary of Contents for Urban Lite

Page 1: ...2017 Euro 240v 50 Htz Owner s Manual LITE Spas for wellness and modern living ...

Page 2: ... optional extra 13 in stream 2 Audio operation 14 Functions Jets 15 Light 15 Bar Top Controls 15 Freeze Protection 15 Compartment Door 15 Clean Cycle 15 Circulation Pump 15 Ozone generator 15 Install optional hand held massage jet 15 TROUBLESHOOTING GUIDE Diagnostics Operation 16 Diagnostics Error Codes 17 MAINTENANCE Water chemistry 18 Overview of water chemistry 18 Starting your spa with new wat...

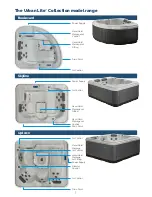
Page 3: ...d Massage Jet Fitting Drain Point Air Control Power Supply Air Control Hand Held Massage Jet Fitting Hand Held Massage Jet Control Drain Point Air Control Hand Held Massage Jet Control Hand Held Massage Jet Fitting Power Supply Diverter Control Air Control Drain Point Boulevard Skyline Uptown ...

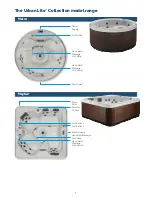
Page 4: ...age Jet Fitting Hand Held Massage Jet Control Drain Point Drain Point Diverter Control Air Control 1 Air Control 2 Power Supply Hand Held Massage Jet Fitting Hand Held Massage Jet Control Metro Mayfair The Urban Lite Collection model range 4 ...

Page 5: ...edication can greatly increase the risk of fatal Hypothermia in a spa b The causes symptoms and effects of Hypothermia maybedescribedasfollows Hypothermiaoccurswhen the internal temperature of the body reaches a level several degrees below the normal body temperature of 37 C 98 6 F The symptoms of Hypothermia include an decrease in the internal temperature of the body dizziness lethargy drowsiness...

Page 6: ... selecting an outdoor site several things should be considered Firstly avoid selecting a site where excessive water may contact the spa such as from sprinklers or a roof edge without rain gutters If possible avoid areas of direct prolonged sunlight The ultraviolet rays of sunlight will tend to fade and damage your Riptide spa cover and cabinet Lastly avoid locating your spa in an area where debris...

Page 7: ... on the filter are closed HAND TIGHT ONLY INSTALLATION SET UP 4 Check Valve Verify that all valves aside from the drainage valves described previously are in the fully open position A valve that is half closed will result in a noisy pump due to lack of water flow 5 Fillthe spa Fill the spa to approximately the halfway point on the skimmer 6 If you live in a hard water area and have access to a wat...

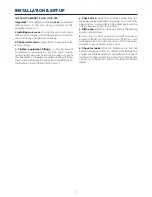
Page 8: ...ucer speakers and a sub woofer speaker Safety features The control system has multiple safety features including water flow protection high and low voltage protection high and low temperature protection and anti dry heating protection to guarantee the spa operates safely The control box is fully waterproof with International Protection Rating IP 55 8 Up Down Jets 1 Jets 2 will only operate if you ...

Page 9: ...buttons to set the desired temperature The set point will appear in blue at the bottom After 3 seconds without any change to the set temperature value the keypad will resume the normal display of messages When the set value is lower than the current temperature Cooling to xx x will appear When the set value is higher than the current temperature Heating to xx x will be indicated Normally there is ...

Page 10: ...y to Friday and will run normally on the weekend Filtration will be reduced when the economy mode is active Light Settings Mode Jets 1 Jets 2 Modifying schedules To see and or modify a Water Care category use the lit button to the right Jets 1 to open the selected Water Care menu Use the arrow keys to choose a schedule to modify choice of economy and filtration schedules Use the Light key to move ...

Page 11: ...ning the filter Each task has its own duration based on normal use The Maintenance reminders menu allows you to verify the time left before maintenance is required as well as to reset the time once a task is completed Use the Up and Down keys to move through the list To reset a task select it by pressing Light key then confirm when prompted Once you have confirmed the task will be reset Standby Th...

Page 12: ...on rim light colour and keypad security When you change the display orientation the contextual options and arrow keys adjust to the chosen orientation The Mode and Menu keys remain unchanged as well as the accessory keys in the main Spa menu With the keypad equipped with a selectable rim light colour module If the RGB backlight option is enabled in the spa configuration an option will appear to al...

Page 13: ... through the list Select your network by pressing on Light key If the WiFi network is password protected enter it when prompted Use the arrow keys to choose your letters and change the type of character uppercase lowercase number symbol Use Key 2 to move the curser forward Use Key 1 to backspace Use Light key to confim If no password is required the in touch will connect automatically Once the in ...

Page 14: ...n using the up down arrows increase decrease the volume Play Pause audio Press the Play Pause button to start or pause the audio This button is available for Bluetooth and USB only Adjusting the volume Press the Up or the Down key to increase or decrease the volume in stream 2 Audio operation Mode Play Pause Last track Turn power On Off This option can be found under the Audio section in the Setti...

Page 15: ...the Jets button once to turn the pump on or off If left running the pumps will turn off after a time out period Light Press the Light button to turn on the LED lighting Press the button once again to turn it off Lighting In spa and water edge LED lighting has seven colour and three sequencing options including a gentle rotation through the spectrum Using the key pad you can permanently select your...

Page 16: ...off Electric control failure display shows error message The default time setting has switched off the jets The pump motor is overheating The water pump has an airlock Filter cartridge needs cleaning There is no cover on the spa creating heat loss Heater is faulty The jets are blocked The water pump s air valve is not fully open Filter is blocked There is not enough water in the spa Check the powe...

Page 17: ...d with a color keypad please refer your techbook for more information on error messages FLO The system has detected no water flow during the main pumps operation UPL No low level configuration is present in the control system memory insert a valid in stik to program the control unit OH The spas water temperature has reached 108 F 42 C Do not enter spa water AOH The temperature inside the spa skirt...

Page 18: ...e in the water pH levels under 7 0 are acidic while pH levels over 7 0 are alkaline The proper pH range for a spa is 7 2 to 7 6 MAINTENANCE High pH levels over 7 6 can cause the following Scale build up on the spa and its equipment cloudy water a prematurely dirty filter and less effective chlorine sanitation To correct high pH levels add a pH REDUCER Low pH levels under 7 2 can cause the followin...

Page 19: ... correct amount to raise the level to between 3 5 PPM Start up water chemistry is now complete However it may take several days for the filter to completely clear the water MAINTENANCE Maintaining Spa Water Sanitizer and pH Levels It is important to test and adjust the sanitizer and pH levels of your spa on a daily basis With each sanitizer test use STABILISED CHLORINE GRANULES to maintain the fol...

Page 20: ...172 80g 192 00g 0 800 Increase Sodium Bicarbonate Alkalinity Increaser 16 00g 32 00g 48 00g 64 00g 80 00g 96 00g 112 00g 128 00g 144 00g 160 00g UPTOWN 1 000 Reduce Sodium Bisulphate pH Reducer 24 00g 48 00g 72 00g 96 00g 120 00g 144 00g 168 00g 192 00g 216 00g 240 00g 1 000 Increase Sodium Bicarbonate Alkalinity Increaser 20 00g 40 00g 60 00g 80 00g 100 00g 120 00g 140 00g 160 00g 180 00g 200 00g...

Page 21: ...nts that will leave suds in your spa water CLEANING AND PROTECTING THE HEADRESTS Clean on a regular basis with soap water and a clean cloth Use 303 Protectant or it s equivalent once per month This will maintain water resistance and lustre of the product Between uses it is recommended to remove the headrests and store in a dry place Note If headrests are left in the spa you must expect colour loss...

Page 22: ... then you may wish to lower the temperature setting to approximately 26 C during the No use period No use for over 6 weeks If you plan to not use your spa for over 6 weeks then it is suggested that you winterize your spa by following the steps below MAINTENANCE Spa Winterisation 1 Drain the water from the spa see Steps to drain your spa under Changing your spa water in this Owner s Manual 2 Drain ...

Page 23: ...arranty Riptide warrants the stainless steel sub frame not to crack or fracture for a period of eight years from delivery date Additionally the Aristech surface material of the Riptide Spa is warranted for five years not to peel crack wrinkle blister yellow efface or delaminate for a period of five years from the spa s delivery date The Aristech surfaces are non permeable and will not absorb odour...

Page 24: ...le for injury to any person or damage to any property however arising Riptide Pools Limited United Kingdom 24 Extent of warranty This warranty extends only to the original consumer purchaser of the Riptide spa when purchased and originally installed or relocated in the boundaries of the country of purchase The Riptide spa warranty terminates upon any transfer of ownership or if the spa is installe...

Reviews: