


16
Maintain the Prism III Printer
For more information visit
rimage.com/support
2001809_A
Clean the Print Head
Clean the print head at every ribbon change, or more often if streaks start to
appear or the ribbon has torn.
There are two methods for cleaning the Prism III print head—the Prism
cleaning kit method, and the alternate method. The alternate method
can be used when a cleaning kit is not available. This section provides
instructions for both methods.
Note:
If the Prism printer is connected to an autoloader or AutoPrinter, it
may be easier to remove the printer from the system before you begin the
cleaning process.
• Power off the printer.
• Remove all cables and cords from the back of the printer. Refer to the
Identify the Parts of the Prism Printer
section on page 6.
• Remove the printer from the system and place it on a flat surface near a
power outlet.
• Connect a separate power cord from the back of the printer to a power
outlet.
Clean the Prism III Print Head Using a Prism Cleaning Kit
If you have a Prism cleaning kit, use the following procedure to clean the
print head.
#
Required tools:
•
Prism cleaning kit (PN 210555-001)
•
One disc
•
99% Isopropyl alcohol
•
Cotton swabs
1. Prepare the
Prism
for cleaning.
a. Power off the
Prism
.
b. Remove the
top cover
.
c. Remove the
ribbon
. Refer to the
Change the Print Ribbon
section on
page 18.
2. Begin
cleaning mode
.
a. While pressing and holding the
operator button
, press the power
switch to power on the Prism.
b. When the Disc Not Present indicator light (the second light on the
operator panel) flashes, release the
operator button
. The printer
tray opens.
The printer is in cleaning mode when the operator button and Disc
Not Present indicator lights (the top two indicator lights on the
control panel) blink rapidly.
3. Prepare the
cleaning pad
.
Note:
The cleaning pad is included in the Prism cleaning kit.
a. Remove the
adhesive backing
from the cleaning pad.
b. Attach the
cleaning pad
to the top of a disc.
c. Make sure that the edges of the pad are aligned with the disc.
d. Place the
cleaning pad with the attached disc
on the
printer tray
.
Make sure the disc is aligned with the retaining pins on the printer
tray.
e. Press the
pad
down and over the
sensor
on the printer tray.
f. Place 5 drops of
isopropyl alcohol
on the
cleaning pad
.
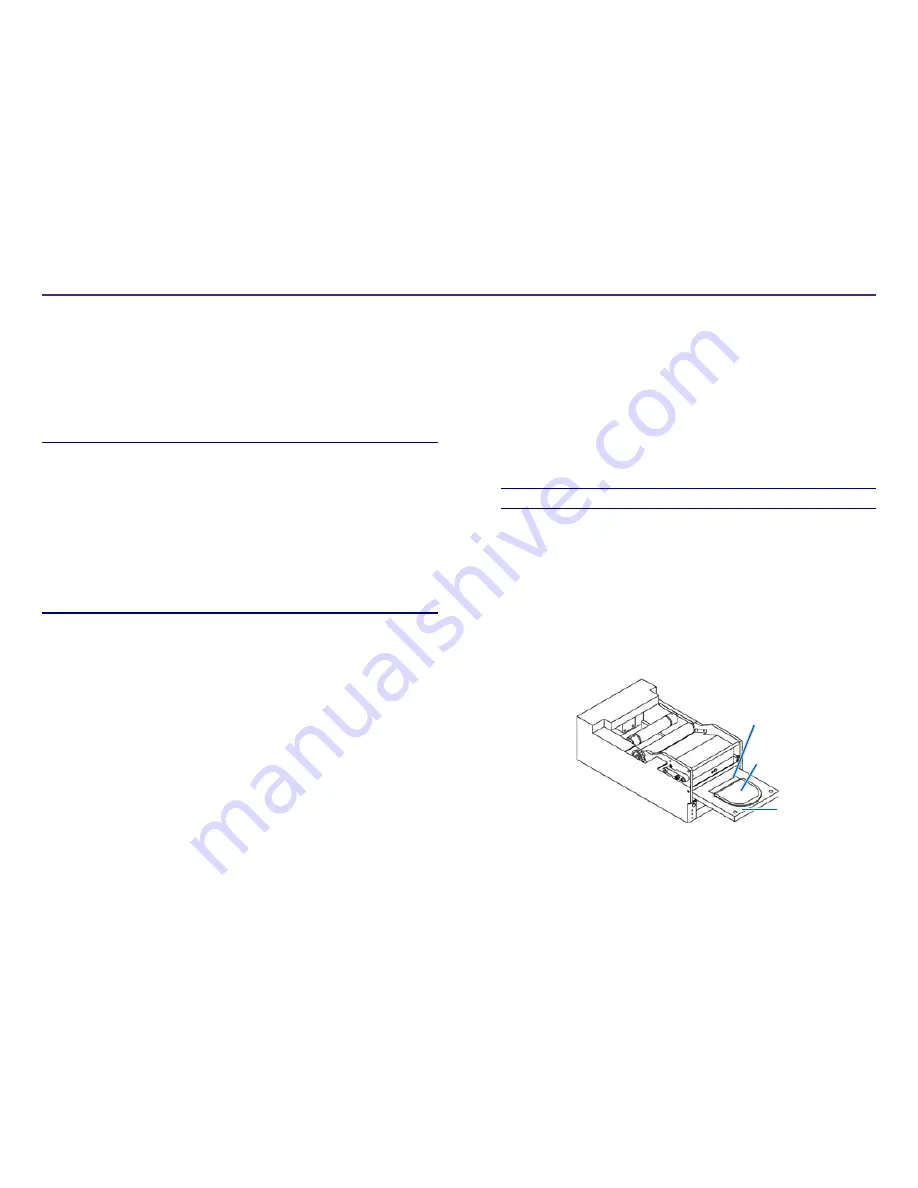
Pad Pressed Down Over
Sensor
Cleaning Pad with Attached
Disc
Printer Tray
Summary of Contents for Prism III
Page 1: ...Prism III Printer User Guide ...
Page 24: ...Prism III Drucker Benutzerhandbuch ...
Page 47: ...Manuel d utilisation de l imprimante Prism III ...
Page 70: ...Guía del usuario de la impresora Prism III ...
Page 93: ...Prism IIIプリンタユーザー ガイ ド ...
Page 116: ...Manuale per l utente della stampante Prism III ...
Page 139: ...Prism III 打印机用户指南 ...