22
OPERATION
ADJUSTMENTS
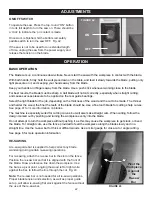
RE-SAWING
A re-saw guide bar is supplied to help correct any blade
wandering during certain re-sawing operations.
For re-sawing, attach the re-saw bar to the slot on the fence.
Position the re-saw bar so that it is aligned with the front of
the blade. Draw a reference line down the workpiece. Use
the bar as a pivot point, angling the wood left or right while
against the bar, to follow the line through the cut. Fig. 43.
Note:
The re-saw bar is not needed for all re-saw operations.
Proper blade tension and selection, as well as proper guide
set up, will allow re-sawing flat stock against the fence without
the use of the re-saw bar.
Pivot the
Workpiece
Against
the
Re-saw
Bar
FIGURE 43
BASIC OPERATION
The blade cuts on a continuous down-stroke. Never start the saw with the workpiece in contact with the blade.
With both hands, firmly hold the workpiece down on the table, and feed it slowly towards the blade, putting only
light pressure on it, and keeping your hands away from the blade.
Keep your hands and fingers away from the blade. Use a push stick whenever working close to the blade.
For best results, the blade must be sharp. A dull blade will not cut correctly, especially when straight cutting,
and causes excess pressure to be applied on the rear guide bearings.
Select the right blade for the job, depending on the thickness of the wood and the cut to be made. The thinner
and harder the wood, the finer the teeth of the blade should be. Use a fine tooth blade for cutting sharp curves.
See page 41 for more information on blades.
The machine is especially suited for cutting curves, but will also make straight cuts. When cutting, follow the
design marked out by pushing and turning the workpiece evenly into the blade.
Do not attempt to turn the workpiece without pushing it, as this may cause the workpiece to get stuck, or bend
the blade. For straight cuts, use the fence provided to feed the workpiece along the blade slowly and in a
straight line. Use the re-saw bar for thick or difficult woods. Use a miter gauge for cross-cut or angle cutting.
See page 6 for more operation information.
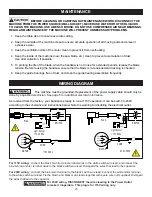
ON/OFF SWITCH
To operate the saw, Press the top, round “ON” button
in to its full depth to turn the saw on. There should be
a ‘click’ to indicate the ‘on’ contact is made.
Once work is finished, hit the bottom red safety
paddle switch to turn the saw OFF. Fig. 42.
If the saw is not to be used for an extended length
of time, unplug the saw from the power supply and
release the tension on the blade.
FIGURE 42
ON
OFF
Summary of Contents for 10-324TG
Page 43: ...43 OPERATION...

