18
Caution
Do not crimp the piston cup (4) when you
remove the connecting rod assembly from
the compressor housing. If the cup is
crimped, you must replace it.
Rebuilding Connecting Rod Assemblies
If you are rebuilding the connecting rod
assembly using component parts, follow this
procedure:
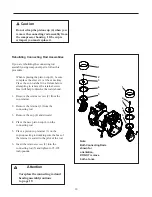
When replacing the piston cup (4), be sure
to replace the sleeve (1) at the same time.
Place the con rod shaft in a fixture before
attempting to remove the retainer screw.
Heat will help to dissolve the loctite bond.
1. Remove the retainer screw (2) from the
cup retainer.
2. Remove the retainer (3) from the
connecting rod.
3. Remove the cup (4) and discard.
4. Place the new piston cup (4) on the
connecting rod.
5. Place a piston cup retainer (3) on the
cup/connecting rod making sure the boss of
the retainer is seated in the pilot of the rod.
6. Insert the retainer screw (2) into the
connecting rod (5) and tighten to 95-105
inch-pounds.
Attention
To replace the connecting rod and
bearing assembly continue
to page 19.
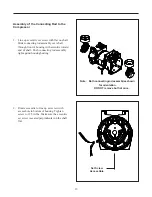
Note:
Both Connecting Rods
shown for
orientation,
DO NOT remove
both at once.
1
2
3
4
5
1
2
3
4
5


