20170392
28
GB
Start-up, calibration and operation of the burner
7.4
Pressure variator adjustment
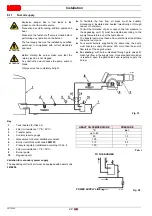
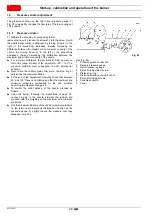
The pressure variation on the return line (pressure gauge, 3)
Fig. 25 on page 28) changes the flow rate of the fuel coming out
of the nozzle.
7.4.1
Pressure variator
To calibrate the eccentric 8), proceed as follow:
remove the cover 9), loosen the screws 7), turn the screw 4) until
the desired eccentricity is obtained. By turning screw 4) to the
right (+) the eccentricity increases, thereby increasing the
difference between the maximum and minimum capacity of the
nozzle. By turning screw 4) to the left (-) the eccentricity
decreases, thereby decreasing the difference between the
maximum and minimum capacity of the nozzle.
For a correct calibration, the eccentric 8) must operate on
the entire range of travel of the servomotor (20° ÷ 130°): a
pressure variation must correspond to each servomotor
variation.
Never drive the variator piston fully home: the stop ring 5)
determines the maximum stroke.
At the end of the adjustment, manually check that between
20° and 130° there is no sticking and that the maximum and
minimum pressures correspond to the one selected
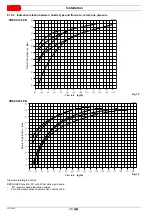
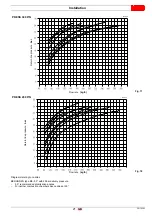
according the diagram of page 20.
To control the outlet delivery of the nozzle, proceed as
follows:
Open the burner following the instructions of page 18,
connect a pipe to the nozzle, simulate the ignition and
proceed with the weighing at the maximum and minimum
pressures.
If at the maximum delivery of the nozzle (maximum pressure
on the return line) pressure oscillations can be seen on the
pressure gauge 3), slightly reduce the pressure until they
disappear (Fig. 25).
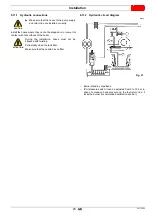
Key (Fig. 25)
1
Pressure switch connection
2
Delivery pressure gauge
3
Return pressure gauge
4
Eccentric adjustment screw
5
Piston stop ring
6
Piston calibration nut and lock nut
7
Eccentric locking screws
8
Variable eccentric
9
Cover
Fig. 25
D2001
Summary of Contents for PRESS 140 P/N
Page 2: ...Translation of the original instructions...
Page 57: ...55 20170392 GB Appendix Electrical panel layout 0 1 2 2 2 0 DIRECT START UP...
Page 58: ...20170392 56 GB Appendix Electrical panel layout 0 1 1 1 STAR TRIANGLE START UP...
Page 59: ...57 20170392 GB Appendix Electrical panel layout 0 1 0...

