background image

FAMILY

20


-

To close the fixing nuts of the air/gas conveyor assembly, use a tightening torque of 

8 Nm.


-

Turn the power and gas feeding to the boiler back on.


b

If there are obstinate combustion products on the surface of the heat exchanger, 

clean by spraying natural white vinegar, being careful NOT to damage the retarder 

insulating panel.


-

Leave it to work for a few minutes.


-

Clean the coils of the heat exchanger with a soft bristled brush.


b

DO NOT USE METAL BRUSHES THAT COULD DAMAGE THE COMPONENTS.


-

Rinse with water, being careful NOT to damage the retarder insulating panel


-

Turn the power and gas feeding to the boiler back on.


-

Once the operations have been completed, reassemble the components by operating 

in the reverse order to what is described.

  Burner


-

Proceed with the burner cleaning operations.


-

Clean the burner with a soft bristled brush, being careful not to damage the insulating 

panel and the electrodes.


b

DO NOT USE METAL BRUSHES THAT COULD DAMAGE THE COMPONENTS.


-

Check that the burner insulating panel and the sealing gasket are undamaged and 

replace them if necessary, following the relative procedure.


-

Once the cleaning operations are finished, carefully reassemble all the components, 

following the above instructions in the reverse order.


-

To close the fixing nuts of the air/gas conveyor assembly, use a tightening torque of 

8 Nm.


-

Turn the power and gas feeding to the boiler back on.

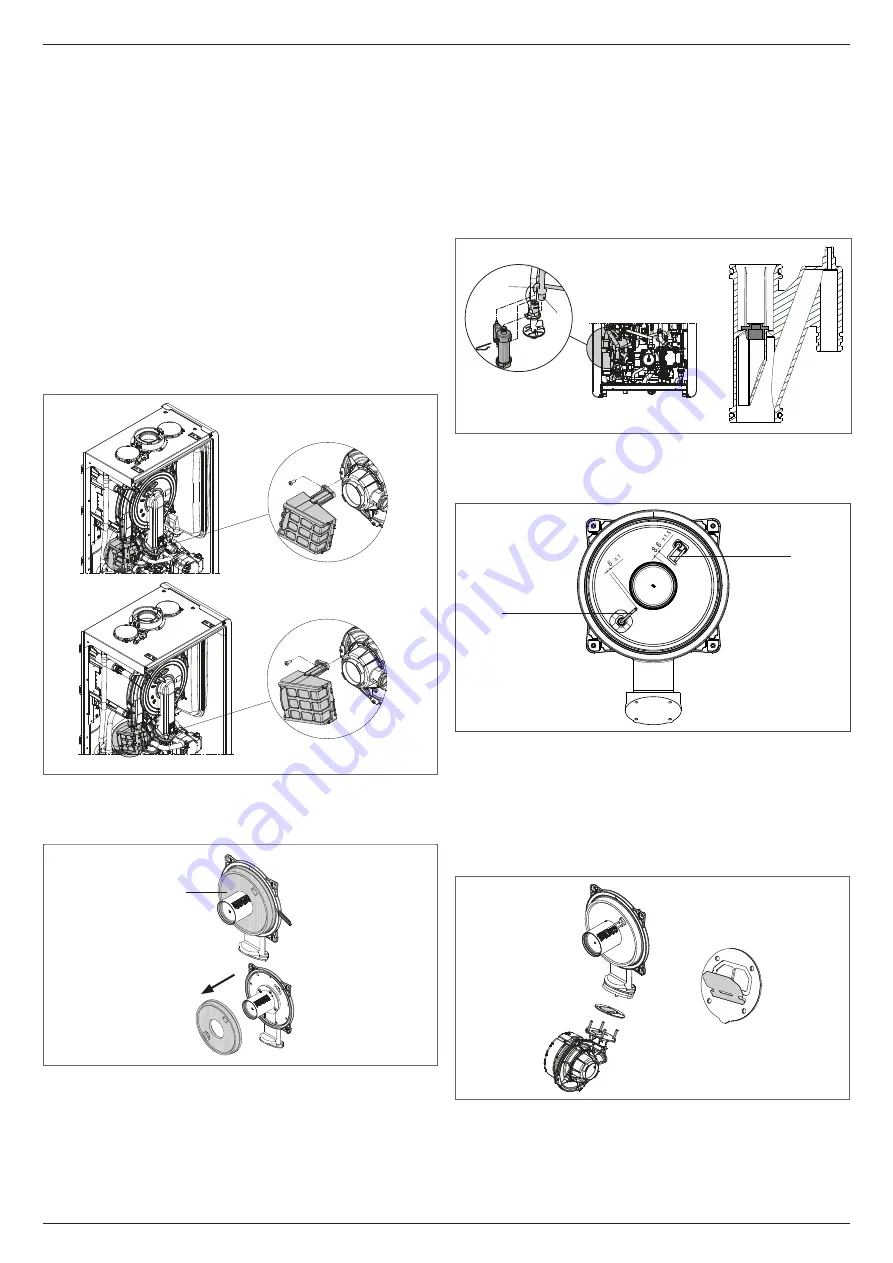
Cleaning the air filter

25kW

A

A

30-35kW

25kW

A

A

30-35kW


-

Unscrew the fixing screw 

A

 and remove the air filter.


-

Blow compressed air on the filter to remove any impurities.


-

In case of persistent dirt wash with water.

Replacing of the burner insulation panel

A


-

Unscrew the ignition/detection electrode fixing screws and remove it.


-

Lever the burner insulation panel (

A

) out using a blade (as shown in the figure).


-

Remove any residual fixing glue.


-

Replace the burner insulation panel.


-

The new insulation panel doesn’t need to be fixed with glue as its shape is designed to 

couple perfectly with the heat exchanger flange.


-

Reassemble the ignition/detection electrode using the previously removed screws and 

replacing the relative sealing gasket.

Cleaning the siphon


-

Disconnect the tubes (

A

) and (

B

), remove the clip (

C

) and remove the siphon.


-

Unscrew the bottom and top caps, then remove the float.


-

Clean the parts of the siphon from any solid residues.


b

Do not remove the safety shutter and its sealing gasket as their presence is in-

tended to prevent the escape of burnt gases into the environment in the event of 

no condensation.


b

Once the operations have been completed, reassemble the components by operat-

ing in the reverse order to what is described, checking the floating seal and replace 

it if necessary. If replacing the float gasket, make sure it is correctly positioned in its 

seat (see figure in section).


b

At the end of the cleaning sequence, fill the siphon with water (see “2.12 Condensate 

siphon”) before restarting the boiler.


-

At the end of the siphon maintenance operations, it is recommended to bring the boiler 

to condensing mode for a few minutes and to check for leaks from the entire condensate 

evacuation line.

A

C

B

Maintenance of the ionisation electrode

The detector electrode/ionisation probe play an important role in the boiler ignition phase 

and maintaining an efficient combustion; in this regard, if it is replaced, it must always be 

positioned correctly and the reference position indicated in the figure must be complied with.

detector electrode/

ionisation sensor

flame ignition 

electrode


a

Do not sandpaper the electrode.


b

During the annual maintenance, check the state of wear of the electrode and replace 

it if has badly deteriorated.

The removal and eventual replacement of the electrodes, including the ignition electrode, 

involves also the replacement of the sealing gaskets.

In order to prevent operating faults, the detector electrode/ionisation probe should be 

changed every 5 years since it is subject to wear during the ignition.

Check valve

D

The boiler has a check valve. To access the check valve:


-

remove the fan by unscrewing the 4 screws (

D

) fixing it to the conveyor


-

make sure there are no foreign material deposits on the membrane of the check valve 

and if any remove them and checking for damage


-

check the valve opens and closes correctly


-

re-assemble the components in reverse order, making sure the check valve is put back 

in the correct direction.

When there is maintenance work on the check valve make sure that it is positioned correctly 

to ensure the system operates correctly and safely.

Summary of Contents for 20187642

Page 1: ...Family KIS EN INSTALLER AND USER MANUAL...

Page 2: ...ser also Warning This instructions manual contains data and information for both the user and the installer Specifically note that the user for the use of the appliance must refer to chapters Warnings...

Page 3: ...this case ventilate the room by opening the doors and windows close the fuel shut off device ask the Technical Assistance Service or professionally qualified personnel to intervene promptly a It is f...

Page 4: ...pe and consider any increase in the diameter of the pipe itself The condensation exhaust pipe must always have an adequate slope level to prevent the condensation from stagnating and its proper draina...

Page 5: ...and immediately before and after each change of direction curve b The boiler is supplied without the flue gas exhaust air suction kit since it is possible to use the accessories for condensing applia...

Page 6: ...e can exceed the static pressure of the collective air duct of 25 Pa in the condition in which n 1 boilers work at maximum rated heat input and 1 boiler at the minimum rated heat input allowed by the...

Page 7: ...e vent cycle Remove any air in the domestic system radiators zone manifolds etc using the bleed valves Once again check that the system pressure is correct ideally 1 1 5 bar and restore the levels if...

Page 8: ...is in progress number 1 is flashing This icon indicates that the circuit for domestic hot water production is enabled When a domestic hot water request is in progress the icon flashes The P at the to...

Page 9: ...LER CHANGE NAME INSTALLER PI PROPORTIONAL 5 0 99 SERVICE only mixing zones with ACTUATION BE16 PI INTEGRAL 10 0 99 SERVICE only mixing zones with ACTUATION BE16 VALVE RUN 120 sec 0 sec 120 sec SERVICE...

Page 10: ...request type TA and zone type HT 0 4 0 2 0 8 INSTALLER if EXTERNAL PROBE request type TA and zone type LT 2 0 1 0 5 0 INSTALLER if request type AMBIENT PROBE or REC10CH AMBIENT INFLUENCE 10 0 20 INSTA...

Page 11: ...DISABLE COOLING FUNCTION NOT ACTIVE FUNCTION ACTIVE FUNCTION NOT ACTIVE INSTALLER USE FOR DHW DON TUSE FOR DHW DHW FUNCTION NOT ACTIVE DHW FUNCTION ACTIVE DHW FUNCTION NOT ACTIVE INSTALLER if BE17 pre...

Page 12: ...t it has all the safety and control devices required by current regulations that the circulator rotates freely because especially after long periods of inactivity deposits and or debris can prevent fr...

Page 13: ...ZONE PARAMETERS WEATHER COMPENSATION INSTALLATION RANGE RATED CALIBRATION INSTALLER TECHNICAL SENSOR CALIBRATION ZONES MANAGER SYSTEM RESET INSTALLER INSTALLATION ADD ZONE MODIFY ZONE DELETE ZONE INS...

Page 14: ...URE C EXTERNAL TEMPERATURE C NIGHT COMPENSATION If a timer is connected to the ROOM THERMOSTAT input the NIGHT COMP function can be enabled as follows menu TECHNICAL WEATHER COMPENSATION CLIMATIC CURV...

Page 15: ...in standby again keeping the outlet temperature displayed If faults arise in ignition or operations the boiler performs a SAFETY STOP the triangle signalling faults will flash on the REC10CH To identi...

Page 16: ...Technical Assistance Centre 4 13 Gas conversion Conversion from a family gas to other family gas can be performed easily also when the boiler is installed This operation must be carried out by profes...

Page 17: ...l E042 water pressure transducer fault definitive E060 domestic hot water probe fault transitional E070 flow sensor faulty flow sensor overtemperature flow return sensor differential alarm transitiona...

Page 18: ...TECHNICAL Note After a reset it is necessary to carry out a new configuration of the system for details about this procedure see the following section 4 19 System configuration b This operation must b...

Page 19: ...in intact and to comply with prescriptions of current regulations it is necessary to render the appliance to systematic checks at regular intervals When carrying out maintenance work observe the instr...

Page 20: ...nnect the tubes A and B remove the clip C and remove the siphon Unscrew the bottom and top caps then remove the float Clean the parts of the siphon from any solid residues b Do not remove the safety s...

Page 21: ...EFAULT VALUE FACTORY SET MINIMUM VALUE MAXIMUM VALUE ACCESS LEVEL NOTES MENU SETTINGS USER TIME DATE USER DAYLIGHT SAVINGS TIME FUNCTION ACTIVE FUNCTION NOT ACTIVE FUNCTION ACTIVE USER LANGUAGE ITALIA...

Page 22: ...ed programme 8 2 3 MANUAL If MANUAL is selected the zone requests will be managed based on the setpoint set by the user 8 2 4 HEAT OFF If HEAT OFF is selected the zone requests will not be fulfilled N...

Page 23: ...0 INFO The INFO function can be used to display a series of data regarding the system ATTENTION The displayed data cannot be modified SCREED HEATER OPERATING HOURS DELIVERY PROBE RETURN PROBE DOMESTIC...

Page 24: ...TART THURSDAY USE THE ARROWS TO MODIFY ENTER START TIME ADD PERIOD END MAIN Once the operation completed the display will show 07 30 08 30 11 30 14 00 13 30 15 00 18 00 22 30 START THURSDAY ADD MODIFY...

Page 25: ...TURE WILL BE ADJUSTED WITH NEW TARGET SET POINT UNTIL 09 04 2021 ON 13 15 1 ZONE1 CONFIRM CANCEL 00 30 YOU ARE ACTIVATING COMFORT MODE ENTER TIME DURATION IN HOURS USE THE ARROWS TO MODIFY 1 ZONE1 26...

Page 26: ...Maximum pressure bar 8 8 8 Minimum pressure bar 0 15 0 15 0 15 Quantity of hot water with t 25 C 30 C 35 C l min 15 1 12 5 10 8 18 1 15 1 12 9 20 8 17 4 14 9 DHW minimum capacity l min 2 2 2 Selectio...

Page 27: ...ith reference to Delegated Regulation EU No 811 2013 the data in the table can be used for completing the product card and the labelling for ambient heating appliances for mixed heating appliances for...

Page 28: ...ivery 34 Hot water 35 Gas 36 Heating return 37 Cold water 2 21 AF AC M R 20 19 1 6 6 8 9 5 4 6 7 3 2 18 15 14 13 12 11 10 16 17 15 3 Residual head of circulator Fig 3 A B C Residual head mbar Flow rat...

Page 29: ...entering a value 10 the circulator speed will change to achieve a system flow rate with the aim of maintain ing the T of 10 C upstream and down stream of the exchanger 3 CIRCULATOR IN MAXIMUM FIXED S...

Page 30: ...Wiring diagram Blu Blue Marrone Brown Nero Black Rosso Red Bianco White Viola Violet Rosa Pink Arancione Orange Grigio Grey Giallo Yellow Verde Green A Gas valve B 230V auxiliary C Voltage free contac...

Page 31: ...from 60 100 to 80 80 110 65 65 1 1 5 90 bend 60 100 60 100 horizontal 10 horizontal 6 horizontal 6 1 3 1 6 105 vertical 11 vertical 7 vertical 7 90 bend 80 125 80 125 25 15 15 1 1 5 130 adaptor from 6...

Page 32: ...T OPTION 4 and SYSTEM INFO INSTALLATION WEATHER COMPENSATION RANGE RATED TECHNICAL INSTALLER 5 PARAMETERS CALIBRATION and ANTI CYCLE FUNCTION RESET CH TIMERS DHW THERMOSTAT PARAMETERS INSTALLER 6 PUMP...

Page 33: ......

Page 34: ......

Page 35: ......

Page 36: ...Cod 20187595 09 21 Ed 3...

Reviews: