background image


- 25 - 


S

OFTWARE


CAUTION: 

It is advisable to use a cable which is shorter than 3 metres for communication with the CPS. 
To obtain additional communication ports with different functions, independent from the standard USB ports 
on the CPS, various accessories are available which can be inserted into the communication card slot. 


To check the availability of new, more updated software versions or for more information about the accessories 
available, consult the website 

www.riello-ups.com

.


M

ONITORING AND CONTROL SOFTWARE


The 

PowerShield

3


software guarantees effective, intuitive CPS management, displaying all the most important information 

such as input voltage, applied load and battery capacity. 
It is also able to perform shutdown operations, send e-mails and network messages automatically when certain events (selected 
by the user) occur. 
 

INSTALLATION OPERATIONS 

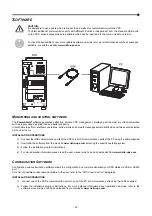
1)  Connect the USB communication ports of the CPS to the USB communication ports of the PC using the cable supplied. 

2)  Download the software from the web site 

www.riello-ups.com

 selecting the specific operating system. 

3)  Follow the installation program instructions. 

4)  For more detailed information please read the user manual which can be downloaded from 

www.riello-ups.com


C

ONFIGURATION 

S

OFTWARE


Configuration and customization software allows the configuration and complete visualization of CPS status via USB or RS232 
port. 
For a list of possible configurations available to the user, refer to the “

CPS


C

ONFIGURATION

” paragraph. 

 
INSTALLATION OPERATIONS 

1)  Connect one of the CPS’s communication ports to one of the PC’s communication ports using the cable supplied. 

2)  Follow  the  installation  program  instructions.  For  more  detailed  information  about  installation  and  use,  refer  to  the 

software manual which can be downloaded from our website 

www.riello-ups.com


Summary of Contents for CSS SENTINEL TOWER CAM 3

Page 1: ......

Page 2: ......

Page 3: ...ur products pursue the objectives defined in the environmental management system developed by the company in compliance with applicable standards No hazardous materials such as CFCs HCFCs or asbestos are used in this product When evaluating packaging the choice of material has been made favouring recyclable materials For correct disposal please separate and identify the type of material of which t...

Page 4: ...XTERNAL PROTECTIVE DEVICES 16 CONNECTION CABLES CROSS SECTION DETAILS 16 CONNECTIONS 17 OTHER INSTALLATION MODES 17 BATTERY CABINET INSTALLATION 18 CPS BATTERY CABINET CONNECTION 18 CONFIGURING THE RATED BATTERY CAPACITY 18 USE 19 SWITCHING ON FOR THE FIRST TIME 19 SWITCHING ON FROM THE MAINS 19 SWITCHING ON FROM THE BATTERY 19 SWITCHING OFF THE CPS 19 INTERNAL CLOCK SETTING 19 DISPLAY PANEL MESSA...

Page 5: ... AND R E P O 24 AUTORESTART 24 REDUNDANT AUXILIARY POWER ADAPTER FOR AUTOMATIC BYPASS 24 EXTERNAL TEMPERATURE PROBE 24 SOFTWARE 25 MONITORING AND CONTROL SOFTWARE 25 CONFIGURATION SOFTWARE 25 CPS CONFIGURATION 26 COMMUNICATION PORTS 28 CONFIGURATION FOR OUTPUT SIGNALS FACTORY DEFAULT 28 COMMUNICATION SLOT 28 TROUBLESHOOTING 29 STATUS ALARM CODES 33 TECHNICAL DATA 35 MECHANICAL DIMENSION 36 ...

Page 6: ... 4 ...

Page 7: ... are equipment designed especially for use in buildings subject to fire safety regulations their main objective is to supply safety lighting systems in case of power failure but they are also used to supply electric circuits supplying automatic fire extinguishing systems paging systems and signaling security systems fume extraction equipment carbon monoxide alarm systems special security systems i...

Page 8: ... 6 CPS VIEWS FRONT VIEW All models Display panel Removable front panel Ventilation grill ...

Page 9: ...g fan EnergyShare sockets 10A max and overcurrent protection Parallel card optional Mains input switch SWIN Slot for optional accessory communication cards and contacts cards Manual bypass switch SWMB USB communication port Output switch SWOUT Dry contact outputs Terminals cover panel ...

Page 10: ...easurement display area SEL2 button Timer STAND BY button Battery charge indicator Regular operation Configuration area Mains operation Maintenance request Battery operation Load level indicator Load powered by bypass Parallel mode indicator Stand by alarm EnergyShare ...

Page 11: ...o the type of CPS for which the BATTERY CABINET is intended It is therefore necessary to take great care to ensure that the battery voltage of the BATTERY CABINET is the same as the voltage permitted by the CPS Several BATTERY CABINETS can be connected in series to achieve a longer extended runtime Front view Rear view Internal battery fuse holder isolator Battery expansion connector BATTERIES EN ...

Page 12: ...ckage must contain CPS Safety manual Quick start guide Download card USB cable Warning labels against backfeed After opening the packaging it is first necessary to check the contents The Battery Cabinet optional package must contain BATTERY CABINET Safety manual Quick start guide Fuses Connection cable CPS Battery Cabinet ...

Page 13: ... Cut the straps and open the cardboard box 2 Remove the packaging and the accessory box located above the product 3 Remove the cardboard box by sliding it upwards and remove the corner supports 4 Remove the protective sack 5 Remove the 4 fixing brackets from the pallet each bracket is fixed to the pallet by 2 screws FRONT VIEW REAR VIEW ...

Page 14: ...e pallet 8 Remove the end wooden support and ensure that the product is held stable during this process 9 Guide the product towards the front of the pallet with caution the pallet will begin to tilt down acting as a ramp continue to move the product down off the pallet If it will be difficult to remove the brackets unhook the front panel pulling it from the edges the front panel is hooked with a s...

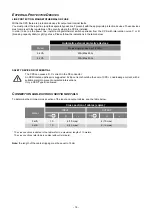
Page 15: ...and the public system It is responsibility of the installer or the user to ensure that the equipment is connected to a supply with the adequate short circuit power Ssc if required consult the distribution network operator If the supply doesn t meet the above requirements or if the requirements listed above are difficult to obtain a single phase installation is suggested PLACEMENT When installing t...

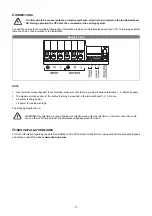
Page 16: ...NSTRUCTIONS FOR CONNECTION Follow the instruction below to access the terminals of the CPS and made the electrical connections 1 Remove the terminals cover in the back of the CPS placed below the disconnector switches see CPS VIEWS 2 Pierce the rubber grommets to allow the wires to pass through otherwise remove the pre cut slots located in the bottom part of the terminal cover using cutters 3 We r...

Page 17: ...e protection characteristics and timings are described CPS in NORMAL OPERATION with the Bypass Line available the load is switched instantaneously to the bypass line the input line is connected to the output without any internal protection CPS in BATTERY OPERATION or in NORMAL OPERATION but with no Bypass Line available the CPS protects itself by providing a higher current than the nominal one see...

Page 18: ...devices Model Mains single phase input 1P N 3 kVA 20A Max 40A 5 kVA 32A Max 40A SAFETY DEVICES DIFFERENTIAL The CPS can cause a D C current in the PE conductor An RCD located upstream is suggested its trip current should be the sum of CPS Load leakage current with a suitable margin to prevent unwanted interventions Only a RCD Type B is allowed CONNECTION CABLES CROSS SECTION DETAILS To determine t...

Page 19: ...ded make sure that there is a jumper between terminals 1 2 Switch bypass 2 The maximum cross section of the cables that may be inserted in the terminal board 1 2 3 4 are 2 5 sqmm for bare cables 1 5 sqmm for cables with lugs The stripping length is 8 mm WARNING Pay attention to connect the input neutral NIN and output neutral NOUT incorrect connection could cause a failure of the load when the Mai...

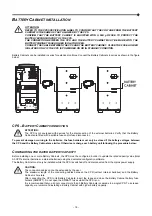
Page 20: ...urring to the batteries the fuse holders must only be closed if the battery voltages between the CPS and the Battery Cabinet are similar Otherwise recharge each battery unit following the procedure below CONFIGURING THE RATED BATTERY CAPACITY Before installing one or more Battery Cabinets the CPS must be configured in order to update the rated capacity value total Ah CPS s internal batteries exter...

Page 21: ... all the icons on the display light up for 1 second and the CPS beeps 2 Close the output switch SWOUT in the back of the CPS 3 Switch on the equipment connected to the CPS When switching on for the first time only after 30 seconds check that the CPS is operating correctly 1 Simulate a blackout by disconnecting power to the CPS 2 The load must continue to be powered the icon on the display must lig...

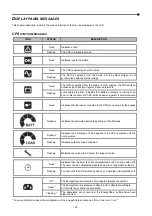
Page 22: ... the loads connected to the CPS are powered by the bypass Dynamic Indicates the estimated percentage charge of the batteries Dynamic Indicates the percentage of load applied to the CPS compared with the nominal value Flashing Indicates output overload condition Flashing Maintenance is required Contact the support centre Fixed Indicates that the timer is active programmed switch on and switch off T...

Page 23: ...MENT DESCRPTION IN Display input mains data such as voltage and frequency BYP Display bypass line data such as voltage current and frequency OUT Display the CPS output data such as voltage current and frequency BATT Display batteries data such as recharge percentage autonomy estimation voltage and current Display the recharging current with the mains present otherwise the discharging current if th...

Page 24: ...S output de synchronises from the mains supply moving to the nominal frequency in this condition the CPS cannot use the bypass In order to optimise performance in ECO mode the load is normally powered by the bypass If the mains goes out of the permitted tolerance range the CPS switches to ON LINE operation If the mains returns within the permitted tolerance range for at least five minutes the CPS ...

Page 25: ...the maintenance bypass switch SWMB in this way the input is short circuited with the output Open the input switch SWIN and output switch SWOUT The display panel is turned off Wait for the electrolytic capacitors on the power board to discharge about 5 minutes and then proceed to perform the maintenance operations N B During this phase with a load powered via the maintenance bypass any disturbance ...

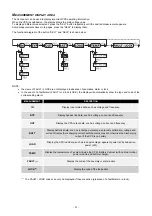
Page 26: ...OTE ON This feature is activated by closing the contact between pin s 2 and 3 for a few seconds AUTORESTART The Autorestart allows the automatic switch on of the CPS when power is restored if during battery operation the CPS switches off due to end of autonomy remote shutdown command or Auto power off enabled CAUTION THE AUTORESTART FUNCTION IS ENABLED BY DEFAULT REDUNDANT AUXILIARY POWER ADAPTER ...

Page 27: ...selected by the user occur INSTALLATION OPERATIONS 1 Connect the USB communication ports of the CPS to the USB communication ports of the PC using the cable supplied 2 Download the software from the web site www riello ups com selecting the specific operating system 3 Follow the installation program instructions 4 For more detailed information please read the user manual which can be downloaded fr...

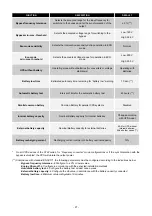
Page 28: ... return of mains voltage 5 s Auto power off Automatic CPS power off in battery operation mode if the load is lower than 5 Disabled Buzzer Reduced Selects the audible alarm operating mode Reduced EnergyShare off Selects the operating mode of EnergyShare sockets Always connected Timer Programmed CPS power ON OFF daily Disabled Autonomy limitation Maximum battery operation time Disabled Maximum load ...

Page 29: ...ery for parallel CPS systems Disabled Internal battery capacity Nominal Battery capacity for internal batteries Change according with UPS model External battery capacity Nominal Battery capacity for external batteries 9 Ah for UPS without internal batteries 0Ah all other cases Battery recharging current Recharging current compare to battery nominal capacity 12 On all CPS devices of the STW series ...

Page 30: ...n 4 If the contact is open at least one anomaly or fault is active in the charger stage or in the batteries OUT 4 Normal operation Double throw contact N O between pin 2 and pin 4 N C between pin 1 and pin 4 If the contact between pin 6 and pin 8 is closed the CPS system is working Double throw contact configurable via the configuration software NOTE The output dry contacts are rated to 1A 24Vdc o...

Page 31: ...explained in the paragraph POWER CONNECTION THE ISOLATOR SWIN IS OPEN Close the isolator MAINS POWER MISSING BLACKOUT Make sure the mains power is present If necessary perform battery start up to power the load INTERVENTION OF THE UPSTREAM PROTECTION DEVICE Restore the protection Warning make sure there is no overload or short circuit on the CPS output NO POWER REACHES THE LOAD CONNECTION TO THE O...

Page 32: ... FOLLOWING CODES F09 F10 THE VOLTAGE VALUE OF PHASE 1 IS NOT SUFFICIENT TO PRE LOAD THE CPS Wait for the input network voltage values to stabilise within the ranges accepted by the CPS FAULT IN THE CPS INPUT STAGE Activate the maintenance bypass SWMB if present turn the CPS off then back on again Exclude the maintenance bypass If the problem persists contact the nearest service centre THE DISPLAY ...

Page 33: ...DES L01 L10 L38 L39 L41 FAULT IN TEMPERATURE PROBE OR CPS COOLING SYSTEM MAIN AUXILIARY POWER SUPPLY STATIC BYPASS SWITCH Activate the maintenance bypass SWMB if present turn the CPS off and back on again Exclude the maintenance bypass If the problem persists contact the nearest service centre THE DISPLAY SHOWS ONE OR MORE OF THE FOLLOWING CODES A22 F23 L23 THE LOAD APPLIED TO THE CPS IS TOO HIGH ...

Page 34: ...operation THE DISPLAY SHOWS THE FOLLOWING CODE L11 STATIC BYPASS RUPTURE OR FAULT Activate the maintenance bypass SWMB if present Turn the CPS off and back on again Exclude the maintenance bypass and if the problem persists contact the nearest service centre THE DISPLAY SHOWS NOTHING OR PROVIDES INCORRECT INFORMATION THE DISPLAY HAS POWER SUPPLY PROBLEMS Activate the maintenance bypass SWMB shut d...

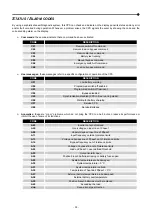
Page 35: ...isabled CPS in Free running mode U06 Waiting for battery charging U07 Service CPS U08 Service Batteries Anomalies these are minor problems which do not bring the CPS to a halt but can reduce its performance or inhibit the use of some of its functions CODE DESCRIPTION A03 Inverter not synchronised A05 Overvoltage on input line of Phase1 A08 Undervoltage on input line of Phase1 A11 Input frequency o...

Page 36: ...ally they are preceded by an alarm signal In case of faults and consequent locking of the inverter the latter will be turned off and the load will be powered via the bypass line this procedure is excluded for locks caused by serious and persistent overloads and for those caused by a short circuit CODE DESCRIPTION L01 Incorrect auxiliary power supply L02 One or more internal cables disconnected L03...

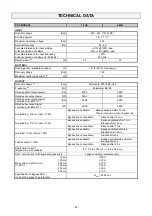
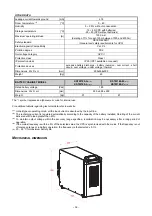
Page 37: ...nt with EN 50171 W 2500 4000 Overloading 100 load 110 Bypass line available Bypass activated after 10 min Then continues to work on bypass line Bypass line not available Blocked after 10 min Overloading 110 load 130 Bypass line available Bypass activated after 1 min Blocked after 1 hour Bypass line not available Blocked after 1 min Overload 130 load 150 Bypass line available Bypass activated after...

Page 38: ...Y CABINET MODEL KSTW180 A KSTW180 L KSTW180 M KSTW180 V Rated battery voltage Vdc 180 Dimensions W x D x H mm 250 x 698 x 500 Weight Kg 57 87 The symbol replaces an alphanumeric code for internal use For additional details regarding technical data refer to website 1 In the Bypass operating mode all the load current is absorbed by the input line 2 The recharging current is regulated automatically a...

Page 39: ......

Page 40: ...0MNCAM3K0RUENUB ...

Reviews: