background image

1. Guide to Components

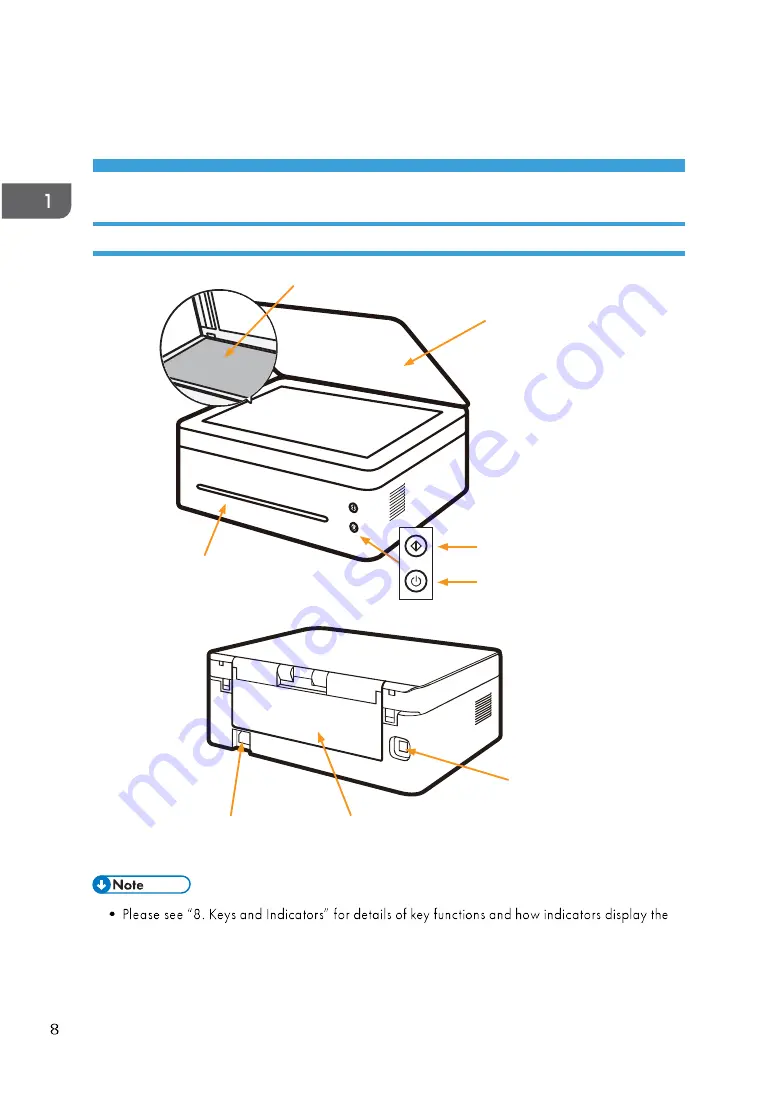
This section introduces the names of the parts in front, at the back and inside the machine.

Exterior

Paper exit

Scanner cover

Start key

Power key

Scanner glass

Power port

USB port

Paper tray

printer device status.

 

Summary of Contents for MFSP150SUW1

Page 1: ...r to a Power Socket 13 Starting the Printer 13 Installing Printer Drivers and Neo Printing Software 14 Printing a Test Page 20 Printing a Configuration Page 20 3 Print Media Supported Paper 21 Non Rec...

Page 2: ...ing the Toner Cartridge 62 Replacing the Toner Cartridge 63 Cleaning the Printer 65 10 Troubleshooting FAQs 67 Paper Feed Problems 67 Removing Paper Jams 68 Print Quality Problems 75 Printing Problems...

Page 3: ...ontains detailed instructions and notes on the operation and use of this machine For handy place for quick reference Legal Prohibition Do not copy or print any item for which reproduction is prohibite...

Page 4: ...e sure that you always copy or have backups of the data registered in this machine Documents or data might be erased due to your operational errors or malfunctions of the machine In no event will the...

Page 5: ...protect the environment For more detailed information on collection and recycling systems for this product please contact the shop where you purchased it your local dealer or sales service representat...

Page 6: ...s to print again it needs a little longer to return from an energy saving mode than from Ready mode For maximum energy savings we recommend that the default setting for power management is used Note f...

Page 7: ...Energy Saver modes Energy Saver mode 1 and Energy Saver mode 2 The machine recovers from Energy Saver mode when it receives a print job prints a received fax or when any key is pressed Energy Saver mo...

Page 8: ...ents This section introduces the names of the parts in front at the back and inside the machine Exterior Paper exit Scanner cover Start key Power key Scanner glass Power port USB port Paper tray print...

Page 9: ...9 Interior Paper jam release lever Toner cartridge Cover Sensor...

Page 10: ...sories listed below Toner cartridge USB cable 1 2 m Power cable 1 5 m CD ROM User Guide Setup Guide Safety Information The toner cartridge has been installed in the printer Some parts may be not used...

Page 11: ...11 Opening the Paper Feed 1 Open the feed tray 2 Pull out the Extension Panel 1 Extension Panel 1 3 Flip open the Extension Panel 2 Extension Panel 2 Attaching the Paper Tray...

Page 12: ...Locate the tray guides on the bottom of the printer 2 Insert the paper tray along the guides Loading Paper This section explains how to load paper into the paper feed 1 Before loading the paper bend t...

Page 13: ...ing please specify the paper size and type in the printer driver so the settings can be used for printing the loaded paper Do not push the paper guide too far This may cause the paper to bend Failure...

Page 14: ...r cable into a properly grounded AC power sup ply socket Starting the Printer Hold the power key for 0 5 seconds or longer to start the printer The indicator display shown below indicates that the pri...

Page 15: ...nal memory Your computer has 200 MB or more free space available on the hard disk Your computer has a Windows or Apple Mac operating system which supported by this printer Quick Installation USB Insta...

Page 16: ...n the installation program interface comes up 5 Click Quick Installation USB Please study the Agreement If you accept the agreement please tick the box in front of I have agreed and then click Next 6...

Page 17: ...he computer and printer with the USB cable 2 Insert the CD ROM supplied with this product into the computer s CD ROM drive 3 Double click the CD disk icon on the computer desktop 4 Double click the In...

Page 18: ...refully read the software License Agreement and click Continue 8 If you accept the terms of the license agreement please click Agree to contin ue installation 9 Click Install and the system will perfo...

Page 19: ...driver by following the steps below 1 In the Start menu click Devices and Printers Windows Server 2003 2003 R2 In the Start menu select Printers and Faxes Windows Vista Windows Server 2008 In the Sta...

Page 20: ...s Windows Server 2003 2003 R2 In the Start menu select Printers and Faxes Windows Vista Windows Server 2008 In the Start menu select Control Panel and click Hardware and Sound Printer Windows 8 8 1 10...

Page 21: ...ck Start then Devices and Printers Right click your printer and select Printer Properties to display the properties dialog box As shown below 2 Click Print Test Page name and password of Soft AP Toner...

Page 22: ...lowing sizes Width Approx 76 2 216mm 3 8 5 inches Length Approx 116 355 6mm 4 57 14 inches Paper Types Plain Paper 70 90 g m Recycled Paper 70 90 g m Thick Paper 90 105 g m Thin Paper 60 70 g m Label...

Page 23: ...hter than the limit Paper with windows holes perforations cutouts or embossing Adhesive label paper on which glue or base paper is exposed Paper with clips or staples Envelopes Poorly stored paper can...

Page 24: ...the software you are using to print for the actual steps you need to follow 1 2 3 Select Print in the File menu The print dialog box is displayed Dialog box may be different for other software Select...

Page 25: ...2 Select Devices and Printers to open the window 3 Select your printer right click and select Printing Preferences 4 printing on this computer the printer device status Printing with Neo Printing Canc...

Page 26: ...for one second or longer The LED indicator display shown below indicates the current task is being canceled Start indicator is off Power indicator alternates between red and green every 0 5 seconds I...

Page 27: ...than 297 mm 11 7 inches Unscannable image area Even if you correctly place originals margins of a few millimeters on all four sides of the original may not be scanned Margins when using scanner glass...

Page 28: ...er offers two ways of copying Copying with Neo Printing Copying with Printer Keys 1 Place the original on the scanner glass 2 When the printer is in the state of standby press the start key once to ma...

Page 29: ...e 5 copies The LED indicator display will change to that shown below Start indicator is green 1 second The printer is in copy multiple copy mode The LED indicator display shown below indicates that th...

Page 30: ...of standby press and hold the start key and power key for one second or longer The indicator display changes to that shown below Start indicator is green Power indicator is green The printer is in ID...

Page 31: ...ID card the printer will remain in double sided copy mode for one minute If no operation is performed within one minute the printer will return to its ready to copy state You can also cancel double s...

Page 32: ...that shown below Start indicator is off Power indicator alternates between red and green every 0 5 seconds If copying is canceled while the machine is scanning the original copying is canceled immedi...

Page 33: ...rocedure for using TWAIN scanner To use the TWAIN scanner you must install the TWAIN driver which is on the supplied CD ROM To use the TWAIN scanner a TWAIN compliant application must be installed Ins...

Page 34: ...ew image of the original to be scanned in the preview window Scan Click Scan to start scanning the original Basic Scanning tab Image Type Black White 8 bit Grayscale 24 bit Full Color default value Re...

Page 35: ...elected a dialog box will pop up to let you enter your preferred resolution Scan size A4 210 x 297 mm A5 148 x 210 mm B5 182 x 257 mm Port Image Quality tab You can adjust the quality of the scanned i...

Page 36: ...6 Scanning Image Options tab WIA Scanning Windows WIA 1 0 Windows Server 2003 The WIA 1 0 provides default user interface for scan as follows...

Page 37: ...scanner glass 4 In the Start menu click Devices and Printers 5 Right click your printer s icon and click Start scan 6 Scanning with Mac ICA The ICA Image Capture scanner device module driver supports...

Page 38: ...face Color Kind Text 1 bit image Black White 8 bit Grayscale image Color 24 bit Color image Resolution 75dpi 100 dpi 150 dpi 200 dpi 300 dpi 600 dpi 1200 dpi 2400 dpi 4800 dpi Scan size A4 B5 JIS B5 U...

Page 39: ...ndows 8 Windows 8 Windows 8 1 Windows 8 1 Windows Server 2012 Windows Server 2012 Windows Server 2012 R2 Windows Server 2012 R2 Windows 10 Home Pro Enterprise Mac OS X 10 8 10 11 Mac OS X 10 8 10 11 D...

Page 40: ...s Paper Type Print Quality Print Settings Multiple Pages Duplex Toner Save Mode 2 Check the selected settings displayed in Window 1 3 Click to OK Paper Size Select the required paper size from the dro...

Page 41: ...e Collate check box is not checked then each page will be printed for the number of copies selected before the next document is printed Collate check box is selected Collate check box is not selected...

Page 42: ...le Page selection can reduce the image size of a page allowing multiple pages to be printed on one sheet of paper You can also enlarge the image size for printing one page on multiple sheets of paper...

Page 43: ...eload the paper to print the second side 4 After reloading the paper press the ing red 5 The printer will continue to print the second side The Label does not support duplex printing Print Order If th...

Page 44: ...3 4 5 7 Toner Save Mode Activate the Toner Save Mode to reduce toner consumption In Toner Save Mode the printed document will be fainter but print density remains the same This option is disabled by...

Page 45: ...eader Footer Print Density Adjustment Skip Blank Page Print Text in Black Reverse Print Scaling You can change the scaling of printed images Off Fit to Paper Size Custom Resize 25 400 When Fit to Pape...

Page 46: ...he pages will be automatically ordered You only have to fold the printed pages You can set the number of pages in each booklet set to between 1 to 15 This option is very useful when printing booklets...

Page 47: ...ext Enter the watermark text in the text box and select the Font Style and Size of the watermark and select the required Transparent option Transparent Check this check box to make the watermark trans...

Page 48: ...ck box unchecked to make the watermark completely opaque such that the text and images underneath it are completely covered able Edit Select the watermark to be edited from the watermark list and clic...

Page 49: ...ner Name Document Name Page Number Date Time Position Three options are available in the horizontal direction Left Center Right Two options are available in the vertical direction Top Bottom Font You...

Page 50: ...ludes them from printing This option does not work when the following options are selected Use Watermark Header Footer Print Multiple Pages Duplex Booklet Print Text in Black If this option is checked...

Page 51: ...51 tions 2 1 3 4 1 2 1 2 Select the icon you want to use from the icon list and click OK 3 The selected settings is displayed on the left of the printer driver window 1 2 3 Click OK 4...

Page 52: ...7 Drivers Support Version Number The Support window provides version information of the installed printer driver...

Page 53: ...the corresponding settings as required Paper Size Orientation Copies Media Type Image Quality Print Settings Toner Save Mode Check the selected settings displayed in the preview window Paper Size Sel...

Page 54: ...he Page Settings is not available select File Print If the Print dialog box contains only two pop up menus and some buttons at the bottom click the triangle beside the pop up menu 3 Select Custom Pape...

Page 55: ...fore the next document is printed Collate check box is selected Collate check box is not selected Media Type This machine supports the following types of printing media For optimal print quality selec...

Page 56: ...side 4 After reloading the paper press the ing red 5 The printer will continue to print the second side The Lable does not support duplex printing Color Balance You can adjust the blackness of the pri...

Page 57: ...ndicators Introduction Start key Power key LED indicator has three colors Start key Green Power key Red Blue Green LED Indicator LED indicator Status Off On Flashing on for one second and off for one...

Page 58: ...or is off Power indicator is green Initializing Standby Start indicator is off Power indicator is blue Firmware Update Start indicator is off Power indicator alternates between red and blue every 0 5...

Page 59: ...t of Paper Machine cooling down Pending to print the reverse side in the manual duplex mode Start indicator is off Toner Near End Start indicator is off Controller error Start indicator is off Fuser U...

Page 60: ...green Starting ID Card Copy Start indicator is green Power indicator is green Pending the reverse side of the ID card Pending the next page in the N in1 mode Laser Scanning Unit Fault Start indicator...

Page 61: ...dby Press the power key three times within 1 5 seconds Task in Progress Printing Cancel the task Press and hold power key for one second or longer Sleep Wake up Press any button or disconnect and reco...

Page 62: ...d power key are both green ID card copy mode Start ID card copy Press the start key once ID card copy mode Exit ID card copy Press and hold power key for one second or longer Pending the reverse side...

Page 63: ...ge can print at least 1 500 pages when used for printing documents with 5 text coverage But the toner cartridge supplied with the printer can print an average of 700 pages Using non recommended paper...

Page 64: ...size and environmental conditions such as temperature and humidity Toner quality degrades over time For good print quality we recommends that you use genuine toner from the RICOH RICOH shall not be r...

Page 65: ...lift the cartridge out off the printer Beware of hot surfaces 3 Take the new toner cartridge out of box and then take it out of the plastic bag 4 evenly within the cartridge Should your clothes be st...

Page 66: ...to maintain high print quality Wipe the printer surface with a soft dry cloth or a soft damp cloth where necessary If the printer is still dirty use a pH neutral detergent to avoid causing deformation...

Page 67: ...ins and paper jams Cleaning the inside of the printer can eliminate or reduce such issues 1 Power off the printer and disconnect the power cord Wait for the printer to cool 2 Open the printer cover an...

Page 68: ...nd contact your sales or service representatives Paper Feed Problems If the machine is operating but paper will not feed or paper jams occur frequently check the condi tion of the machine and paper Pr...

Page 69: ...uide adjust the paper guides to remove the gaps The printed paper is curled Load the paper upside down in the feed tray Paper is damp Use only paper that has been stored properly Images are printed di...

Page 70: ...Exit If the paper is jammed here it can cause the toner to spill onto the paper If your clothes is stained with the toner wash off the stain with cold water 1 Open the printer cover 2 Remove the toner...

Page 71: ...71 4 Pull the jammed paper carefully out of the paper exit Be careful not to tear the paper 5 Push the release lever back into position 6 Reinstall the toner cartridge...

Page 72: ...Tray If the paper has already entered the toner cartridge section carry out the following steps 1 Open the printer cover and then remove the toner cartridge If the power indicator remains red it indi...

Page 73: ...e the toner cartridge and then close the cover Paper Jams Inside the Printer If the paper jam occurs here it can cause the toner to spill onto the paper If your clothes is stained with the toner wash...

Page 74: ...ridge to the sun for more than a few minutes to avoid damaging it Cover the cartridge with a sheet of paper after it has been removed from the printer 3 Gently pull the paper out of the printer Make s...

Page 75: ...nting Do not use corrugated folded wet or curled paper Do not mix different types of paper in the same feed tray Store the print media in a suitable environment The jammed sheet of paper will likely b...

Page 76: ...the machine Incorrect paper type settings Make sure that the paper type setting of the printer driver matches the Non genuine toner cartridge has been used Non genuine toner cartridge has been used T...

Page 77: ...aper that has been stored properly If you have enabled Toner Save Mode printing is generally less dense Condensation may have collected If rapid change in temperature or humidity occurs use this machi...

Page 78: ...n ner cover down A moire pattern is produced The original document probably has heavily lined or dotted areas Switching the setting for image quality between Photo and Text Photo may eliminate the moi...

Page 79: ...The original was moved during the scanning process Do not move the original during the scanning process The scanned image is upside down The original was placed upside down Load the original in the c...

Page 80: ...ly when moving it Make sure to move the machine horizontally Take extra caution when carrying the machine up or down stairs Do not take out the toner cartridge during the moving Make sure to keep the...

Page 81: ...commend you purchase and store extra toner cartridges The actual number of printable pages varies depending on the image volume and density num ber of pages printed at a time paper type and paper size...

Page 82: ...umption Maximum 900 W Power Saving Mode 1 1 2 W or less Dimension Width Depth Height 350 x 275 x 135 mm Weight Machine and toner cartridge Approx 7 5 kg 16 5 pounds or less Printing speed 22 pages per...

Page 83: ...s 50 70 81 100 122 141 200 Fine adjustment ratios 25 to 400 Number of copies maximum number of copies per job 99 Maximum scan area horizontal vertical A4 Letter Maximum resolution when scanning from a...

Page 84: ...crosoft Windows Vista Home Basic Microsoft Windows Vista Enterprise Names of Windows 7 products are as follows Microsoft Windows 7 Home Premium Microsoft Windows 7 Professional Microsoft Windows 7 Ult...

Page 85: ...ver 2012 products are as follows Microsoft Windows Server 2012 Foundation Microsoft Windows Server 2012 Essentials Microsoft Windows Server 2012 Standard Names of Windows Server 2012 R2 products are a...

Reviews: