


Page 50 MSI-9750A RF Remote Indicator • User Guide
9750A
HANDHELD RF REMOTE INDICATOR for
C
ELL
S
CALE
®
1) Program Set Point – Enter the set point
number from 1 to 32. This determines
the set point that subsequent menus
will operate on. Go to “PROGRAM
SET POINT” menu (next page).
2) Set Points Enabled/Disabled – This
is the master switch for all set points.
When disabled no Set Point will oper-
ate. You must Enable the set points here
for any set point to operate.
3) View Status – The LCD displays all 32
Set Points along with a status indication.
The 9750A queries the master CellScale
for status. This can take several seconds
to fully update (a low priority task for
the CellScale). Select the desired Set
Point to program with either the cursor
keys, or key in the number.
Pressing a number from 1-3 will cause groups to highlight
waiting for a second key. If no second key is pressed
within 3 seconds, Set Point 1, 2, or 3 is selected. To go
immediately to Set Points 1-3, press the ENTER key after
pressing 1-3. Press the ALPHA key to see the Set Point
names (if any) entered in the 9000.
Once the desired Set Point is high-
lighted, press the
ENTER
key to
set up the set point response. Go to
“PROGRAM SET POINT” menu (next
page).
4) View Status w/Name – Same as above
except the Set Point name is displayed
along with the Status. Press the
ALPHA
key to enter or edit a set point name. Use
the Cursor keys to see the second half
of set points (17-32).
5) Clear Latches – Any set point that is
latched on is cleared with this selection.
However, if the tripped condition still
exists, the set point will remain on and
latched.
SET POINT SETUP MENU
There are three ways to program values, operators, and remote relays for Set Points. 1) Use the Terminal Interface
Mode at the CellScale, 2) use a 3750CS, or 3) use the 9750A.
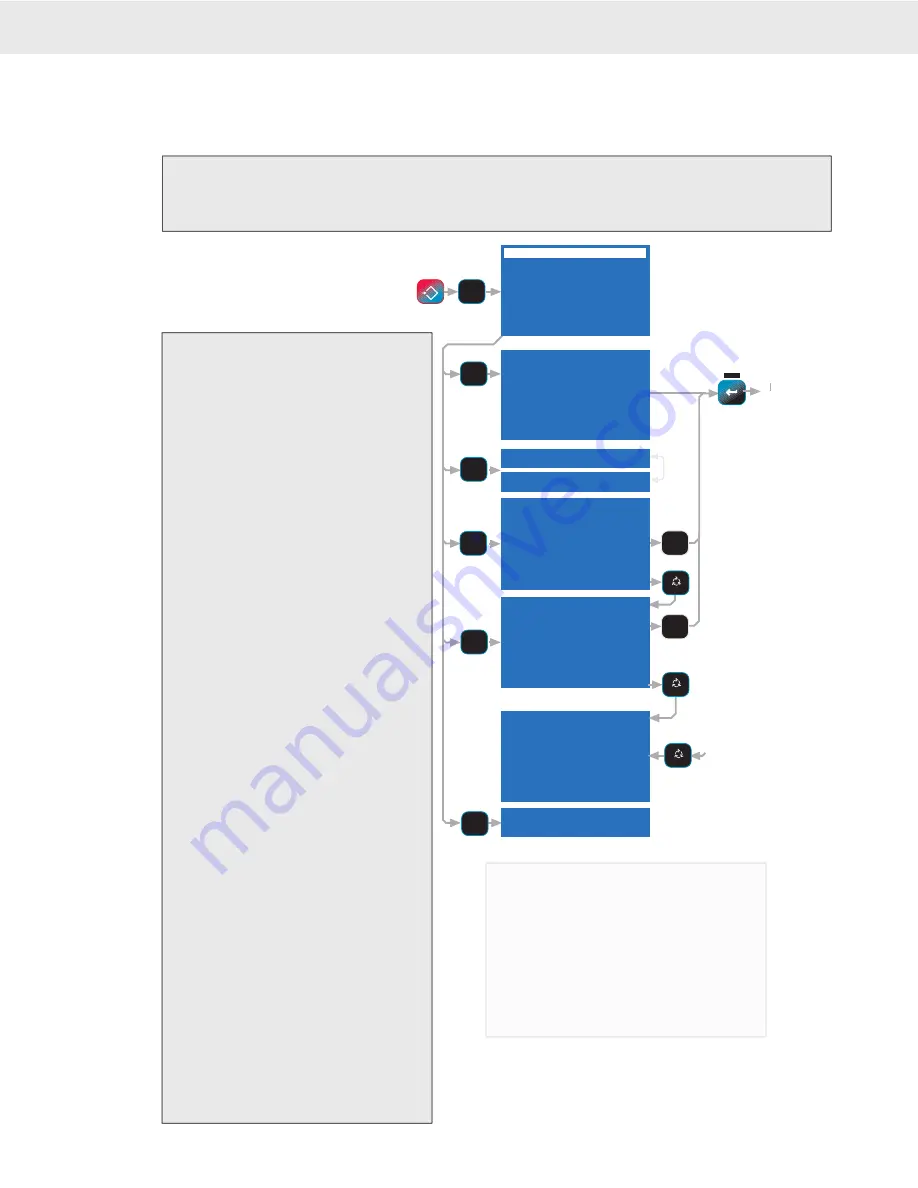
To Enter the Set Point Setup Menus
1) Press
SETUP
.
2) Select “Set Points” by pressing
[2]
.
3) The “MASTER SET POINTS” menu appears. Menu items 1-5 are discussed next.
1 S 9 S 17 S 25 S
2 S 10 S 18 S 26 S
3 S 11 S 19 S 27 S
4 S 12 S 20 S 28 S
5 S 13 S 21 S 29 S
6 S 14 S 22 S 30 S
7 S 15 S 23 S 31 S
8 S 16 S 24 S 32 S
SP1-NameS SP9 Name-S
SP2-NameS SP10Name-S
SP3-NameS SP11Name-S
SP4-NameS SP12Name-S
SP5-NameS SP13Name-S
SP6-NameS SP14Name-S
SP7-NameS SP15Name-S
SP8-NameS SP16Name-S
2 Set Points DISABLED
2 Set Points ENABLED
5 Clear Latches
Cleared
Len 0 F4 Menu
Max 8 ENT Save
Pos 1
SETPOINT XX NAME
1
To Program Set
TT
Point Menu
To Edit Highlighted
TT
Set Point Name
0-9
or
Cursors
0-9
or
Cursors
MASTER SET POINTS
1 Program Set Point
2 Set Points
ENABLED
3 View Status
4 View Status w/Name
5 Clear Latches
6 Mom Timeout Ø.Ø s
See General Text Editing
Procedure
MASTER SET POINTS
ESC
!
SETUP
2
DEF
2
DEF
3
GHI
4
JKL
5
MNO
ALPHA
A
a
1
ALPHA
A
a
1
ALPHA
A
a
1
1
ABC
PROGRAM SET POINT
ESC exits no change
ENTER edits value
Ø-9 replaces value
1
min = 1 max = 32
^ incs, v decs value
Status Indicators
U Unknown – the CellScale has not yet
reported the Set Point Status
O Off – All Set Points are off
D Disabled – This Set Point is off
R Reset – Set Point not tripped (inactive
state).
T Tripped – Set Point active


