Rextron KNV104 Manual Download Page 6

!

!

)!

 
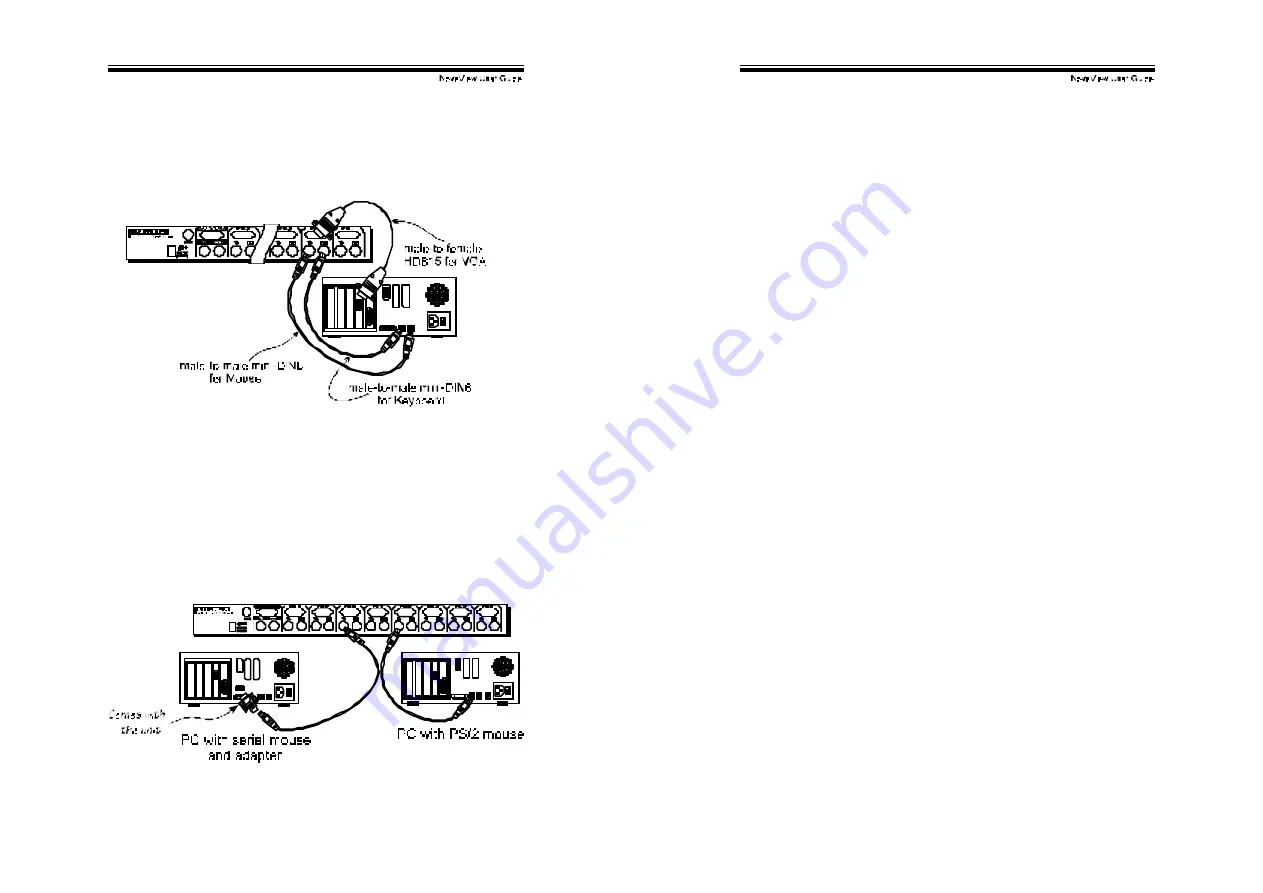
Determine the  channel  address  of each computer.   For computers 
using PS/2 mouse, connect the computer's mouse and key board 
cables to the Nov aView’s connectors marked with a mouse and 
key board respectiv ely, as shown in f igure 4. 


Figure 4: Master computer connection 

 
For computers using serial mouse, connect the DB-9 to mini-DIN-6 
adapter (supplied with the NovaView) to the computer mouse port, 
then  use  PS/2 cables to connect  the mouse to  NovaView, see f igure 
5.  Connect the computer's monitor cable to the HD-DB-15 VGA 
connector.  Repeat above steps for all remaining computers to be 
connected to the Nov aView.     


Figure 5: Adapter and serial mouse connection 

!

!

*!

 
Initial Power-Up 

 
Make sure all computers and NovaViews are powered down 
during installation.  You must power up the Master NovaView 
before turning on any other devices.


!

 For single  NovaView: 1) Apply  a power adapter to the Master.  

2) Turn on computers.   

!

  For cascade: 1) Apply  a power adapter to the Master.               

2) Apply power adapters to all Slaves.  3) Turn on 
computers.  


Note: You may hot plug additional powered-down computer and 
Slave without turning any existing Nov aView or computer off after 
initial power up.   


Replace Master Console Devices


You can replace a faulty key board or mouse of the Master 
CONSOLE port at any  time without powering down the Master, as 
long as y our computers are booted with proper dev ice driver for the 
new dev ice. Should y ou encounter any difficulty, just activ ate K/M 
RESET
 by holding both f ront-panel ‘1’ and ‘2’ push buttons down f or 
2 seconds.    


Adhesive Rubber Foot


For desk-top operation, y ou may stick the f our round rubber feet 
(supplied with the unit) to the bottom of the Nov aView.   NOTE: Do 
not use the rubber f eet f or rack mount operation.   
 

Summary of Contents for KNV104

Page 1: ...uttons 13 OSD On Screen Display Operation 14 Hot key Commands 20 Cascade Configuration Connection 22 Change Configuration while Running 24 Multi access NovaView Overview 25 Connections 25 Operation 26...

Page 2: ...IBM compatible computers The Nov aView is independent of the computer operating sy stem Two Console NovaView Switches The adv anced multi access NovaView Switches enable you to control multiple comput...

Page 3: ...tomatically selects computers sequentially Supports Microsof t IntelliMouse Pro Hot key f unctions allow easy computer access Key board states automatically sav ed and restored whenswitching computers...

Page 4: ...NV108 KNV116 of a Master unit Cascade configuration expands system ability allowing y ou to select computers connected to the Master or Slaves There is only one Master which has a mouse a keyboard and...

Page 5: ...onsult the monitor user s manual Connect a PS 2 mouse and a key board to the CONSOLE port marked with a mouse and a key board respectively as shown in f igure 3 NOTE Only a PS 2 mouse can be connected...

Page 6: ...wer up the Master NovaView before turning on any other devices For single NovaView 1 Apply a power adapter to the Master 2 Turn on computers For cascade 1 Apply a power adapter to the Master 2 Apply p...

Page 7: ...mount bracket Figure 7 shows how to assemble rack cable support then screw it to the back and inside the rack cabinet v ertical post Figure 7 Assembling rack cable support Then keyboard mouse monitor...

Page 8: ...computers and switch accordingly 01 01 01 01 Front Panel Push Buttons You may select a computer by pressing the f ront panel push button directly by issuing hot key commands or by activ ating the OSD...

Page 9: ...ly selected computer or operating status For a 4 port KVM switch you can only use the and arrow key s to highlight a computer A triangle mark to the right of a name indicates the port is cascaded to a...

Page 10: ...pter then restart everything Function key F4 More functions are available by hitting F4 A new screen pops up display ing more f unctions as described below Most of them are marked with a triangle indi...

Page 11: ...speed options are Low Middle Fast and Faster as 10 15 20 and 30 characters sec respectively The non v olatile memory stores the Key board Speed setting Hotkey Menu When y ou hit the left CTRL key twi...

Page 12: ...omputers one by one at a f ixed interv al lef t Ctrl lef t Ctrl F 1 When Auto Scan detects any key board or mouse activity it suspends the scanning till activ ity stops it then resumes with the next c...

Page 13: ...er A power adapter with DC 9V 500mA output rating must be connected to the Master Figure 10 Slave console connection The maximum number of computers controlled by a master slav e conf iguration with a...

Page 14: ...connected to the Master 5 1 6 7 8 19 KNV2108D KNV2116D Overview The adv anced multi access KNV2108D and KNV2116D hav e all the f eatures of KNV108D and KNV116D respectively Both models hav e two Conso...

Page 15: ...key F4 under the sub menu More Note Keyboard Speed option is not av ailable f or multi access models Configuration To expand the number of computers under control y ou may connect CONSOLE port of ano...

Page 16: ...is turned on Scan mode wor ks for power on computers only Scan type is eye mark selected but no power up PC is eye mark selected in OSD Turn on computers Set proper Scan Type in OSD and deter mine wh...

Page 17: ...ED3 GD IL A GNNK IANG FI BI QOGN BK3 L PE FGDA 3 F A GDBGR N BK3 E P BD II PE GDK LG B AONG LO LEI AB C D E GNIE I C I B S B BE C I E OL GB B L E OAB E EAOF DBGB ED J B EOB ERN SGB ED BE DEB PK GDK O...

Reviews: