


!
!
#)!
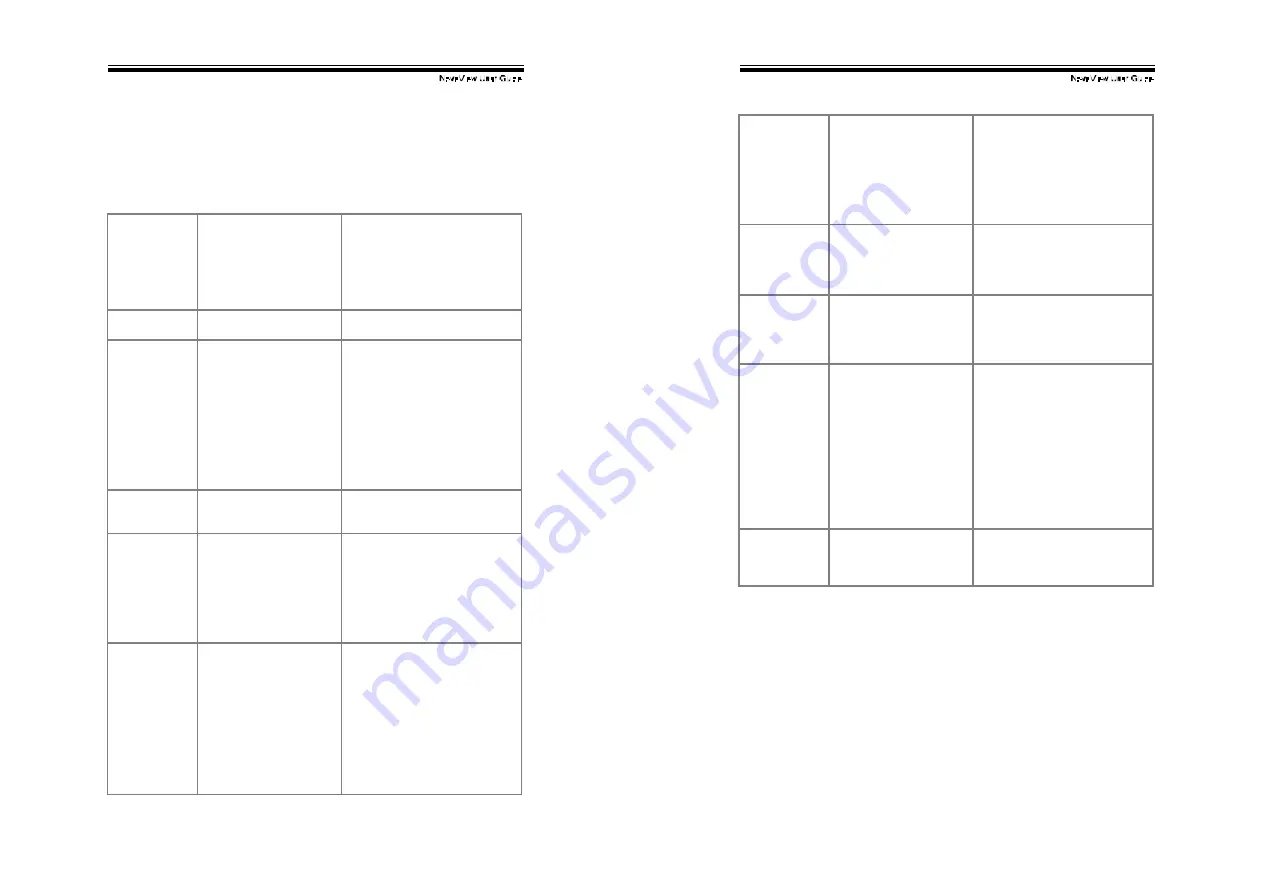
Troubleshooting:
Ensure that all cables are well seated. Check that keyboard/mouse
cables are not swapped. Label and bundle the cables for each
computer to avoid confusion when connected to the NovaView.
Symptom Possible causes Recommended solutions
No OSD screen No power to NovaView
Loose monitor connection
Monitor not multi-sync
Establish power by turni ng on
comput ers, wait , pr ess left CTRL
keys several times.
Reconnect monitor
Use multi-sync monitor
Keyboard error
on boot
Loose keyboard
connection
Make sure keyboard cables are
Well seated
Master/slave
does not work
Improper installation
procedures
Make sure slave’s CONSO LE is
connected to Mas ter’s PC 1~ PC
8 port
Press and hold the 1 and 2 push
buttons to initiate K/M reset
Remove any possibl e power
suppl y to t he slave (unplug all
cables), bef ore c onnecti ng it to
the Master
Keyboard
strokes shifted
The computer was in
shifted state when last
switched
Press both SHIFT keys
The
#
#
#
#
and
$
$
$
$
keys do not
wor k in Manual
Scan
All PCs are off or onl y one
PC is turned on. Sc an
mode wor ks for power-on
computers only
Scan ty pe is eye mark
selected but no PC is eye
mark selected in OSD.
Turn computers on.
Press any ot her key to abort
Manual Scan mode.
Set pr oper Scan type in OSD
and deter mine which PCs are
eye mark selected, do it in OSD.
Auto Sc an does
not s witc h PC
and N ovaView
beeps fr om
time to time and
red indicat or
flashes
All PCs are off or onl y one
PC is turned on. Sc an
mode wor ks for power-on
computers only
Scan ty pe is eye mark
selected but no power-up
PC is eye mark s elect ed
in OSD.
Turn on computers
Set proper Scan Type in OSD
and deter mine which PCs are
eye mark selected, do it in OSD.
Press lef t CTRL key t wice to
abort Auto Scan mode.
Press any front butt on to select a
PC, and Auto Scan stops.
!
!
#*!
"
"
Double OSD
images at
cascade
configuration
Improper slave
connection procedure.
Press push but tons 1 and 2
down f or 2 s econds t o acti vate
K/M RESET.
Remove any possibl e power
suppl y to the Slav e (unplug all
cables), bef ore c onnecti ng it to
the Master.
"
OSD menu is
not at the
proper position
OSD menu has fixed
resolution and its size
varies due t o comput er
VGA resolution changes.
Use <F4>:More\Position to
select UL or UR. O SD menu
may appear near t he middl e of
the screen when LL or LR is
selected.
Computer c an
not use s erial
mouse
Loose mouse adapter
Incorrect mouse adapter
Secure t he mous e adapter to
computer’s COM port
Use only t he mous e adapt er
comes with the unit
Can not select
a computer
connected to a
slave
.Improper Master unit
connection
.Improper slave unit
connection
.Too many levels of
slaves
Only Mast er ports PC 1~PC8 c an
be connected to slaves.
Connect slave CONSO LE port to
PC1~PC8 ports of the Master
Only one level of slave units is
allowed. Pop up O SD again to
chec k if Mast er recogniz es t he
slave connecti on. Look f or
triangle mark and the number
before it.
The N ovaView
fails to f unc tion
occasionally.
Computers do not s uppl y
enough power.
Make sure a power adapter with
minimum of 9V 500mA out put
rating is firml y c onnect ed t o t he
power jack.
"