background image

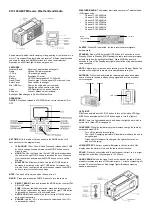
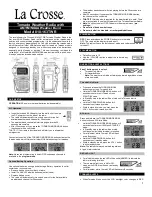
Частота записи / внешний 

/ порт гарнитуры

Кнопка PTT

Клавиша определения PF1

Приращение канала

Клавиша определения PF2

Уменьшение канала

 Антенна

Индикатор

Переключатель громкости / питания

Фонарик

Оратор

Микрофон

Знаком с этой рацией

Примечание: боковую кнопку 1 / боковую кнопку 2 можно запрограммировать с помощью программного 

обеспечения для определения функции длительного или короткого нажатия со следующими

Можно определить несколько функций:

Боковые клавиши: 1. Нет   2. Монитор   3. Мгновенный монитор   4. Высокая и низкая мощность 

                                5. Сканирование   6. Фонарик  7. Канал плюс   8. Канал минус

Основная операция

Включение / выключение питания

Поверните переключатель питания / регулятор громкости по часовой 

стрелке, Пока вы не услышите звук щелчка. Сделайте звук Короткий 

звуковой сигнал означает, что тест загрузки прошел успешно.

нота:

Если рация не включается, проверьте аккумулятор. Убедитесь, что 

аккумулятор заряжен и правильно установлен. Если рация не включается, 

обратитесь к своему агенту.

Чтобы выключить радио, поверните переключатель питания / регулятор 

громкости против часовой стрелки, пока не услышите щелчок.

Отрегулируйте громкость

Когда двустороннее радио включено, поверните переключатель питания / 

регулятор громкости, чтобы отрегулировать громкость. Поверните по 

часовой стрелке, чтобы увеличить громкость; поверните против часовой 

стрелки, чтобы уменьшить громкость. Вы можете нажать кнопку, 

запрограммированную на мониторинг, чтобы контролировать текущий 

уровень громкости.

Примечание: кнопка монитора установлена на кнопку программирования 1 

                       или 2 в соответствии с программированием программного

                       обеспечения.

Настроить канал

Выберите канал, который будет использоваться боковой клавишей канала. 

Всего у этого радио 32 канала.

выброс

Чтобы позвонить, удерживайте кнопку [PTT] и говорите в микрофон 

обычным тоном. Держите микрофон на расстоянии 3-4 см от губ.

получить

Отпустите кнопку [PTT] для приема. Отрегулируйте соответствующую 

громкость, чтобы получить наилучший эффект прослушивания.

Особенности

Светодиодный индикатор

Светодиодный индикатор показывает рабочее состояние рации.

Пара раций издает сигнал, когда горит красный свет.

Горит зеленым светом - двусторонняя радиосвязь включается, принимает незашифрованные вызовы или 

данные или обнаруживает активность в воздухе.

Кнопка разговора 

(PTT)

Каждый канал в рации можно настроить как цифровой канал.

1. Во время разговора кнопка PTT позволяет рации передавать сигналы на другие рации, участвующие в 

    вызове. Чтобы позвонить, нажмите и удерживайте кнопку PTT. Чтобы ответить, отпустите кнопку PTT. При

    нажатии кнопки PTT включается микрофон.

59

60

Summary of Contents for RB25

Page 1: ...3 C Zhonghaixin Science Technology Park No 12 Ganli 6th Road Jihua Street Longgang District Shenzhen China Web www retevis com E mail kam retevis com Facebook facebook com retevis MADE IN CHINA RB25 T...

Page 2: ...es Charging mode Battery usage information Install remove accessories Acquainted the radio Basic operation Function introduction Encryption function Set up Troubleshooting Guide Warning DE P11 to P22...

Page 3: ...ing of the battery Please wipe it clean before charging Before charging please turn off the power of the walkie talkie with the battery otherwise it will affect the normal charging of the battery When...

Page 4: ...attery Make sure the battery is charged and installed correctly If your walkie talkie does not turn on please contact your agent To turn off the radio turn the power switch volume adjuster countercloc...

Page 5: ...position and keep it 1 to 2 inches 2 5 to 5 0 cm from your mouth 3 Press the PTT button to initiate a call the LED indicator lights up red Encryption function Encryption setting this function is only...

Page 6: ...ted and found to comply with the limits for a Class B digital device pursuant to part 15 of the FCC Rules These limits are designed to provide reasonable protection against harmful interference in a r...

Page 7: ...n off your radio when you are in a potentially hazardous environments Near electrical blasting caps in a blasting area in explosive atmospheres inflammable gas dust particles metallic powders grain po...

Page 8: ...u nicht vollst ndig aufgeladen werden Bereiten Sie daher bei kaltem Wetter Ersatzbatterien vor Entsorgen Sie die Batterien die derzeit nicht verwendet werden k nnen nicht Sie k nnen weiterhin bei Raum...

Page 9: ...rement PF2 definiert den Schl ssel Kanalabfall Installieren Sie die Walkie Talkie Schlinge Befestigen Sie den Walkie Talkie Gurt am Ring in der Mitte des Walkie Talkies Wenn Sie den Akku einbauen m ch...

Page 10: ...gr n 2 Halten Sie das Walkie Talkie aufrecht und halten Sie einen Abstand von 2 5 bis 5 0 cm zu Ihrem Mund ein 3 Dr cken Sie die PTT Taste um den Anruf anzunehmen Die LED Anzeige leuchtet rot 4 Lasse...

Page 11: ...enz von ihnen ausgestellt zu haben Die genaue Klassifizierung und die Verwendung Ihrer beiden Funkger te erfahren Sie bei den rtlichen Funkverwaltungsabteilungen Die Verwendung dieses Radios au erhalb...

Page 12: ...s Betriebs unterliegt der Abstand zwischen Benutzer und Antenne den geltenden Best immungen Durch diesen Abstand wird sichergestellt dass ein ausreichender Abstand zu einer ordnungsgem installierten e...

Page 13: ...it wird ben tigt um Ihr Geh r zu beeintr chtigen Geh rsch den durch laute Ger usche sind manchmal zun chst nicht nachweisbar und k nnen sich kumulativ auswirken Verbrennungen vermeiden Antennen Verwen...

Page 14: ...compl tement charg e Par cons quent par temps froid pr parez des batteries de remplacement Veuillez ne pas jeter les piles qui ne peuvent pas tre utilis es pour le moment Ils peuvent toujours tre util...

Page 15: ...init l incr ment de cl canal PF2 d finit la d croissance cl canal Installez l lingue de talkie walkie Attachez la sangle du talkie walkie l anneau au milieu du talkie walkie Si vous souhaitez installe...

Page 16: ...t r pondre Pour recevoir des appels d utilisateurs 1 Le voyant LED s allume en vert 2 Tenez le talkie walkie la verticale et gardez une distance de 1 2 pouces 2 5 5 0 cm de votre bouche 3 Appuyez sur...

Page 17: ...s veuillez contacter les services de gestion des radios du gouvernement local L utilisation de cette radio en dehors du pays o elle devait tre distribu e est soumise la r glementation gouvernementale...

Page 18: ...l mobile pendant le fonctionnement la distance de s paration entre l utilisateur et l antenne tant soumise aux r glementations en vigueur cette distance de s paration garantira qu il y a une distance...

Page 19: ...portable dans la zone situ e au dessus d un airbag ou dans la zone de d ploiement de celui ci La radio peut tre propuls e avec une grande force et causer des blessures graves aux occupants du v hicule...

Page 20: ...o batteria senza autorizzazione Conservazione della batteria 1 La batteria si scaricher automaticamente quindi se la batteria non viene utilizzata per un lungo periodo caricarla completamente e conser...

Page 21: ...are in senso orario per aumentare il volume ruotare in senso antiorario per diminuire il volume possibile premere il pulsante programmato per monitorare per monitorare il livello di volume corrente No...

Page 22: ...er filtrare le chiamate inutili con bassa potenza del segnale o canali con un rumore di fondo pi elevato del normale Impostazioni Da 1 a 10 sono livelli maggiori di impostazione pi profondo lo Squelch...

Page 23: ...hio e ha la capacit di ridurre rischio NON destinato all uso in una popolazione generale ambiente non controllato Popolazione generale Radio non controllata questa radio progettata e classificata come...

Page 24: ...i medici potrebbero utilizzare apparecchia ture sensibili all energia RF esterna Spegnere la radio quando a bordo di un aereo Qualsiasi utilizzo di una radio deve essere conforme alle normative applic...

Page 25: ...tre 5 C y 40 C Si carga fuera de esta temperatura la bater a no se podr cargar por completo Por lo tanto en climas fr os prepare bater as de repuesto Por favor no deseche las bater as que no se puedan...

Page 26: ...disminuci n de clave canal PF2 define la disminuci n de clave canal Instale el cabestrillo de walkie talkie Coloque la correa del walkie talkie en el anillo en el medio del walkie talkie Si desea ins...

Page 27: ...tical y mantenga una distancia de 1 a 2 pulgadas 2 5 a 5 0 cm de su boca 3 Presione el bot n PTT para contestar la llamada El indicador LED se ilumina en rojo 4 Suelte el bot n PTT para responder Inic...

Page 28: ...de administraci n de radio FCC ISED OFCOM ANFR BFTK Bundesnetzagentur Para transmitir en estas frecuencias usted requiere tener una licencia emitida por ellos La clasificaci n detallada y el uso de s...

Page 29: ...iones relevantes de la Directiva RED 2014 53 UE y la Directiva ROHS 2011 65 UE y la Directiva WEEE 2012 19 EU El texto completo de la declaraci n de conformidad de la UE est disponible en la siguiente...

Page 30: ...uede producir una peque a quemadura Baterias si es apropiado Cuando el material conductor como joyas llaves o cadenas toque los terminales expuestos de las bater as puede completar un circuito el ctri...

Page 31: ...1 1 1 1 1 1 1 1 5 C 40C 1 2 6 3 Zhuo 57 58...

Page 32: ...PTT PF1 PF2 1 2 1 2 3 4 5 6 7 8 1 2 32 PTT 3 4 PTT PTT 1 PTT PTT PTT PTT 59 60...

Page 33: ...415 3250 400 0250 440 4250 469 9750 400 1250 469 1250 400 0250 440 4250 469 9750 425 3250 435 2250 440 5250 445 6250 450 0525 455 6250 CTCSS DCS 67 0 D023N CTCSS DCS 67 0 D023N 17 18 19 20 21 22 23 2...

Page 34: ...hat may cause undesired operation of the device Le pr sent appareil est conforme aux CNR d Industrie Canada applicables aux appareils radio exempts de licence L exploitation est autoris e aux deux con...

Page 35: ...Retevis 50 PTT PTT 50 Retevis Retevis IEEE ICNIRP RF 2 5 EMI 3 65 66...

Page 36: ...turer s warranty from the date of purchase Further details pls read http www retevis com after sale 3 The user can get warranty and after sales service as below Contact the seller where you buy Produc...

Reviews: